

If you’ve ever dreamed of capturing the whimsical delight of carnival cotton candy in an ice cream form without the hassle of an ice cream maker, you’re in for a treat with this No-Churn Cotton Candy Ice Cream Recipe. It’s creamy, colorful, and bursting with that nostalgic, sugary flavor that immediately brings out your inner child. The best part? It’s so simple and fun to make at home with just a handful of ingredients, yet it feels like a special occasion in every scoop.
Ingredients You’ll Need
For this recipe, you only need a few simple but carefully chosen ingredients that work magic together. Each one plays a vital role in creating that silky texture, sweet flavor, and vibrant colors that make this ice cream irresistible.
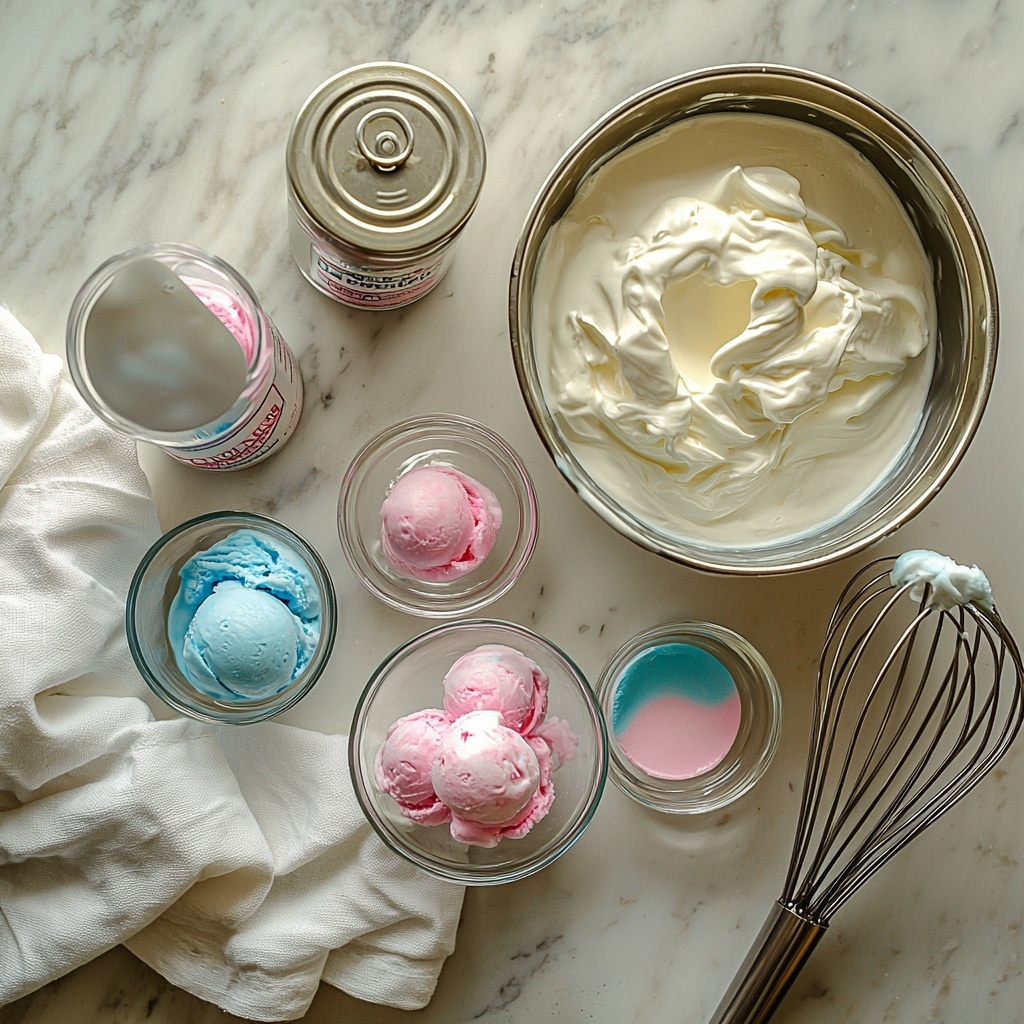
- 2 cups very cold heavy whipping cream: This is the base for your creamy, fluffy ice cream texture, so the colder, the better for whipping.
- 1 14-ounce can sweetened condensed milk (cold): Adds rich sweetness and a smooth, creamy consistency without needing to churn.
- 2 teaspoons cotton candy flavoring: The secret star that brings that nostalgic carnival flavor to life.
- Food coloring in pink and blue (optional): For that playful, eye-catching swirl of pastel colors true to classic cotton candy vibes.
How to Make No-Churn Cotton Candy Ice Cream Recipe
Step 1: Prepare Your Tools and Ingredients
Start by chilling your loaf pan, a large mixing bowl, and a whisk in the freezer for about 30 minutes. This step is a game-changer because cold equipment helps your cream reach stiff peaks faster and ensures the ice cream sets beautifully. Also, make sure your heavy whipping cream and sweetened condensed milk are well chilled for the same reason.
Step 2: Whip the Cream
Using your chilled bowl and whisk (or a stand mixer), beat the heavy whipping cream until it forms stiff peaks. This means when you lift the whisk, the cream holds its shape firmly without collapsing. It takes roughly four minutes, and this whipped cream is where your ice cream gets its light, airy texture.
Step 3: Mix Condensed Milk with Flavoring
In a medium bowl, gently stir together the cold sweetened condensed milk and the cotton candy flavoring until smooth. This mixture will infuse your ice cream with that unmistakable carnival taste that makes this recipe stand out.
Step 4: Combine with Care
Slowly add the condensed milk mixture into the whipped cream by folding gently. Folding rather than stirring ensures you keep all the air whipped into the cream, which is key to a soft, creamy ice cream without heaviness.
Step 5: Divide and Color
Split the combined mixture evenly between two bowls—about 3 cups each. Add pink food coloring to one bowl and blue food coloring to the other, mixing each until you achieve a beautiful, pastel cotton candy swirl effect.
Step 6: Assemble and Freeze
Take your frozen loaf pan or container out of the freezer. Spoon dollops of the pink and blue mixtures into the pan, alternating colors to create a fun, marbled effect. If you like, sprinkle the top with fun sprinkles or jimmies for even more festive flair. Then cover it up and freeze overnight until it’s firm and scoopable.
How to Serve No-Churn Cotton Candy Ice Cream Recipe
Garnishes
Take your No-Churn Cotton Candy Ice Cream to the next level by adorning it with colorful sprinkles, edible glitter, or even mini cotton candy pieces for that extra pop of sweetness and fun texture. A swirl of whipped cream can also add a lovely, creamy contrast.
Side Dishes
This dreamy ice cream pairs beautifully with light desserts like angel food cake, sugar cookies, or fresh berries. The airy texture and delicate flavor also make it a perfect companion to rich chocolate brownies for those who love mixing sweet and decadent.
Creative Ways to Present
For a party or special treat, serve your ice cream in waffle cones or colorful dessert cups topped with candy sticks or lollipops. You can even create a cotton candy-themed sundae bar with various toppings like crushed candy, marshmallows, and sprinkles to let everyone customize their sweet treat.
Make Ahead and Storage
Storing Leftovers
If you have any leftover No-Churn Cotton Candy Ice Cream, simply cover the container tightly with plastic wrap or a lid and keep it stored in your freezer. It will stay at its best quality for 3-4 days, allowing you to enjoy creamy sweetness any time without losing its silky texture or vibrant flavor.
Freezing
This ice cream needs to be frozen overnight for proper setting. When making ahead, keep it covered and freeze for at least 8 hours or until completely firm. This ensures the best scoopable texture and rich flavor with every serving of your No-Churn Cotton Candy Ice Cream Recipe.
Reheating
Reheating is not necessary or recommended for this ice cream, as it is best enjoyed cold and creamy straight from the freezer. If it’s too hard to scoop after freezing, simply let it sit at room temperature for 5-10 minutes before serving to soften slightly without melting.
FAQs
Can I make this ice cream without the cotton candy flavoring?
You could omit the cotton candy flavoring, but it’s really what gives this ice cream that unique carnival taste. Without it, you’ll have a delicious no-churn ice cream, but it won’t be the same magical cotton candy experience.
Do I need an ice cream maker for this recipe?
Nope! That’s the beauty of this No-Churn Cotton Candy Ice Cream Recipe. Thanks to whipped cream and sweetened condensed milk, the ice cream sets beautifully in the freezer without any special equipment.
Can I use gel food coloring instead of liquid?
Absolutely! Gel food coloring works great and tends to give even more vibrant colors without thinning the mixture, so feel free to use whichever type you have on hand.
How long will the ice cream keep in the freezer?
For the best texture and flavor, enjoy your ice cream within 3-4 days. After that, it might start to develop ice crystals or lose some of its creamy consistency.
Can this recipe be doubled for a larger batch?
Yes, you can easily double the ingredients and use a larger container. Just make sure to keep everything cold and follow the same gentle folding technique for best results.
Final Thoughts
Making this No-Churn Cotton Candy Ice Cream Recipe is such a joyful experience that brings a sprinkle of magic to your kitchen. It’s playful, colorful, and incredibly delicious, perfect for sharing with family and friends or treating yourself on a sunny day. Give it a try—you’re going to love how easy it is and how every spoonful takes you back to fun memories of cotton candy and carefree moments.
Print
No-Churn Cotton Candy Ice Cream Recipe
- Prep Time: 40 minutes
- Cook Time: 10 minutes
- Total Time: 8 hours 50 minutes
- Yield: 6 servings
- Category: Dessert
- Method: No-Cook
- Cuisine: American
- Diet: Vegetarian
Description
This No-Churn Cotton Candy Ice Cream is a whimsical and easy-to-make treat perfect for cotton candy lovers. It requires no ice cream maker and combines fluffy whipped cream with sweetened condensed milk and cotton candy flavoring to create a creamy, fun, and colorful dessert that can be whipped up quickly and frozen overnight. Optional food coloring adds a playful pink and blue swirl, ideal for kids’ parties and summer gatherings.
Ingredients
Ice Cream Base
- 2 cups very cold heavy whipping cream
- 1 14-ounce can sweetened condensed milk (cold)
- 2 teaspoons cotton candy flavoring
Optional
- Food coloring in pink and blue
- Sprinkles or jimmies for topping
Instructions
- Chill Equipment and Ingredients: Place your loaf pan, large mixing bowl, and whisk or mixer attachments in the freezer for about 30 minutes to chill. Ensure the whipping cream and condensed milk are also very cold to help achieve the best texture.
- Whip the Cream: In the chilled large bowl or stand mixer bowl, beat the very cold heavy whipping cream using a whisk or mixer until stiff peaks form, which takes approximately 4 minutes. This creates the fluffy base of the ice cream.
- Mix Flavoring: In a separate medium bowl, stir together the cold sweetened condensed milk and the 2 teaspoons of cotton candy flavoring until the mixture is smooth and fully combined.
- Fold Mixtures Together: Gradually add the cotton candy flavored condensed milk mixture to the whipped cream. Gently fold the mixtures together carefully to maintain the airy texture of the whipped cream without deflating it.
- Divide and Color: Separate the mixed ice cream base evenly into two bowls (about 3 cups each). Add pink food coloring to one bowl and blue food coloring to the other, stirring gently to incorporate colors evenly.
- Layer Ice Cream Mixture: Remove the chilled loaf pan from the freezer and spoon the colored ice cream mixtures alternately into the pan to create a marbled effect. You can drop spoonfuls of each color to build a fun swirl design.
- Add Toppings: Optionally sprinkle your favorite fun sprinkles or jimmies on top to enhance the festive look and add texture.
- Freeze: Cover the pan and freeze the ice cream overnight for at least 8 hours or until firm enough to scoop and serve.
Notes
- Make sure all ingredients and equipment are very cold to achieve the best whipped cream texture.
- Gently folding the whipped cream and condensed milk mixture is crucial to keep the ice cream light and fluffy.
- Use a loaf pan or a similar container with a lid or covered with plastic wrap for freezing.
- This recipe requires no ice cream maker, making it simple and accessible.
- Allow the ice cream to sit out 5-10 minutes before scooping for easier serving.
- Feel free to customize the flavoring or colors for different variations.


