
“`html
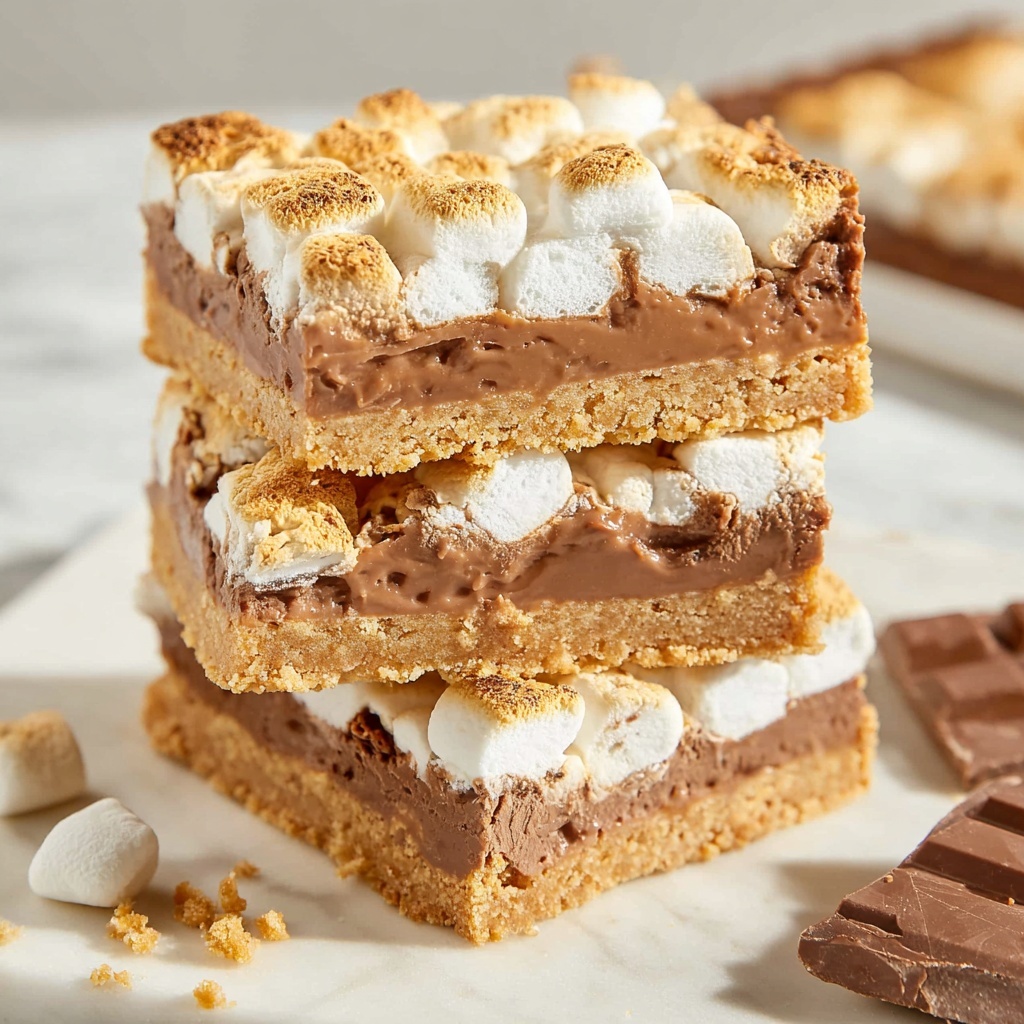
If you’re looking for the ultimate treat to satisfy your sweet tooth and bring all those nostalgic campfire vibes indoors, this S’mores Bar Recipe is a total winner. It’s like a cozy hug of graham cracker crunch, melty Hershey’s chocolate, and gooey toasted marshmallows all baked into one irresistible bar. Perfect for sharing at parties, family nights, or whenever you want to feel that warm, fuzzy happiness in every bite!
Ingredients You’ll Need
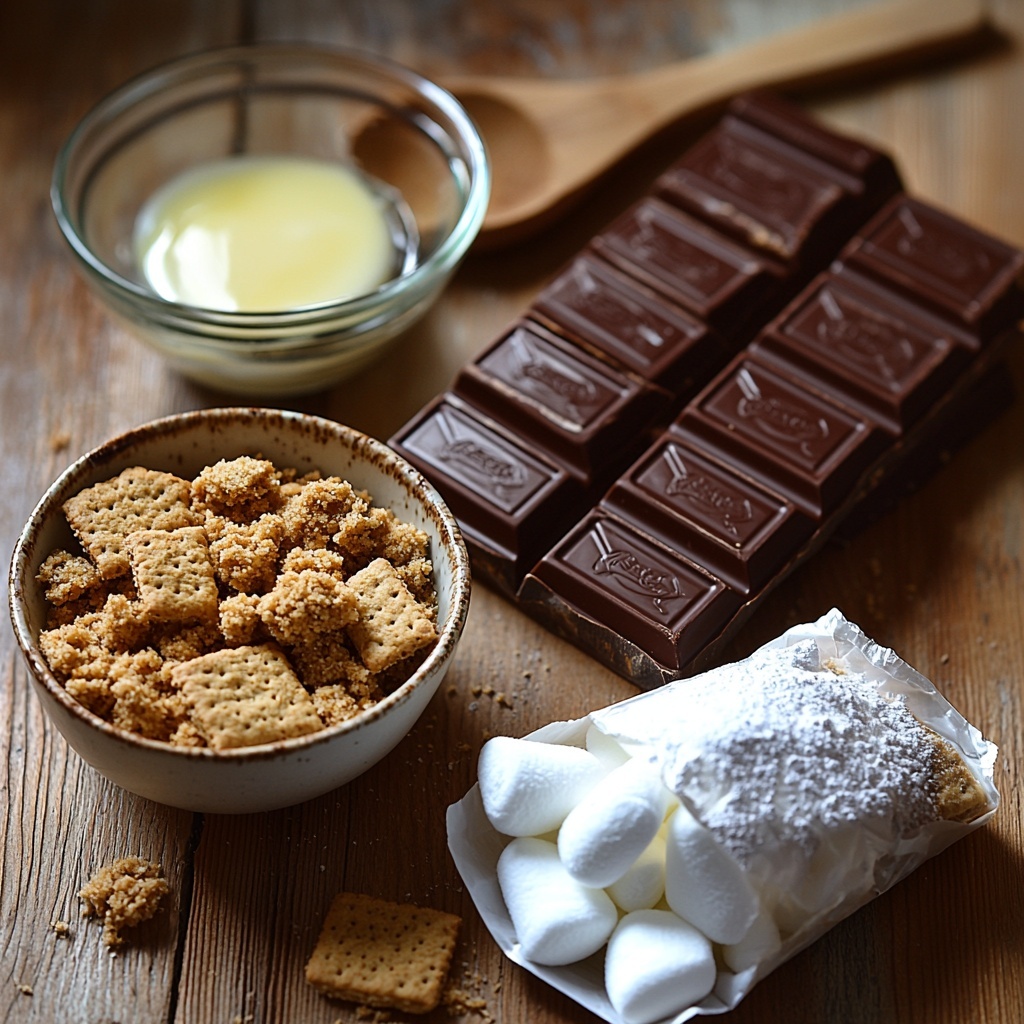
These ingredients are simple, classic, and absolutely essential for creating the perfect S’mores Bar Recipe. Each one plays a key role in balancing the texture and flavor to bring that authentic s’mores experience right to your countertop.
- 2 Cups graham cracker crumbs: Provides the crispy, buttery base and the signature crunch.
- 8-12 Tablespoons butter (melted): Helps bind the crumbs together and adds rich, luscious flavor.
- 1/2 Cup powdered sugar: Adds a touch of sweetness and helps the crust hold firm once baked.
- 4 Hershey Chocolate Bars (4.4 ounce each): Classic milk chocolate that melts perfectly over the crust.
- 1 package mini marshmallows: The gooey, toasted topping that completes the s’mores magic.
How to Make S’mores Bar Recipe
Step 1: Prep Your Oven and Pan
First up, preheat your oven to 350 degrees Fahrenheit. This is the perfect temperature to bake the crust just enough to get it golden and firm without drying it out. Don’t forget to grease a 9×13 baking pan generously with non-stick butter spray—this makes sure your bars come out perfectly every time.
Step 2: Mix the Crust
In a medium-sized bowl, combine the graham cracker crumbs, powdered sugar, and melted butter. Stir everything together with a spoon until the mixture resembles wet sand. The melted butter is crucial here—it not only adds richness but also helps the crust bind and crisp up beautifully once baked.
Step 3: Press and Bake the Crust
Press the crumb mixture evenly into the bottom and sides of your greased pan. Firmly packing it down is key for a sturdy crust that won’t crumble when serving. Pop the pan into the oven and bake for about 5 to 8 minutes, just until the edges turn a lovely golden brown. Keep in mind the crust will continue to harden as it cools.
Step 4: Layer the Chocolate
Once the crust has cooled, lay the Hershey chocolate bars neatly on top so they cover the entire crust surface. Then, put the pan back in the oven for about 3 minutes, just until the chocolate starts melting and looks shiny and luscious. This step ensures your chocolate layer melds perfectly with the crust below and marshmallows above.
Step 5: Add the Marshmallows and Broil
After letting the chocolate layer cool for a minute or two, it’s time to pile on the mini marshmallows. Pack them tightly together in an even layer. Now switch your oven setting to broil and place the pan inside. Watch closely—this only takes about 2 minutes! The marshmallows toast up with the perfect golden-brown spots, but if you look away for a second, they could burn. Trust me, staying glued to the oven window is part of the fun.
Step 6: Cool and Serve
After broiling, let the s’mores bars cool completely. For an extra neat cut, pop them in the refrigerator for a bit to set. When it’s time to slice, warm a sharp knife under hot water, dry it, and cut through the bars—this trick helps prevent the gooey marshmallows from sticking to the blade, making serving a breeze.
How to Serve S’mores Bar Recipe
Garnishes
To elevate these classic bars, sprinkle a tiny pinch of sea salt over the marshmallows right after broiling. The salty contrast just enhances the sweet layers beautifully. You can also add a dusting of cocoa powder or crushed graham crackers for added texture and flair.
Side Dishes
This S’mores Bar Recipe is rich and indulgent, so pairing it with something fresh like sliced strawberries or tangy lemon sorbet can balance the sweet heaviness wonderfully. For a party, iced cold milk or creamy hot chocolate makes a dreamy companion.
Creative Ways to Present
Consider serving these bars in individual ramekins or mini cast iron skillets for a rustic look. Or arrange mini skewers of roasted marshmallows alongside for a fun dip-your-own treat station that everyone will love. Adding colorful sprinkles or edible glitter on top also turns this into a dazzling dessert centerpiece.
Make Ahead and Storage
Storing Leftovers
If you happen to have leftovers (though unlikely!), store them in an airtight container in the refrigerator for up to 3-4 days. Keeping them chilled helps maintain the marshmallow texture and prevents the chocolate from getting too melty or sticky.
Freezing
You can freeze the bars for longer storage. Wrap them well in plastic wrap and place them in a freezer-safe container or bag. They’ll stay delicious for up to 1 month. Thaw them in the refrigerator overnight before serving to enjoy their perfect texture.
Reheating
When you’re ready to enjoy again, warming the bars briefly in a preheated oven at 300 degrees for 5-7 minutes can bring back that melty, freshly-made feeling. Just keep an eye on them to make sure the marshmallows don’t overbrown again.
FAQs
Can I use other types of chocolate in this S’mores Bar Recipe?
Absolutely! While Hershey’s milk chocolate bars bring that classic s’mores vibe, feel free to experiment with dark chocolate, white chocolate, or even flavored bars to match your taste preferences.
What if I don’t have mini marshmallows? Can I use regular sized ones?
You can use regular marshmallows, but you’ll want to cut them in half or quarters for more even coverage. Mini marshmallows toast more quickly and uniformly, which is why they’re perfect here.
Why do I need to chill the bars before cutting?
Chilling the bars helps the layers set firmly, making it easier to slice through the gooey marshmallows without everything sticking or squishing out.
Can I make this recipe gluten-free?
Yes! Just substitute the graham cracker crumbs with gluten-free graham cracker crumbs or a similar gluten-free cookie crumb, and double-check that your other ingredients are gluten-free as well.
How long does it take to make the entire S’mores Bar Recipe?
From start to finish, it only takes about 25 minutes of active prep and baking time, making it a quick and impressive dessert for any occasion.
Final Thoughts
This S’mores Bar Recipe is pure joy on a plate, blending simple ingredients into a crowd-pleasing dessert that always impresses. Whether you’re chasing campfire memories or just need a sweet pick-me-up, give this a try—you’ll find yourself coming back for seconds (or thirds!). So go ahead, pull up a chair, grab a fork, and dive into that perfect s’mores goodness.
“`
Print
S’mores Bar Recipe
- Prep Time: 10 minutes
- Cook Time: 15 minutes
- Total Time: 25 minutes
- Yield: 16 servings
- Category: Dessert
- Method: Baking
- Cuisine: American
Description
Delicious and easy-to-make S’mores Bars featuring a buttery graham cracker crust, melted Hershey chocolate, and toasted mini marshmallows. Perfect for a nostalgic dessert that’s simple to prepare and sure to please any crowd.
Ingredients
Crust
- 2 Cups graham cracker crumbs
- 8–12 Tablespoons butter, melted
- 1/2 Cup powdered sugar
Filling
- 4 Hershey Chocolate Bars (4.4 ounces each)
- 1 package mini marshmallows
Instructions
- Preheat oven: Set your oven to 350°F (175°C) to prepare for baking the crust.
- Grease pan: Spray a 9×13 inch baking pan with non-stick butter spray to prevent sticking.
- Mix crust ingredients: In a medium bowl, combine the graham cracker crumbs, powdered sugar, and melted butter. Stir until the mixture resembles wet sand.
- Press crust: Evenly distribute the crumb mixture in the baking pan and firmly press it down and along the sides using your fingers to form a compact crust.
- Bake crust: Place the pan in the oven and bake for 5-8 minutes until the edges begin to turn golden brown. Note that the crust hardens more as it cools.
- Cool crust: Remove the pan from the oven and allow the crust to cool completely.
- Layer chocolate: Place the Hershey chocolate bars evenly over the cooled crust, covering it as much as possible.
- Heat chocolate: Return the pan to the oven for about 3 minutes at 350°F until the chocolate starts to melt and looks shiny on top.
- Cool slightly: Let the pan cool for 1-2 minutes to prevent marshmallows from melting too quickly.
- Top with marshmallows: Arrange mini marshmallows closely together over the melted chocolate surface.
- Broil marshmallows: Switch the oven to broil setting and place the pan inside. Watch carefully and broil for about 2 minutes or until marshmallows are golden brown and toasted. Remove immediately to avoid burning.
- Cool completely: Allow the bars to cool fully. For easier cutting, chill in the refrigerator until set.
- Serve: Use a sharp knife warmed under hot water and dried to slice the bars cleanly. Repeat warming the knife as needed to prevent stickiness. Serve and enjoy!
Notes
- Melted butter amount can vary depending on desired crust texture; using 8 tablespoons will result in a firmer crust, while 12 tablespoons creates a softer crust.
- Watch the marshmallows closely while broiling as they can burn quickly and catch fire.
- Chilling the bars after baking helps them set and makes cutting easier.
- Use a warmed sharp knife to avoid sticky residue when slicing.


