
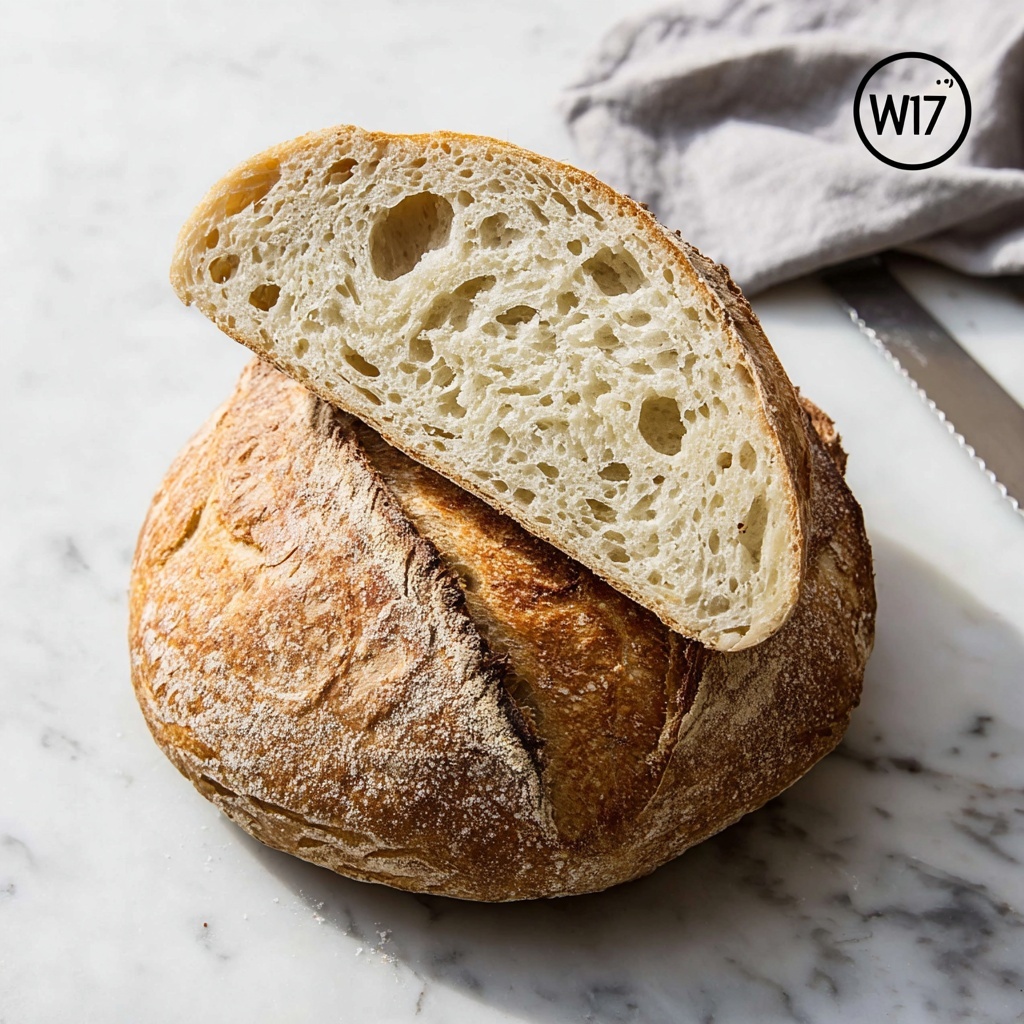
If you’ve ever dreamed of baking your own loaf from scratch that’s bursting with flavor, has a beautiful crust, and a soft, airy crumb, you’re going to love this Sourdough Bread Recipe. It’s more than just bread—it’s a delicious project that fills your kitchen with irresistible aromas and results in a loaf so good you’ll want to share it with everyone you know. With patience and a few simple ingredients, this recipe transforms humble flour and water into a masterpiece that feels truly artisanal.
Ingredients You’ll Need
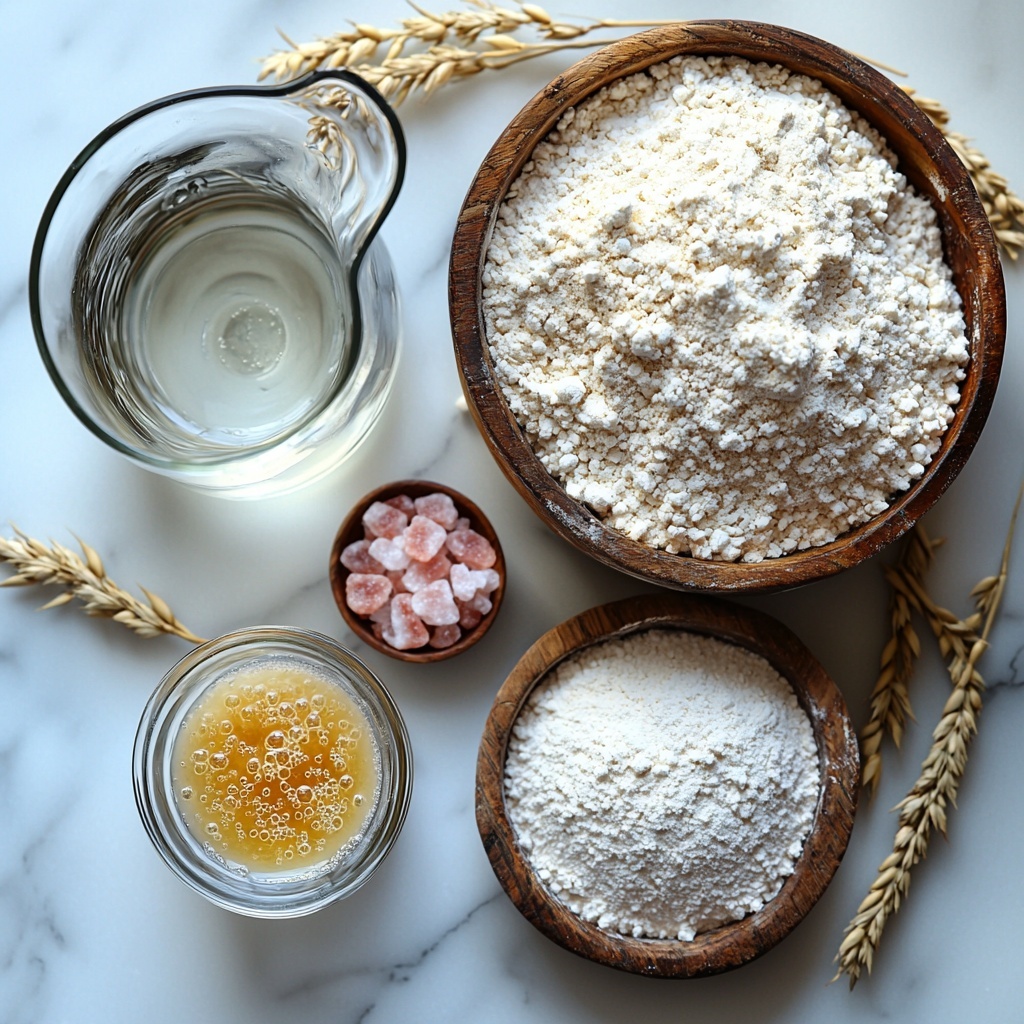
Every incredible sourdough loaf starts with simple, quality ingredients that each play an essential role in creating flavor, texture, and that gorgeous crust. Here’s what you’ll need for this Sourdough Bread Recipe:
- 50 to 100 grams ripe bubbly active starter: This is where all the magic happens—your starter brings the natural yeast and tangy flavor that defines sourdough.
- 350 to 375 grams warm water: Warm water helps to activate the starter and hydrate the flour, making the dough easy to work with and helping the bread rise beautifully.
- 500 grams bread flour (or all-purpose flour): Bread flour’s higher protein content promotes excellent gluten development for that chewy, satisfying texture; if unavailable, all-purpose flour works just fine.
- 10 to 12 grams fine sea salt: Salt enhances flavor and strengthens the gluten network, giving the bread structure and depth—pink Himalayan salt adds a nice mineral touch.
How to Make Sourdough Bread Recipe
Step 1: Feed Your Starter
The day you plan to bake, begin by feeding your sourdough starter to ensure it’s lively and ready. If it’s been refrigerated, take it out the night before and feed it. Then, several hours before making your dough, discard some and feed it again. You’ll know it’s ready when it doubles in size and bubbles up proudly.
Step 2: Make The Dough
In a large mixing bowl, combine your bubbly starter with warm water and salt. Give it a good stir to mix everything evenly, then add the bread flour. Mix until a wet, sticky dough forms and all the flour is incorporated. Cover with a damp towel and let it rest for 30 minutes—this step is key for hydration and gluten formation.
Step 3: Stretches and Folds
After resting, use wet hands to gently grab one corner of the dough, stretch it, and fold it into the middle of the bowl. Rotate and repeat about 4 to 5 times, turning the dough into a tighter ball. Let it rest covered for 30 minutes, then repeat this stretching and folding three more times every 30 minutes over the next two hours. If short on time, two rounds still work beautifully.
Step 4: Bulk Fermentation
Cover the dough well to prevent drying and allow it to rise at room temperature for about 6 to 7 hours (or up to 8 to 9 hours in cooler temperatures). This slow rise lets the dough develop complex flavor and some lovely bubbles—which you’ll see clinging to the sides and top.
Step 5: Pre-shape
Turn your dough onto a lightly floured surface, then gently fold it into a round by tucking the edges underneath. This helps build tension in the dough’s surface, which is vital for an open crumb and round shape after baking.
Step 6: Bench Rest
Flip the dough ball smooth-side down and let it rest uncovered for 30 minutes. Then, tighten the shape by gently pulling the dough towards you while rotating, creating a taut surface that will hold its shape.
Step 7: Shaping
Dust a bread proofing basket or a medium mixing bowl lined with a heavily floured, clean towel. Fold your dough into a neat round once more, place it seam-side up into your prepared basket, and cover it with plastic wrap or a shower cap to keep humidity in.
Step 8: Cold Fermentation
Refrigerate your dough overnight, or up to 24 hours for the best texture and flavor. If you’re short on time, allow it to rest for 1 to 2 hours at room temperature until it puffs up a bit before baking.
Step 9: Baking
Preheat your oven to 450°F (230°C) and prepare your Dutch oven with parchment paper. Turn your dough gently onto the parchment, score the top with your favorite design, and carefully transfer it into the hot Dutch oven. Bake covered for 30 minutes, then remove the lid, reduce the temperature to 400°F (205°C), and bake uncovered for another 20 to 30 minutes until golden and hollow sounding when tapped.
Step 10: Cooling
Once baked, transfer your bread to a wire rack to cool completely—at least one hour—so the crumb can set perfectly and slicing won’t be gummy.
How to Serve Sourdough Bread Recipe
Garnishes
This sourdough bread shines on its own, but adding a pat of high-quality butter or a drizzle of extra virgin olive oil sprinkled with flaky sea salt elevates every bite. For a savory touch, fresh herbs like rosemary or thyme complement the tangy crumb wonderfully.
Side Dishes
Sourdough is incredibly versatile, pairing beautifully with soups ranging from creamy tomato to chunky vegetable stews. It also makes the perfect canvas for cheeses, charcuterie, or a hearty bowl of chili, soaking up every delicious drop.
Creative Ways to Present
Try slicing your loaf and toasting the pieces until crisp for bruschetta topped with ripe tomatoes and basil, or turn thick slices into grilled sandwiches packed with melty cheese and fresh ingredients. Toasted cubes can even be a fantastic addition to your favorite salads as homemade croutons.
Make Ahead and Storage
Storing Leftovers
When you have leftovers, store your sourdough bread wrapped loosely in a paper bag or wrapped in a clean kitchen towel at room temperature. It will stay fresh for 3 to 4 days without becoming overly soft or stale.
Freezing
You can freeze whole loaves or sliced bread by wrapping tightly in plastic wrap and then placing it in a freezer-safe bag. Frozen sourdough holds its flavor and texture for up to 3 months—perfect for baking ahead.
Reheating
To enjoy your sourdough when you’re ready, thaw frozen bread at room temperature and reheat in a 350°F oven for 10 to 15 minutes. This refreshes the crust and brings back that bakery-fresh feel and flavor.
FAQs
What makes this a true sourdough bread recipe?
This recipe uses a naturally fermented starter instead of commercial yeast, which creates a distinct tangy flavor and chewy texture unique to sourdough bread. The long, slow fermentation process also improves digestibility.
Can I use all-purpose flour instead of bread flour?
Yes! All-purpose flour works fine though bread flour will give a chewier crumb and better rise due to its higher protein content, which helps gluten development.
How do I know when the dough has risen enough?
Your dough should increase in volume by about 50% to 70%, jiggle slightly when you shake the bowl, and have bubbles visible under the surface—these signs indicate it’s ready for the next step.
Why is cold fermentation recommended?
Cold fermentation slows down yeast activity, allowing the flavor to deepen and the crumb to become lighter and airier. It also makes scheduling baking easier since you can prepare the dough ahead of time.
Can I skip the stretches and folds?
While the bread may still bake, the stretches and folds help develop gluten strength and structure, improving the texture and shape. Skipping them might result in a denser loaf.
Final Thoughts
There’s nothing quite like pulling a warm, crusty loaf of homemade sourdough from the oven and knowing you made it yourself. This Sourdough Bread Recipe isn’t just about baking—it’s about the joy of nurturing your starter, the satisfaction of patience, and the happiness of sharing something delicious. So, grab your ingredients, give it a go, and make your kitchen smell wonderful with this timeless classic!
Print
Sourdough Bread Recipe
- Prep Time: 1 hour 30 minutes (including starter feeding and dough mixing)
- Cook Time: 50 to 60 minutes
- Total Time: 29 hours (including fermentation and cold proofing)
- Yield: 1 large loaf (about 28 servings)
- Category: Bread
- Method: Baking
- Cuisine: American
- Diet: Vegetarian
Description
This classic sourdough bread recipe guides you through the process of creating a deliciously tangy, crusty loaf with an airy crumb. Using a natural sourdough starter, the recipe employs techniques like stretches and folds, bulk fermentation, and cold proofing to develop flavor and texture. Baked in a Dutch oven, the bread yields a golden crust and tender inside perfect for sandwiches or enjoying plain.
Ingredients
Sourdough Starter
- 50 to 100 grams ripe bubbly active starter (¼ cup to ½ cup; typically 100 grams)
Main Dough
- 350 to 375 grams warm water (375 grams preferred; less in humid weather)
- 500 grams bread flour (or all-purpose flour; approx. 4 cups plus 2 tbsp; King Arthur Bread Flour recommended)
- 10 to 12 grams fine sea salt (pink Himalayan sea salt preferred)
Instructions
- Feed Your Starter: If your starter was refrigerated, take it out the night before and feed it. Feed again a few hours before making the dough, ensuring it doubles in size and is bubbly before use.
- Make The Dough: In a large mixing bowl, combine the active starter with warm water and salt, stirring well. Add the bread flour and mix until you have a wet, sticky dough fully combined. Cover with a damp towel and let rest 30 minutes at room temperature.
- Stretches and Folds: Using a wet hand, pull one corner of the dough and fold it toward the center, rotating the bowl around to repeat this 4-5 times, shaping the dough into a ball. Let rest covered for 30 minutes. Repeat this process 3 more times every 30 minutes for a total of 2 hours; twice is acceptable if pressed for time.
- Rest (Bulk Fermentation): Cover the dough and let it rise for 6-7 hours at room temperature (or 8-9 hours in cooler temps) until it increases by 50-70% in volume, jiggles when shaken, with visible bubbles.
- Pre-shape: Turn the dough onto a lightly floured surface. Fold the top of the dough down to the center, rotate, and continue until a round shape forms, creating surface tension by tucking edges under if using a bench scraper.
- Bench Rest: Flip the dough ball over and let it rest 30 minutes. Then, gently pull the edges to tighten the ball, rotating to form a tight, smooth round.
- Shaping: Prepare a proofing basket or bowl by dusting generously with flour or lining with a floured towel. Fold the dough edges down to the center in a circular manner, place dough smooth side down into the basket, and cover with plastic wrap, a shower cap, or towel.
- Cold Fermentation: Refrigerate the dough overnight or up to 24 hours for a lighter crumb. Alternatively, proof at room temperature for 1-2 hours until puffed if baking the same day.
- Baking Preparation: Preheat the oven to 450°F. Cut a piece of parchment paper to fit your Dutch oven.
- Transfer Dough: Carefully turn the dough out onto the parchment paper using a plate or bowl to assist without deflating it.
- Score the Dough: Using a sharp blade or lame, score the top of the dough with a simple ‘X’ or desired pattern to allow for expansion.
- Bake Covered: Transfer the dough with parchment paper into the preheated Dutch oven, cover with the lid, and bake at 450°F for 30 minutes.
- Bake Uncovered: Remove the lid, reduce oven temperature to 400°F, and continue baking uncovered for 20-30 minutes until the crust is deep golden brown and the bread sounds hollow when tapped or reaches an internal temperature of 205–210°F.
- Cool: Remove bread from the Dutch oven, transfer to a wire rack, and cool for at least 1 hour before slicing to allow the crumb to set.
Notes
- The amount of active starter and water can be adjusted slightly depending on humidity and flour type for optimal hydration.
- Stretches and folds build gluten structure without kneading; be gentle but consistent.
- Cold fermentation overnight enhances flavor and creates a lighter crumb.
- Using a Dutch oven traps steam, which develops a crisp crust.
- Ensure the bread is fully cooled before slicing to avoid a gummy texture.
- If you don’t have a proofing basket, a floured bowl with a towel works well.


