
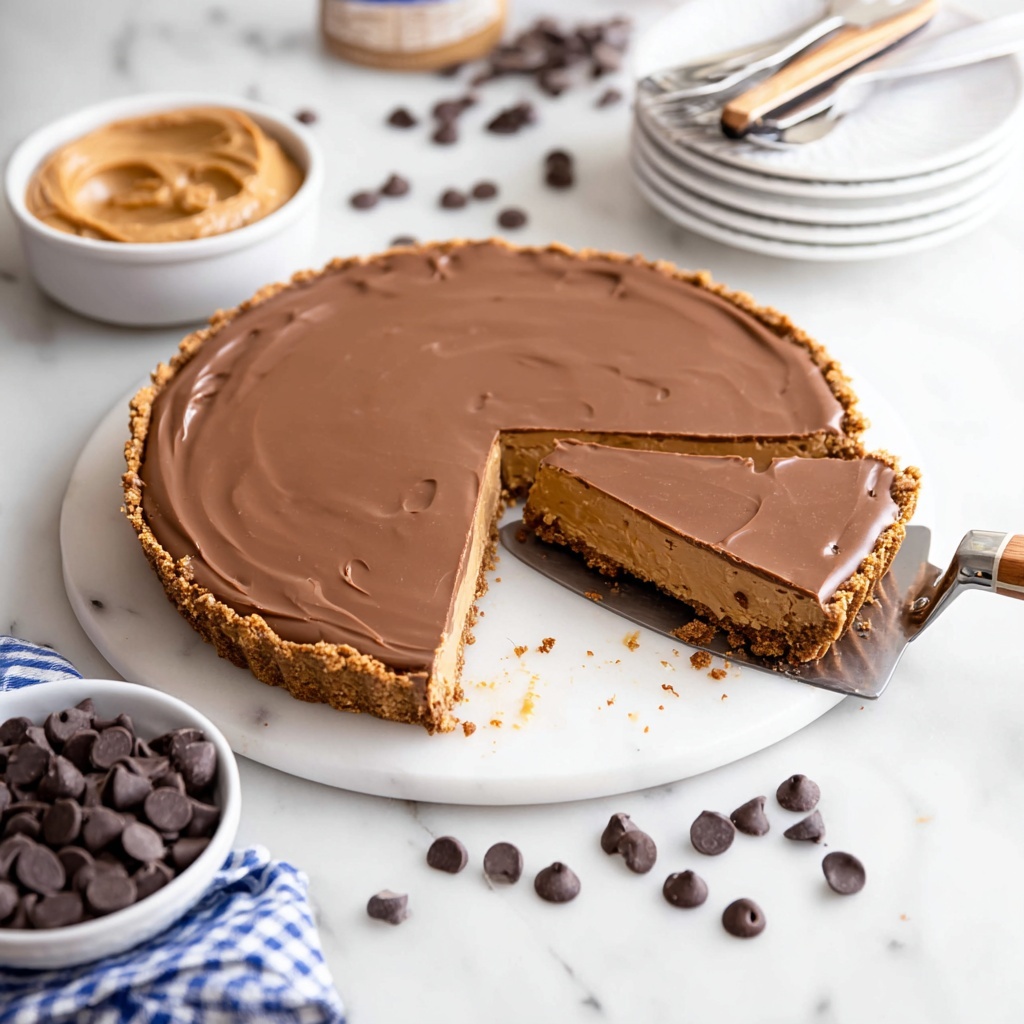
If you are a devoted fan of the magical marriage between chocolate and peanut butter, this Reese’s Peanut Butter Cup Pie Recipe is about to become your new obsession. Imagine a rich, creamy peanut butter filling nestling beneath a glossy, smooth chocolate shell, all set atop a crisp graham cracker layer that gives just the right amount of crunch. This no-bake wonder offers an irresistible combination of textures and flavors that bring the classic candy bar to life in a whole new way. Whether you’re making it for a special occasion or just indulging a sweet craving, this pie is guaranteed to delight every bite with the familiar taste that we all love.
Ingredients You’ll Need
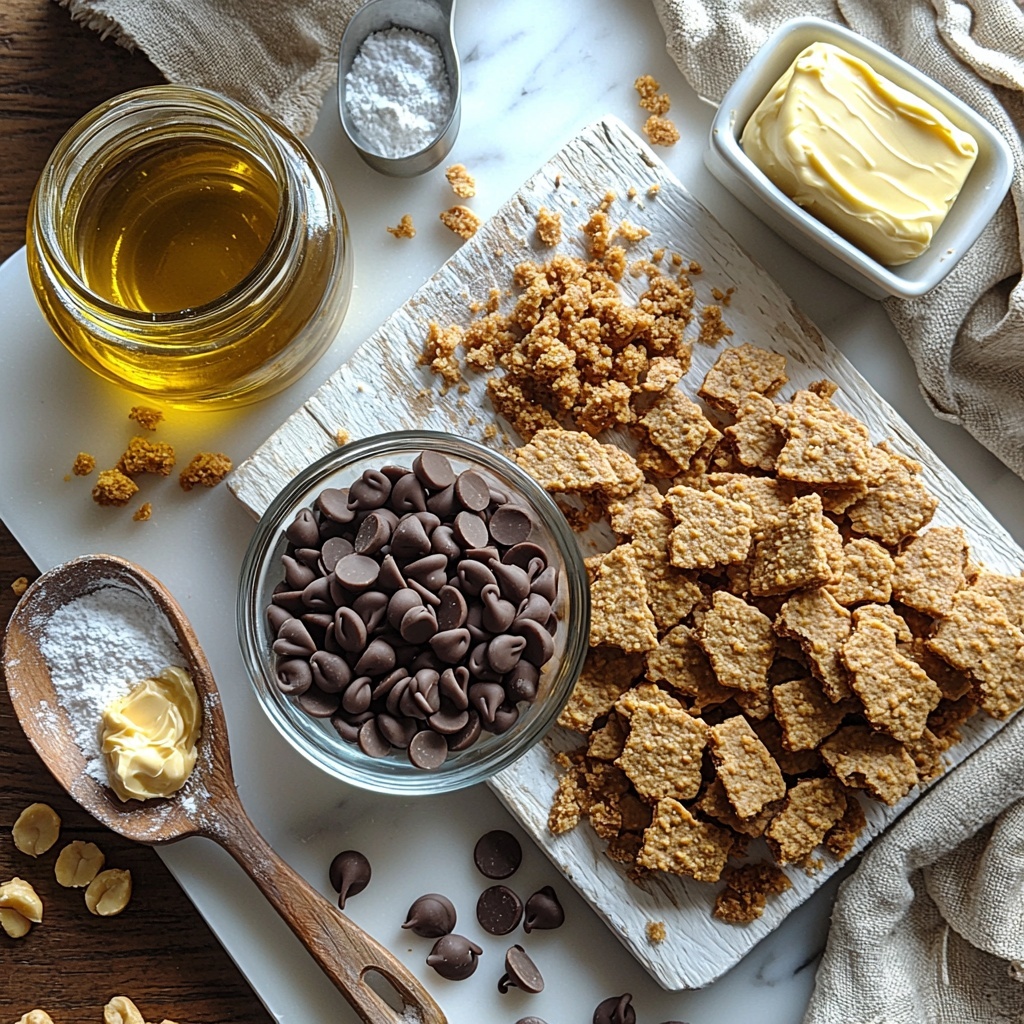
These ingredients are simple yet come together beautifully to create a dessert that feels both indulgent and satisfying. Each one has its own role — the chocolate brings silky richness, the peanut butter delivers creamy texture and nutty depth, while the graham cracker crumbs add just enough crunch and a hint of sweetness.
- Milk chocolate chips: Provides that smooth, melty chocolate coating with gorgeous shine and taste.
- Vegetable oil: Helps melt the chocolate perfectly without seizing and keeps it glossy for a flawless finish.
- Powdered sugar: Sweetens the peanut butter filling while ensuring the consistency remains silky smooth.
- Graham cracker crumbs: Add a tasty, crunchy base that enhances the pie’s texture contrast.
- Crunchy peanut butter: Supplies authentic peanut flavor and delightful bits for extra dimension.
- Salted sweet cream butter: Enhances richness and smoothness in the filling while balancing the sweetness.
How to Make Reese’s Peanut Butter Cup Pie Recipe
Step 1: Prepare the Tart Pan
Start by lining the bottom circle of your 9-inch fluted tart pan with parchment paper, spraying it lightly with nonstick spray to ensure your masterpiece will release easily later. This small step saves you from any pie drama and keeps everything pristine for serving.
Step 2: Melt the Chocolate
Using a microwave-safe bowl, combine the milk chocolate chips with vegetable oil. Heat in short bursts of 45 to 55 seconds, stirring until the chocolate is completely melted and smooth. This luscious chocolate will form the outer shell and top layer, creating that classic peanut butter cup look.
Step 3: Coat the Tart Pan with Chocolate
Spoon half of your melted chocolate into the pan and spread it evenly across the bottom and up the sides using a spatula or the back of a spoon. Chill this chocolate layer in the fridge while you whip up your peanut butter filling. This chilling step is essential for a crisp shell that holds everything securely.
Step 4: Mix the Dry Ingredients
In a large bowl, whisk together the powdered sugar and graham cracker crumbs. This dry blend acts as the base texture for the peanut butter filling, giving it body and a little crunch without overwhelming the creamy peanut butter flavor.
Step 5: Heat and Combine the Peanut Butter and Butter
Warm your crunchy peanut butter together with the salted butter in the microwave for about 45 seconds until soft and easily stirrable. This blend adds irresistible creaminess and a hint of indulgent butteriness to the filling.
Step 6: Create the Peanut Butter Filling
Pour the melted peanut butter and butter mixture over your powdered sugar and graham cracker crumbs. Stir thoroughly until every bit is combined into a smooth, thick filling rich with crunchy peanut butter pieces.
Step 7: Add the Filling to the Chocolate Shell
Take the chocolate-coated tart pan out of the fridge and spread the peanut butter mixture evenly over the bottom, pressing gently to smooth it. This layer forms the heart of your pie, bursting with flavor in each bite.
Step 8: Top with Remaining Chocolate
Spoon the remaining melted chocolate over the peanut butter layer, smoothing it all around to encase the filling beautifully in a shiny chocolate jacket. Tap the pan gently to settle the chocolate evenly, promising a flawless finish.
Step 9: Chill to Set
Place the tart pan in the fridge for at least 4 hours or up to overnight. This chilling time is crucial for the pie to firm up, allowing those layers to firm perfectly into the iconic peanut butter cup experience you are craving.
Step 10: Unmold Your Pie
When ready to enjoy, carefully remove the tart pan’s removable base by pressing slightly at the edges, then flip the pie onto a serving plate and peel away the parchment. You’ll be greeted with a picture-perfect Reese’s-inspired creation, ready to be sliced and shared.
Step 11: Serve and Enjoy
Slice into generous wedges and watch everyone’s eyes light up at the sight of that creamy peanut butter center surrounded by silky chocolate. It’s the perfect homemade tribute to a timeless classic!
How to Serve Reese’s Peanut Butter Cup Pie Recipe
Garnishes
Elevate your pie’s presentation with a sprinkle of chopped peanut butter cups or a drizzle of caramel or peanut butter sauce. A few lightly toasted peanuts on top add a delightful crunch and a pretty finishing touch.
Side Dishes
This pie pairs beautifully with a scoop of vanilla ice cream or a dollop of freshly whipped cream for a balanced richness. Alternatively, a fresh berry salad offsets the sweetness nicely for a refreshing contrast.
Creative Ways to Present
Consider serving this pie in individual tartlets for parties or layering the peanut butter and chocolate filling in clear glass jars to showcase the layers. For a fun twist, sprinkle some crushed pretzels on top for a sweet and salty surprise.
Make Ahead and Storage
Storing Leftovers
Simply cover the pie tightly with plastic wrap or a pie dome and refrigerate. It stays fresh and delicious for up to 3 days, making it a convenient dessert to prepare ahead of time.
Freezing
You can freeze slices of the pie wrapped individually in plastic wrap and placed in a freezer bag. Thaw overnight in the refrigerator before serving to preserve the perfect texture.
Reheating
Since this pie is best enjoyed cold and the filling is creamy rather than baked, avoid reheating. Allow it to sit at room temperature for 10-15 minutes if you prefer a softer texture before serving.
FAQs
Can I use creamy peanut butter instead of crunchy?
Absolutely! Creamy peanut butter will give your filling a smoother texture. Using crunchy just adds a bit of delightful bite and texture, which is why it’s called for in the recipe.
Is it necessary to use vegetable oil when melting chocolate?
Vegetable oil helps melt the chocolate evenly and keeps it glossy. You can melt chocolate without it, but adding oil prevents it from thickening or seizing, making it easier to spread.
Can I substitute the graham cracker crumbs with something else?
Yes, crushed digestive biscuits or cookie crumbs work well as a substitute. They add the same kind of sweetness and crunch to the filling.
How long does the pie need to chill before serving?
At least 4 hours is recommended to let the layers set perfectly, but chilling overnight is even better for a firmer texture.
Is this recipe suitable for a gluten-free diet?
To make it gluten-free, use gluten-free graham cracker crumbs or substitute with gluten-free cookies. Double-check all ingredients to ensure they meet your dietary needs.
Final Thoughts
Trust me when I say this Reese’s Peanut Butter Cup Pie Recipe is one dessert you want to have in your recipe arsenal. It’s stunningly simple to make, yet tastes like that perfect indulgence you’d never want to share (well, maybe just a little). Whether it’s for a family gathering, a treat-yourself day, or a celebration, this pie never fails to impress. So grab those ingredients, dig in, and watch your kitchen fill with the happy smiles this pie effortlessly creates.
Print
Reese’s Peanut Butter Cup Pie Recipe
- Prep Time: 30 minutes
- Cook Time: 0 minutes
- Total Time: 4 hours 30 minutes
- Yield: 8 servings
- Category: Dessert
- Method: No-Cook
- Cuisine: American
Description
A decadent no-bake Reese’s Peanut Butter Cup Pie featuring layers of smooth milk chocolate, a crunchy peanut butter filling, and a graham cracker crust. Perfectly chilled to set, this dessert combines rich chocolate and peanut butter flavors for a creamy, indulgent treat.
Ingredients
Chocolate Coating
- 2½ cups milk chocolate chips
- 1½ tbsp vegetable oil
Filling
- 1⅓ cup powdered sugar
- 1 cup graham cracker crumbs
- 1¼ cup crunchy peanut butter
- ½ cup salted sweet cream butter
Instructions
- Prepare Tart Pan: Line the bottom circle of a 9-inch fluted tart pan with parchment paper and lightly spray with nonstick spray. Set aside.
- Melt Chocolate: In a medium heat-safe bowl, combine milk chocolate chips and vegetable oil. Microwave for 45-55 seconds, then stir until smooth and completely melted.
- Coat Tart Pan: Spoon half of the melted chocolate into the prepared tart pan. Spread evenly over the bottom and up the sides using a spoon or offset spatula. Chill in the refrigerator while preparing the filling.
- Mix Dry Ingredients: In a large bowl, whisk together the powdered sugar and graham cracker crumbs. Set aside.
- Prepare Peanut Butter Mixture: In a medium heat-safe bowl, combine crunchy peanut butter and salted sweet cream butter. Microwave for 45 seconds and stir until thoroughly combined.
- Combine Filling: Pour the peanut butter mixture over the powdered sugar and graham cracker crumbs. Stir until fully incorporated into a smooth mixture.
- Assemble Filling: Remove the chocolate-coated tart pan from refrigerator. Spread the peanut butter filling evenly into the coated pan using a silicone or offset spatula, smoothing its surface.
- Add Top Chocolate Layer: Spoon the remaining melted chocolate on top of the peanut butter layer and smooth to the edges with a spoon or offset spatula.
- Set Pie: Tap the tart pan gently to settle the chocolate layers. Chill in the refrigerator for at least 4 hours or overnight to fully set.
- Remove From Pan: When ready to serve, remove pie from refrigerator. Place pan over a small mixing bowl, apply slight pressure on the pan edge to loosen sides, and have a serving plate or 10-inch cake circle ready.
- Invert Pie: Gently flip the pie upside down to remove the removable tart pan bottom and peel off the parchment paper carefully. Place serving plate or cake circle over bottom of the pie and flip it back over.
- Serve: Slice the pie into wedges and serve chilled.
Notes
- For best results, chill the pie overnight to ensure it sets well.
- You can substitute crunchy peanut butter with smooth if preferred.
- Ensure chocolate is fully melted and smooth for even coating and topping.
- Use a tart pan with a removable bottom for easy pie removal.
- Store leftovers covered in the refrigerator for up to 3 days.


