

If you want to wow your loved ones with a sweet treat that bursts with festive charm and irresistible flavor, this Valentine Cake Pops Recipe is just what you need. These adorable bite-sized delights are not only eye-catching but also perfectly moist, chocolaty, and easy to make. Whether you choose rich chocolate, classic vanilla, or romantic red velvet cake as your base, each pop is a little bundle of joy coated in luscious melting chocolate and sparkling with heart-shaped sprinkles. It’s a fun, creative way to celebrate love and share something truly special, and I can’t wait to walk you through every step!
Ingredients You’ll Need
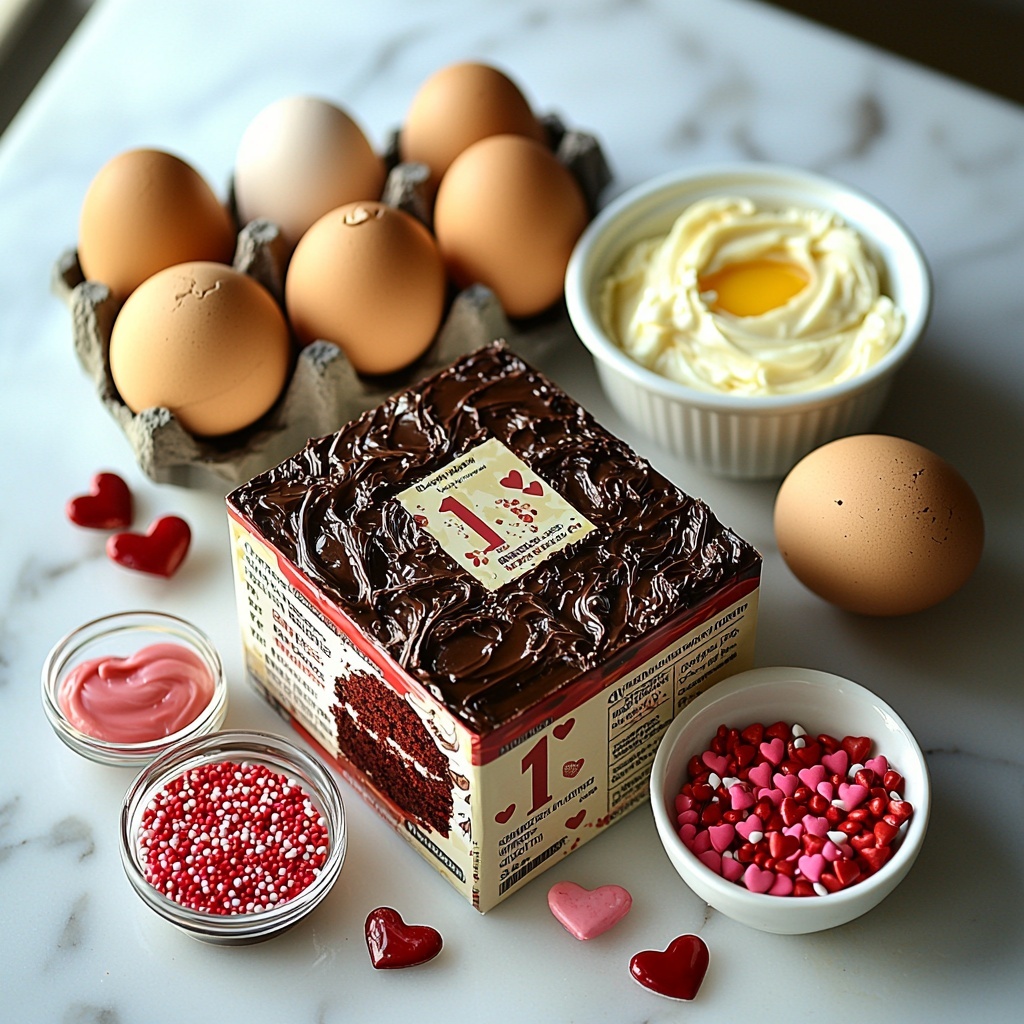
Gathering the right ingredients is key to nailing the perfect texture and flavor of your cake pops. Each component plays an essential role, from the moist cake base to the smooth frosting that binds, all the way to the glossy chocolate coating that adds that irresistible snap and shine.
- Cake mix (15.25 oz): Choose chocolate, vanilla, or red velvet for a flavor foundation that suits your mood or theme perfectly.
- Large eggs (3): These give your cake structure and a tender crumb.
- Unsalted butter (1/2 cup, melted): Adds richness and helps keep the cake moist without overpowering flavors.
- Frosting (1/2 cup): Vanilla or cream cheese frosting work brilliantly to bind the cake crumbs into perfect balls.
- Melting chocolate (1 cup): Red or pink melting chocolate is ideal for a smooth, festive coating that sets beautifully.
- Heart-shaped sprinkles (1/4 cup): For that extra pop of fun and Valentine’s Day spirit on the finished treats.
How to Make Valentine Cake Pops Recipe
Step 1: Bake the Cake Base
Start by preheating your oven to 350°F (175°C). Mix the cake mix with eggs and melted butter (and water if your box calls for it) following the package directions, then pour the batter into a greased baking pan. Bake for 25 to 30 minutes until the cake is golden and a toothpick inserted comes out clean. This fresh homemade cake sets the delicious foundation for your pops.
Step 2: Crumble and Combine
Once the cake has fully cooled, crumble it into fine crumbs in a large bowl. The key here is to get evenly fine crumbs so your cake balls will have a smooth texture without lumps. Gradually add the frosting, mixing gently until the mixture holds together well but isn’t overly sticky. This balance ensures the cake pops will be firm yet soft.
Step 3: Shape and Chill
Using a tablespoon to scoop, roll the mixture into small balls. Place them on a parchment-lined baking sheet and pop them into the fridge for at least one hour. Chilling helps the balls firm up, which makes dipping them in chocolate much easier.
Step 4: Dip and Decorate
Gently melt your chosen red or pink chocolate according to package instructions. Carefully dip each chilled ball into the melted chocolate, ensuring a smooth, even coat. Immediately sprinkle the heart shapes on top before the chocolate hardens, adding that festive Valentine’s touch. Place the finished pops back onto parchment paper and refrigerate for another hour so the coating sets nicely.
How to Serve Valentine Cake Pops Recipe
Garnishes
Sprinkles are the classic Valentine’s touch, but you can also add edible glitter, tiny candy hearts, or drizzle contrasting colored chocolate. Fresh rose petals on the serving plate add a romantic flair without overwhelming the sweet pops themselves.
Side Dishes
Pair your Valentine Cake Pops Recipe with a cup of rich hot chocolate or a fruity berry smoothie to balance the chocolate sweetness. Fresh strawberries or a small plate of mixed nuts also complement the flavor beautifully without stealing the spotlight.
Creative Ways to Present
Consider arranging your cake pops in a decorative bouquet with colorful tissue paper or standing them upright in a pretty polka dot vase filled with candy or foam. Personalized tags or little heart flags stuck in each pop make them perfect for gifting or a charming party centerpiece.
Make Ahead and Storage
Storing Leftovers
If you have any leftovers, keep your Valentine Cake Pops Recipe covered in an airtight container in the refrigerator. They maintain their freshness and texture for up to 3 days, making them perfect for prepping in advance of your celebration.
Freezing
To enjoy your cake pops later, wrap each one individually in plastic wrap and freeze in a sealed container. They stay delicious for up to a month. When ready to enjoy, thaw in the fridge overnight to keep the chocolate coating intact.
Reheating
Since these are best served cool, reheating isn’t necessary. If the chocolate looks dull after storage, just allow the cake pops to come to room temperature for about 20 minutes to restore their shine and softness before serving.
FAQs
Can I use homemade cake instead of box mix for this Valentine Cake Pops Recipe?
Absolutely! Homemade cake works wonderfully and lets you customize flavors fully. Just make sure it’s fully cooled and crumbled finely for the best results.
What frosting works best to bind the cake crumbs?
Vanilla and cream cheese frostings are top choices because they add both flavor and the right moisture level to keep the cake mixture cohesive without being soggy.
How do I prevent the cake pops from falling off the sticks?
Chilling the cake balls until firm before dipping is crucial. Also, dip the stick in melted chocolate before inserting it into the ball to create a glue-like effect for a secure hold.
Can I make these Valentine Cake Pops Recipe dairy-free?
Yes! Use dairy-free cake mix, nondairy butter substitutes, dairy-free frosting, and vegan melting chocolate to adapt the recipe while keeping it just as tasty.
What’s the best way to melt chocolate for coating?
Use a double boiler or microwave in short intervals, stirring frequently to avoid burning. Smooth melted chocolate ensures an even coat and a beautiful finish on your pops.
Final Thoughts
You really can’t go wrong with this Valentine Cake Pops Recipe when you want a treat that is both adorable and delicious. It’s simple enough for a fun kitchen activity and impressive enough to wow your friends and family. So grab your ingredients, get cozy in your kitchen, and let the sweet magic begin—these cake pops are sure to bring smiles to all your Valentine’s Day celebrations!
Print
Valentine Cake Pops Recipe
- Prep Time: 15 minutes
- Cook Time: 30 minutes
- Total Time: 50 minutes
- Yield: 12 servings
- Category: Dessert
- Method: Baking
- Cuisine: American
Description
Delight your Valentine with these adorable Valentine Cake Pops, a fun and easy dessert featuring moist cake mixed with frosting, dipped in colorful melted chocolate, and decorated with festive heart-shaped sprinkles. Perfect for parties or a sweet gift, these bite-sized treats bring a charming twist to traditional cake.
Ingredients
Cake Ingredients
- 1 box (15.25 oz) cake mix (chocolate, vanilla, or red velvet)
- 3 large eggs
- 1/2 cup unsalted butter, melted
- Water as required by cake mix package instructions
Frosting
- 1/2 cup frosting (vanilla or cream cheese)
Coating and Decoration
- 1 cup melting chocolate (red or pink)
- 1/4 cup heart-shaped sprinkles
Instructions
- Prepare the Cake Batter: Preheat your oven to 350°F (175°C). In a mixing bowl, combine the cake mix, eggs, melted butter, and the amount of water specified on the cake mix package. Stir until smooth and well incorporated.
- Bake the Cake: Pour the batter into a greased baking pan and bake in the preheated oven for 25-30 minutes, or until the cake is golden and a toothpick inserted into the center comes out clean. Allow the cake to cool completely before proceeding.
- Crumble the Cake: Once cooled, crumble the cake into fine crumbs using your hands or a fork inside a large mixing bowl, ensuring there are no large pieces.
- Mix in Frosting: Gradually add the frosting to the cake crumbs, mixing gently until the mixture holds together but is not too moist or sticky. The texture should be pliable enough to roll into balls.
- Form Cake Balls: Scoop tablespoon-sized portions of the mixture and roll them into smooth balls. Place these on a parchment-lined baking sheet and chill in the refrigerator for at least one hour to firm up.
- Melt the Chocolate: Follow the package instructions to melt the chocolate coating—usually by microwaving in short bursts or using a double boiler—until smooth and fully melted.
- Dip and Decorate: Dip each chilled cake ball into the melted chocolate coating, ensuring it is fully covered, then gently tap off any excess chocolate. Place the dipped cake pops back onto the parchment paper and immediately sprinkle with heart-shaped sprinkles before the coating sets.
- Chill to Set: Return the decorated cake pops to the refrigerator and chill for another hour until the chocolate coating is firm and the cake pops are ready to serve.
Notes
- Use any cake flavor you prefer—chocolate, vanilla, or red velvet all work beautifully for these pops.
- If the mixture feels too dry when mixing frosting, add frosting a little at a time to achieve the right consistency.
- Melt chocolate carefully to avoid burning; use short intervals if microwaving and stir often.
- Store finished cake pops in the refrigerator in an airtight container for up to 5 days.
- For extra flair, you can use colored melting chocolates or different shaped sprinkles based on the occasion.


