
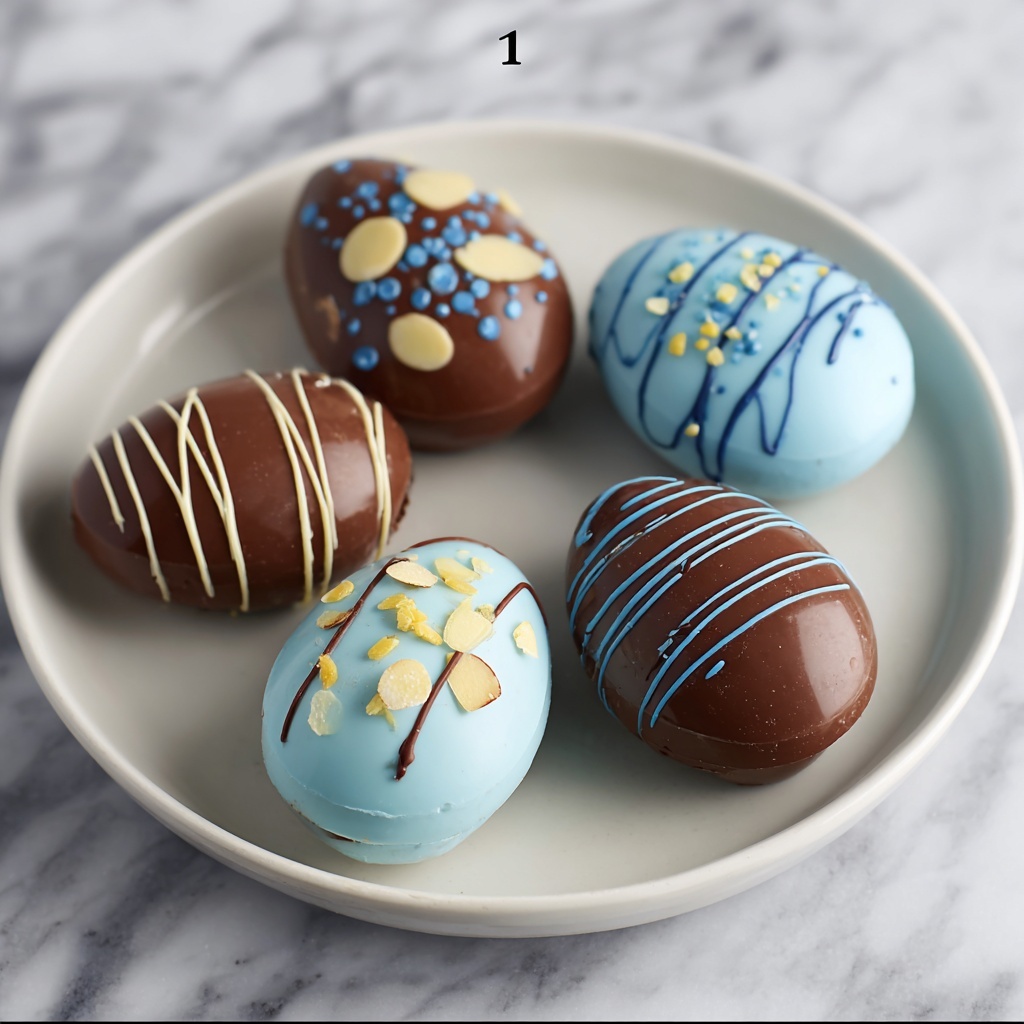
There is something truly magical about making your own festive treats, and this Easy Homemade Chocolate Easter Eggs (Simple & No-Bake) Recipe perfectly captures that joy with minimal fuss. Imagine glossy, rich chocolate shells that you can fill with creamy, dreamy peanut butter or your favorite spread, all set without turning on the oven. Whether you’re crafting these with family or just treating yourself, these delightful chocolate eggs bring a personal touch to your Easter celebrations that store-bought versions simply cannot match.
Ingredients You’ll Need
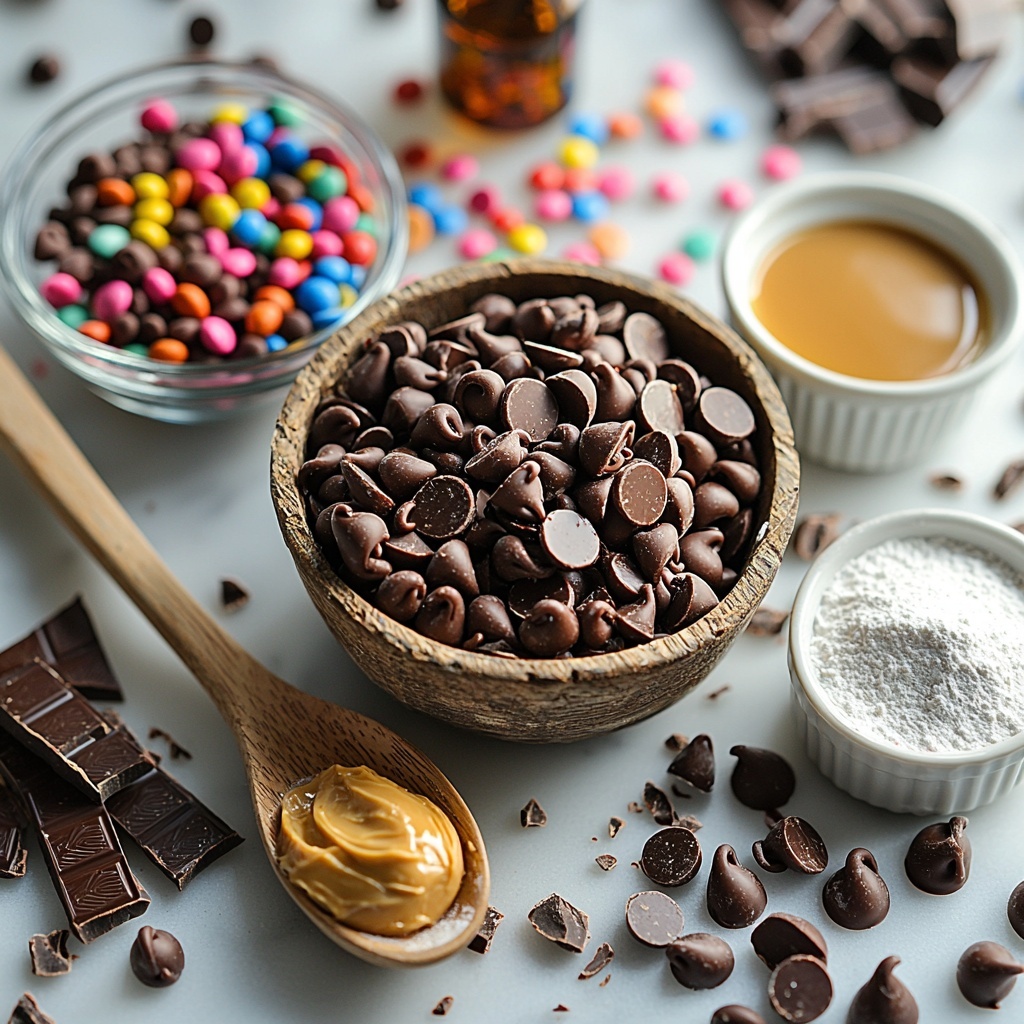
Getting started with this Easy Homemade Chocolate Easter Eggs (Simple & No-Bake) Recipe is a breeze because it calls for simple but essential ingredients that work beautifully together. Each one plays a crucial role in crafting smooth, flavorful shells and luscious fillings that will have everyone asking for more.
- 2 cups high-quality milk or semi-sweet chocolate chips: The heart and soul of your eggs, providing that irresistible chocolate flavor and glossy finish.
- 1 tablespoon coconut oil or vegetable shortening: Helps the chocolate melt smoothly and sets with the perfect shine and snap.
- 1/2 cup creamy peanut butter or chocolate hazelnut spread (optional filling): Adds a rich, nutty, or chocolaty surprise inside each egg.
- 1/4 cup powdered sugar (if making peanut butter filling): Sweetens and firms the peanut butter filling for the perfect texture.
- 1/2 teaspoon vanilla extract (optional): Enhances the flavor complexity of your filling, making it taste homemade and extra special.
- 2 tablespoons colorful sprinkles or crushed candies for decoration (optional): For a festive pop of color and texture that brightens up each egg.
How to Make Easy Homemade Chocolate Easter Eggs (Simple & No-Bake) Recipe
Step 1: Melt the Chocolate
Begin by gently melting your chocolate chips together with the coconut oil or vegetable shortening. You can do this in a heatproof bowl placed over simmering water, stirring frequently until the mixture is perfectly smooth and glossy. Alternatively, use the microwave in short 20-second bursts, stirring between each to avoid burning the chocolate. This step is crucial because a smooth melt ensures your chocolate eggs will have that beautiful, shiny finish.
Step 2: Prepare the Filling (if using)
If you’re adding a peanut butter filling, mix the creamy peanut butter with powdered sugar and vanilla extract in a small bowl. Stir until the mixture is smooth yet firm enough to hold its shape when scooped. This filling gives your eggs a sublime creamy center that contrasts perfectly with the crisp chocolate shell.
Step 3: Form the Chocolate Shells
Spoon a small amount of melted chocolate into clean silicone egg molds, then use the back of a spoon to coat each mold’s interior evenly. Make sure the layer is not too thin so your eggs have a sturdy shell. Next, pop the molds into the refrigerator for 10 to 15 minutes to let the chocolate set completely.
Step 4: Add the Filling and Seal
Once your chocolate shells are firm, add a small dollop of the prepared filling into the center of each shell, leaving room around the edges for sealing. Cover the filling with more melted chocolate to fully encase it, using a spoon to smooth the tops. Gently tap the molds to release any trapped air bubbles for a flawless finish.
Step 5: Decorate and Chill
Sprinkle colorful sprinkles or crushed candies on top while the chocolate is still soft for a festive touch. Then, return the molds to the fridge for another 20 to 30 minutes until the eggs are completely firm and ready to pop out.
Step 6: Unmold and Store
Carefully remove your beautiful chocolate eggs from the silicone molds. Place them in an airtight container and keep them refrigerated until you’re ready to enjoy these little pieces of homemade happiness.
How to Serve Easy Homemade Chocolate Easter Eggs (Simple & No-Bake) Recipe
Garnishes
You can dress up your Easter eggs with a touch of edible glitter, finely chopped nuts, or even a drizzle of white chocolate for contrast. These small touches make your homemade chocolates look like they belong in a fancy chocolatier’s display.
Side Dishes
Serving these eggs alongside a fresh fruit platter, like tangy berries or juicy orange slices, complements the rich chocolate beautifully, balancing the sweetness with refreshing brightness.
Creative Ways to Present
Think outside the box by wrapping each egg in colorful cellophane with a little bow for gifting, or arrange them in a rustic basket lined with pastel paper shreds for an inviting Easter centerpiece. You could even nestle them among edible flowers for a stunning springtime display.
Make Ahead and Storage
Storing Leftovers
Keep your Easy Homemade Chocolate Easter Eggs (Simple & No-Bake) Recipe fresh by storing them in an airtight container in the refrigerator. This will preserve their texture and flavor for several days, making them perfect to prepare ahead of time.
Freezing
If you want to make a larger batch, these chocolate eggs freeze well. Place them in a freezer-safe container separated by parchment paper to prevent sticking. Thaw in the refrigerator before serving to maintain their shape and taste.
Reheating
Since this is a no-bake recipe, reheating isn’t necessary or recommended as it may melt or change the texture of the eggs. Enjoy them chilled for the best flavor and firm texture.
FAQs
Can I use dark chocolate instead of milk chocolate?
Absolutely! Dark chocolate can be a wonderful alternative if you prefer a richer, less sweet taste. Just be sure to choose high-quality chocolate for the best results.
Is it necessary to use silicone molds?
Silicone molds are ideal because they make it easy to release the chocolate eggs without cracking. However, if you use plastic molds, be gentle when unmolding to keep the eggs intact.
Can I make these eggs vegan?
Yes! Just swap the milk chocolate chips for a dairy-free or vegan chocolate alternative and use vegan-friendly fillings. Coconut oil is also a great choice to keep it plant-based.
What other fillings can I try?
Feel free to experiment with caramel, marshmallow fluff, cookie butter, or even crushed nuts. These variations create fun surprises inside each chocolate egg.
How long do these homemade Easter eggs keep?
When properly stored in the refrigerator, they typically stay fresh for up to a week. For longer storage, freezing is a great option and preserves the flavor and texture well.
Final Thoughts
Making these Easy Homemade Chocolate Easter Eggs (Simple & No-Bake) Recipe is such a fun, rewarding experience that anyone can enjoy. From the creamy fillings to the shiny, smooth shells, each bite is a little celebration of spring and sweetness. I encourage you to try this recipe soon — it’s a fantastic way to add a personal, heartfelt touch to your Easter festivities or just to indulge your chocolate craving with something homemade. Happy chocolate making!
Print
Easy Homemade Chocolate Easter Eggs (Simple & No-Bake) Recipe
- Prep Time: 20 minutes
- Cook Time: 5 minutes
- Total Time: 25 minutes
- Yield: 12 chocolate eggs
- Category: Dessert
- Method: No-Cook
- Cuisine: American
- Diet: Vegetarian
Description
These Easy Homemade Chocolate Easter Eggs are a simple, no-bake recipe perfect for festive celebrations. Made with high-quality chocolate and optional creamy peanut butter filling, these delightful eggs are customizable, quick to prepare, and ideal for gifting or enjoying during Easter.
Ingredients
Chocolate Shell
- 2 cups high-quality milk chocolate or semi-sweet chocolate chips
- 1 tablespoon coconut oil or vegetable shortening
Optional Peanut Butter Filling
- 1/2 cup creamy peanut butter or chocolate hazelnut spread
- 1/4 cup powdered sugar
- 1/2 teaspoon vanilla extract (optional)
Decoration
- 2 tablespoons colorful sprinkles or crushed candies (optional)
Instructions
- Melt the Chocolate: In a heatproof bowl, combine the chocolate chips and coconut oil. Melt the mixture either over a pot of simmering water (double boiler method) or in the microwave, heating in 20-second intervals and stirring after each until smooth and fully melted.
- Prepare the Filling (Optional): In a small bowl, mix the creamy peanut butter, powdered sugar, and vanilla extract until the mixture is smooth and slightly firm to hold its shape.
- Form the Chocolate Shells: Spoon a small amount of the melted chocolate into silicone egg molds. Use the back of a spoon to spread and coat the sides evenly. Place the molds in the refrigerator for 10 to 15 minutes to allow the chocolate to set firmly.
- Add the Filling: If using filling, spoon a small amount of the peanut butter mixture into the center of each chocolate shell, leaving some space around the edges for the top chocolate layer.
- Seal the Eggs: Cover the filling with more melted chocolate, smoothing the tops with a spoon. Gently tap the molds to release any trapped air bubbles. Add sprinkles or crushed candies on top for decoration if desired.
- Chill Until Firm: Refrigerate the filled molds again for 20 to 30 minutes, or until the chocolate eggs are completely firm and set.
- Unmold and Store: Carefully remove the eggs from the silicone molds. Store them in an airtight container in the refrigerator until ready to serve to keep them fresh and prevent melting.
Notes
- Use dairy-free chocolate to make this recipe vegan-friendly.
- Silicone molds work best for easy removal of the chocolate eggs.
- Store in a cool place to prevent melting and maintain shape.
- You can customize the filling with alternatives such as caramel, marshmallow cream, or cookie butter for variety.


