

If you have a sweet tooth and a love for nostalgic treats, you are going to adore Mom’s Classic Fudge Recipe. This timeless chocolate fudge offers a beautifully rich, creamy texture that melts in your mouth and delivers just the right balance of sweetness and cocoa flavor. It’s the kind of dessert that not only satisfies your cravings but also warms your heart with memories of family gatherings and holiday celebrations. Simple ingredients come together in this recipe to create a luscious fudge that’s perfect for sharing or savoring in quiet moments. You’ll quickly see why Mom’s Classic Fudge Recipe remains a beloved staple for fudge lovers everywhere.
Ingredients You’ll Need
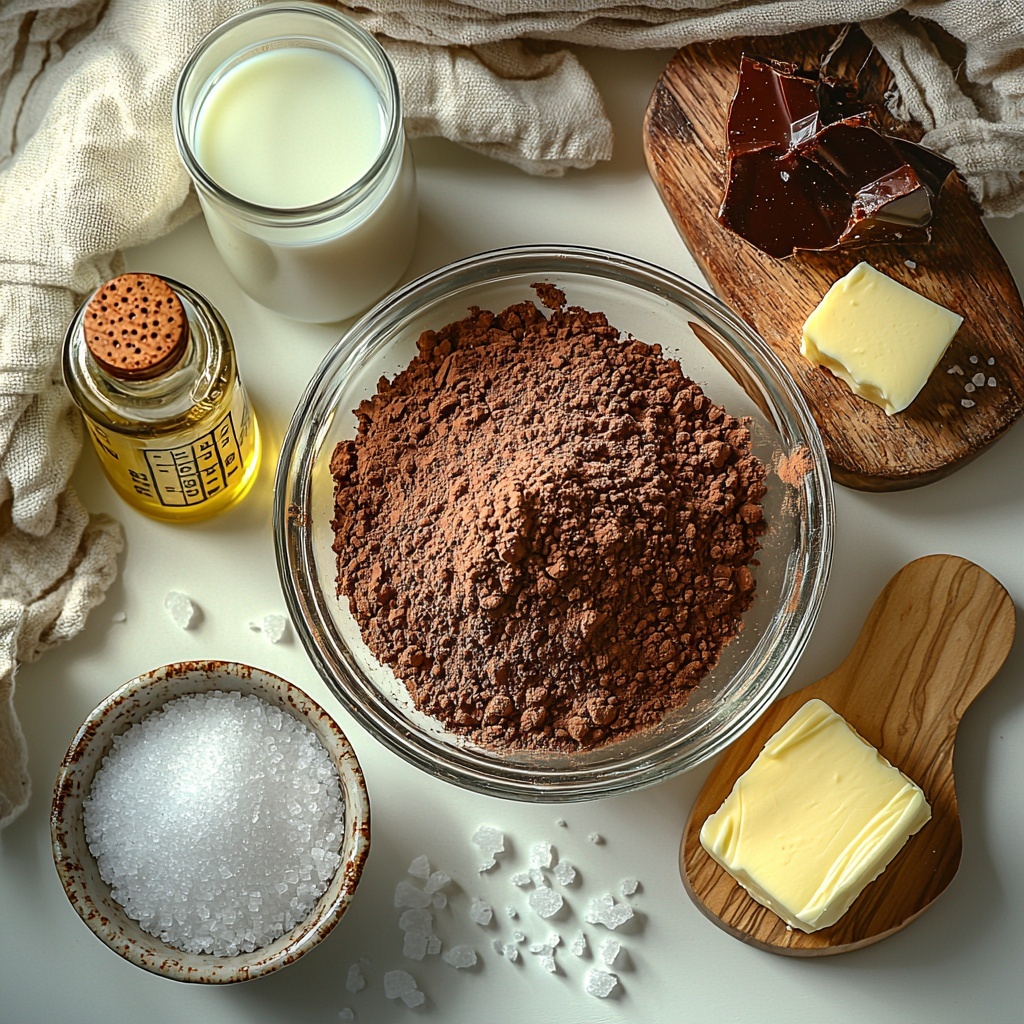
Every great dish starts with the right ingredients, and for Mom’s Classic Fudge Recipe, these simple pantry staples work harmoniously to create a decadent treat. Each component plays a crucial role — from the deep chocolate taste imparted by cocoa powder to the smooth richness from butter and milk.
- 3 cups granulated sugar: Provides the essential sweetness and structure to the fudge.
- 2/3 cup unsweetened cocoa powder: Adds intense chocolate flavor and a beautiful dark color.
- 1/8 teaspoon salt: Balances the sweetness and enhances overall flavor depth.
- 1 1/2 cups whole milk: Creates a creamy base that helps achieve the perfect texture.
- 1/4 cup unsalted butter: Contributes to the smoothness and richness of the fudge.
- 1 teaspoon vanilla extract: Adds a subtle aromatic sweetness that complements the chocolate.
How to Make Mom’s Classic Fudge Recipe
Step 1: Mix the Dry Ingredients
Start by combining granulated sugar, unsweetened cocoa powder, and salt in a heavy saucepan. Stir them together until they are well blended. This ensures every spoonful of fudge will have a consistent and balanced chocolate flavor from the very beginning.
Step 2: Add Milk and Heat to Boil
Pour in the whole milk and stir thoroughly. Then, place the saucepan over medium heat. Keep stirring as you gently heat the mixture until it reaches a rolling boil. This step is essential to dissolve the sugar and cocoa fully and start the thickening process.
Step 3: Boil to Soft Ball Stage
Once boiling, stop stirring and allow the mixture to reach 234°F, also known as the soft ball stage. This temperature is critical for the fudge to set properly later. Patience here really pays off with a perfect smooth texture.
Step 4: Add Butter and Vanilla, Then Cool
Remove the pan from heat and immediately stir in the unsalted butter and vanilla extract. Then set the mixture aside to cool to 110°F, but don’t stir during this period. This cooling stage helps the fudge develop its signature shine and creaminess.
Step 5: Beat Until Thickened
Using a wooden spoon, beat the fudge mixture energetically until it thickens and the glossy surface fades. This usually takes around 7 to 10 minutes. This is where you witness the magic, as the fudge begins to transform from a liquid into a velvety, luscious dessert.
Step 6: Pour and Set
Pour the thickened fudge into a buttered 8×8-inch pan. Spread it evenly with the back of a spoon or a spatula, then let it set at room temperature until firm. Once set, cut into 36 delightful squares that are ready to share and enjoy.
How to Serve Mom’s Classic Fudge Recipe
Garnishes
While classic fudge is wonderful on its own, you can elevate it with simple garnishes. Try sprinkling chopped nuts like walnuts or pecans on top before it sets for added crunch and nutty flavor. A light dusting of sea salt can also bring a sophisticated contrast to the sweet chocolate.
Side Dishes
Mom’s Classic Fudge Recipe pairs beautifully with a scoop of vanilla ice cream or a cup of rich coffee or milk. For festive occasions, serve alongside a fruit platter with strawberries or cherries that complement chocolate’s richness with a fresh tang.
Creative Ways to Present
Presentation can be part of the fun! Wrap individual fudge squares in parchment paper tied with a colorful ribbon for charming edible gifts. Or arrange fudge on a decorative platter with assorted nuts, dried fruits, or even peppermint pieces for a holiday twist that wows any crowd.
Make Ahead and Storage
Storing Leftovers
Keep your leftover fudge fresh by storing it in an airtight container at room temperature. Properly stored, it will remain soft and delicious for up to two weeks, making it an easy treat to enjoy anytime.
Freezing
If you want to save fudge for longer, wrap pieces tightly in plastic wrap and then place them in a freezer-safe container or bag. Frozen fudge can last up to three months without losing its luscious texture or flavor. Thaw at room temperature before enjoying.
Reheating
While fudge is best enjoyed as is, if you prefer a softer texture, warm it gently in short bursts in the microwave or let it sit in a warm room. Avoid overheating, which can alter the texture and cause it to become grainy.
FAQs
Can I use low-fat milk instead of whole milk?
Whole milk is recommended for the creamiest texture and richest flavor. Using low-fat milk may result in a fudge that is less smooth and slightly drier, but it can still work if needed.
What if I don’t have a candy thermometer?
You can test the soft ball stage by dropping a small amount of the boiling fudge into cold water. If it forms a soft, pliable ball when you scoop it up, it’s ready to proceed.
Can I add nuts or other mix-ins?
Absolutely! Stir in nuts, dried fruits, or even crushed candies after beating the fudge but before it sets to add texture and flavor variations to this classic dessert.
Why do I need to stop stirring while boiling?
Stopping stirring allows the temperature to rise evenly and the sugar to reach the precise soft ball stage, which is essential for the fudge’s proper texture and setting.
How long does the fudge need to cool before cutting?
Let the fudge sit at room temperature until completely firm, usually a few hours. Chilling it briefly in the refrigerator can speed this up but avoid freezing before cutting to prevent cracking.
Final Thoughts
Mom’s Classic Fudge Recipe is truly a treasure to have in your recipe box — comforting, straightforward, and guaranteed to impress. With just a handful of ingredients and simple steps, you can create a rich and indulgent treat that brings smiles every time. Don’t hesitate to try this recipe soon; once you’ve tasted this fudgy goodness, it will become one of your favorite go-to desserts for any occasion.
Print
Mom’s Classic Fudge Recipe
- Prep Time: 5 minutes
- Cook Time: 30 minutes
- Total Time: 35 minutes
- Yield: 36 servings
- Category: Dessert
- Method: Stovetop
- Cuisine: American
Description
This classic Mom’s Fudge recipe yields rich, creamy, and perfectly textured chocolate fudge that’s easy to make at home. With simple pantry ingredients and a straightforward cooking process, this fudge is a nostalgic treat perfect for holidays, gifts, or anytime you crave a sweet homemade dessert.
Ingredients
Fudge Ingredients
- 3 cups granulated sugar
- 2/3 cup unsweetened cocoa powder
- 1/8 teaspoon salt
- 1 1/2 cups whole milk
- 1/4 cup unsalted butter
- 1 teaspoon vanilla extract
Instructions
- Combine dry ingredients: In a heavy saucepan, mix granulated sugar, unsweetened cocoa powder, and salt thoroughly until well blended to ensure even flavor distribution.
- Add milk and heat: Pour in the whole milk and stir the mixture gently. Place the saucepan over medium heat and bring the mixture to a rolling boil while stirring occasionally to prevent burning.
- Boil to soft ball stage: Stop stirring and allow the mixture to boil until it reaches 234°F (soft ball stage) as measured with a candy thermometer. This temperature ensures proper fudge consistency.
- Add butter and vanilla, cool: Remove the saucepan from heat, add the unsalted butter and vanilla extract, and let the mixture cool without stirring until it reaches 110°F.
- Beat to thicken: Using a wooden spoon, beat the cooled mixture vigorously for about 7-10 minutes until it thickens and loses its glossy appearance, signaling the fudge is ready to set.
- Pour and set: Pour the fudge into a buttered 8×8-inch pan, spreading it evenly. Allow it to set at room temperature until firm, then cut into 36 squares for serving.
Notes
- Use a heavy saucepan to prevent burning during boiling.
- Do not stir after reaching the soft ball stage to ensure proper texture.
- Allow the fudge to cool to the correct temperature before beating for best results.
- Butter the pan well to prevent sticking.
- Store fudge in an airtight container to maintain freshness.


