

If you’re searching for a cookie that captures the festive spirit and offers a delightful burst of flavor with every bite, the Red Velvet Blossom Cookies Recipe is your new best friend. These cookies marry the rich, velvety taste of classic red velvet cake with a playful twist—a melted kiss of chocolate right in the center! Soft, slightly chewy, and coated with a sparkle of sugar, they feel festive yet comforting, perfect for sharing with loved ones or bringing a smile to any occasion.
Ingredients You’ll Need
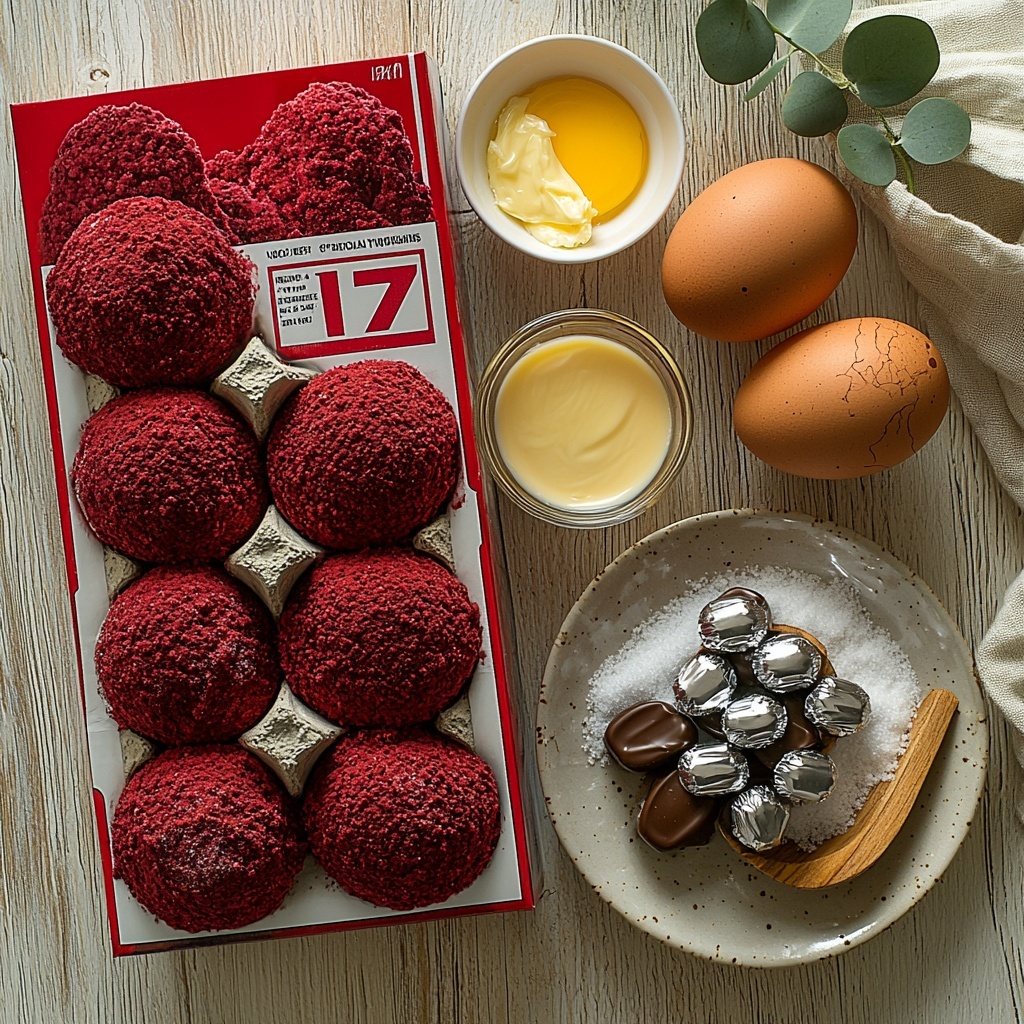
This recipe keeps things refreshingly simple but doesn’t skimp on flavor or texture. Each ingredient plays a key role—from the boxed red velvet mix that ensures that beautiful crimson hue and signature cocoa flavor, to the sugar that provides a delightful crunch. Every component is essential to bring these charming cookies to life.
- 1 box red velvet cake mix (15.25 oz.): The foundation of our cookies, delivering the classic red velvet flavor and vibrant color.
- 2 large eggs: Bind everything together and add moisture for a soft, chewy texture.
- ½ cup unsalted butter (melted): Brings richness and helps achieve that tender crumb irresistible in every bite.
- 1 tsp vanilla extract: Enhances the flavor with a warm, sweet aroma.
- ½ tsp espresso powder (optional!): Intensifies the chocolate notes for a subtle depth you won’t want to miss.
- 1 cup regular or coarse sugar: For rolling the dough balls, giving the cookies a sparkling sugar crust.
- 24 Hershey’s kiss candies (or other mini chocolate candy): The signature “blossom” center—melty, chocolatey, and absolutely delightful.
How to Make Red Velvet Blossom Cookies Recipe
Step 1: Prepare the Dough
Start by whisking together the eggs, melted butter, and vanilla extract until they’re perfectly combined and smooth. Then, add in the red velvet cake mix along with the optional espresso powder if you want that extra chocolate kick. Stir everything gently until the dough is thoroughly incorporated—this mixture is going to form the base of your delicious cookies!
Step 2: Chill the Dough
Pop the dough into the fridge for about 30 minutes. This step is crucial because chilling helps the dough firm up, making it much easier to roll into perfect little balls without sticking all over your hands.
Step 3: Roll and Coat
Once chilled, roll your dough into 1½-inch balls—don’t worry about making them perfectly uniform, a little rustic charm is part of the fun! Then, roll each ball in sugar to coat completely, which adds a beautiful sparkly finish and a hint of crunch to the outside of the cookies.
Step 4: Bake Your Cookies
Place your sugar-coated dough balls on a baking sheet lined with parchment paper or a silicone mat. Bake in a preheated oven at 350°F for about 8 to 10 minutes. You’ll know they’re ready when the edges are set, the tops look puffed up, and just starting to develop tiny cracks—the perfect invitation for the chocolate center.
Step 5: Add the Chocolate Kiss
As soon as the cookies come out of the oven, gently press a Hershey’s kiss candy into the center of each one. This is where the magic happens! Let the cookies cool completely so the chocolate sets perfectly nestled in the soft cookie body. If you use Hugs candy kisses, be aware they may melt and blend slightly into the cookie unless chilled quickly.
How to Serve Red Velvet Blossom Cookies Recipe
Garnishes
These cookies shine on their own, but if you want to get fancy, consider dusting them lightly with powdered sugar or decorating with a drizzle of white chocolate. You could even sprinkle some edible glitter or red sprinkles around the edges for extra festive flair.
Side Dishes
Pair these delicious cookies with a cold glass of milk for the classic combo or a warm cup of chai tea or coffee to complement the slight espresso hints in the dough. For a dessert platter, add cream cheese frosting or whipped cream on the side to echo the red velvet cake experience.
Creative Ways to Present
Arrange these cookies on a decorative plate with some fresh berries or mint leaves to brighten the presentation. You can also stack them in a clear jar tied with a festive ribbon as a thoughtful homemade gift that anyone would cherish during holiday seasons or celebrations.
Make Ahead and Storage
Storing Leftovers
Keep your Red Velvet Blossom Cookies in an airtight container at room temperature for up to 3 days. This will preserve their soft texture and keep the sugar coating crisp, ensuring they taste fresh every time you reach for one.
Freezing
If you want to keep your cookies longer, they freeze beautifully. Place them in a single layer on a baking sheet to freeze individually before transferring to a freezer-safe bag or container. They’ll stay fresh for up to 3 months—perfect for preparing ahead for parties or special treats.
Reheating
When you’re ready to enjoy frozen cookies, let them thaw at room temperature, then warm them up slightly in the oven at 300°F for 5 minutes. This brings back that soft, fresh-baked warmth and melts the chocolate just a little for that perfect experience.
FAQs
Can I make Red Velvet Blossom Cookies without espresso powder?
Absolutely! The espresso powder is optional and mainly enriches the chocolate flavor. If you prefer, you can leave it out, and your cookies will still be deliciously moist and full of red velvet charm.
What if I don’t have Hershey’s kisses? Can I use other chocolates?
Definitely! Mini chocolate candies or even small squares of your favorite chocolate bar will work. Just keep in mind how the chocolate melts to avoid candies that might run too much or overpower the cookie.
How thick should I roll the dough balls?
The dough balls should be about 1½ inches in diameter. This size ensures the cookie bakes evenly and has a nice soft center with pleasing edges.
Can I use homemade red velvet cake mix instead of boxed?
While boxed cake mix is convenient and consistent, you can experiment with homemade mixes if you like. Just make sure your batter isn’t too wet, or you may need to adjust baking time and chilling duration accordingly.
Why do I need to chill the dough before baking?
Chilling tightens the dough, which helps maintain the cookie shape and makes rolling easier. It also slows spreading during baking so your cookies have a nice, thick texture instead of flattening out too much.
Final Thoughts
These Red Velvet Blossom Cookies Recipe are truly a joy to make and even more delightful to share. With minimal ingredients and simple steps, you can create a treat that looks like it took hours, bursting with color, texture, and flavors that everyone will crave. So gather your ingredients, roll up your sleeves, and bring a little sparkle to your kitchen and your loved ones’ taste buds with these irresistible cookies!
Print
Red Velvet Blossom Cookies Recipe
- Prep Time: 15 minutes
- Cook Time: 10 minutes
- Total Time: 50 minutes
- Yield: 24 cookies
- Category: Dessert
- Method: Baking
- Cuisine: American
Description
Delightfully soft and festive Red Velvet Blossom Cookies feature a moist red velvet cake mix base, rolled in sugar for a slight crunch, and topped with a classic Hershey’s kiss candy. Perfect for holiday gatherings or anytime you want a tender, chocolaty treat with a touch of elegance.
Ingredients
Cookies
- 1 box red velvet cake mix (15.25 oz.)
- 2 large eggs
- ½ cup unsalted butter, melted
- 1 tsp vanilla extract
- ½ tsp espresso powder (optional)
- 1 cup regular or coarse sugar (for rolling)
- 24 Hershey’s kiss candies or other mini chocolate candies
Instructions
- Prepare the dough: In a mixing bowl, whisk together the eggs, melted butter, and vanilla extract until fully combined. Add the red velvet cake mix and optional espresso powder, stirring until the mixture forms a consistent dough.
- Chill the dough: Cover the dough and chill it in the refrigerator for about 30 minutes. This step firm ups the dough for easier shaping.
- Form and sugar-coat balls: Once chilled, roll the dough into 1½-inch balls. Then, roll each ball in the sugar to coat thoroughly, giving the cookies a sweet, crunchy exterior.
- Bake the cookies: Preheat the oven to 350°F (177°C). Arrange the sugar-coated dough balls on a baking sheet lined with parchment paper, spacing them evenly. Bake for 8-10 minutes until the edges are set, cookies puff up, and slight crinkling begins.
- Add the chocolate kisses: Remove the cookies from the oven and gently press a Hershey’s kiss into the center of each cookie. Allow the cookies to cool completely so the chocolate can set.
- Optional cooling tips: If using Hugs candy kisses, they may melt slightly into the cookie. To prevent this, refrigerate or freeze the cookies until the chocolate sets firmly. Regular Hershey’s kisses will hold their shape when left until fully set at room temperature.
Notes
- Espresso powder is optional but enhances the chocolate flavor.
- Using coarse sugar for rolling adds a crunchy texture on the outside.
- Chilling the dough helps maintain cookie shape and makes rolling easier.
- Let cookies cool fully before storing to keep the chocolate kiss intact.
- Cookies can be stored in an airtight container at room temperature for up to 3 days.
- For a festive touch, use colored sugar or sprinkles instead of plain sugar.


