

If you have been looking for a fresh, fun, and utterly delicious way to enjoy Japanese cuisine at home, then the Delicious Onigiri: Japanese Rice Balls You Can Customize Today Recipe is exactly what you need. These little rice triangles are not only incredibly tasty but also endlessly adaptable, allowing you to tailor each one to your taste buds, making every bite a delightful surprise. Soft, savory, and wrapped in the perfect touch of nori seaweed, these rice balls will quickly become your new favorite snack or meal component.

Ingredients You’ll Need
Getting this recipe right is all about simple, quality ingredients that work together to create that classic onigiri experience. Each element is essential — from the fluffy, medium-grain rice that forms the base to the seasoning that brings the flavor alive, and the nori that adds texture and aroma.
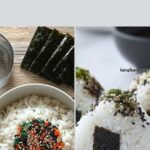
- 2 cups Cooked Rice: Use freshly cooked medium-grain rice for that perfect sticky yet tender texture crucial for molding onigiri.
- 2 tablespoons Furikake: This umami-packed seasoning blend gives the rice its irresistible savory punch.
- 1 cup Water: Keeps your hands wet for smooth shaping without the rice sticking to you.
- 1 teaspoon Kosher Salt: A pinch of salt on your hands enhances the rice’s flavor subtly as you shape it.
- 4 sheets Roasted Nori: Cut into strips, the nori wraps the onigiri providing a satisfying crunch and distinctive taste.
- 2 tablespoons Sesame Seeds (optional): Adds a delicate nutty finish and a bit of crunch when sprinkled on top.
How to Make Delicious Onigiri: Japanese Rice Balls You Can Customize Today Recipe
Step 1: Season the Rice
Start by mixing your freshly cooked medium-grain rice with the furikake seasoning in a bowl. This step infuses the rice with layers of savory flavor, ensuring every bite is packed with delicious umami. Take your time to fold the mixture gently, so the rice grains stay intact and fluffy but are evenly flavored throughout.
Step 2: Prepare for Shaping
Next, pour about a cup of water into a small bowl. This will keep your hands wet while shaping the onigiri, preventing the rice from sticking to your fingers. Sprinkle a small pinch of kosher salt on your wet hands as well to season the outside of the rice balls subtly and bring out the rice’s natural sweetness.
Step 3: Shape Your Onigiri
With your hands ready, scoop up roughly half a cup of the seasoned rice mixture and gently press it into a compact triangle. Don’t press too hard—you want the onigiri to hold its shape but still feel tender and light. For a cleaner look, you can press the sides against a flat surface, shaping crisp edges that make your rice balls look as good as they taste.
Step 4: Wrap with Nori and Add Finishing Touches
Take a strip of roasted nori and wrap it around the base of your perfectly shaped rice triangle. This not only adds a wonderful flavor dimension but also makes the onigiri easier to hold and eat. If you want to add a little extra flair, sprinkle sesame seeds on top at this stage for a tiny crunch and a nutty note that complements the nori beautifully.
Step 5: Serve or Store
Your Delicious Onigiri: Japanese Rice Balls You Can Customize Today Recipe is now ready to enjoy! Eat them fresh for the best texture and flavor, or wrap each rice ball in plastic wrap and store them for later snacking or lunchbox treats.
How to Serve Delicious Onigiri: Japanese Rice Balls You Can Customize Today Recipe
Garnishes
Onigiri is a blank canvas that benefits from fun, colorful garnishes. Pickled umeboshi (Japanese plum), finely sliced scallions, or a sprinkle of toasted sesame seeds can elevate your rice balls from everyday snacks to eye-catching bites. These small touches add bursts of flavor and make your onigiri visually irresistible.
Side Dishes
Serve your onigiri alongside light Japanese sides for a harmonious meal. Miso soup, a simple seaweed salad, or even some pickled vegetables balance the rice balls perfectly, making for a satisfying and wholesome experience that’s easy on the palate but rich in tradition.
Creative Ways to Present
Give your onigiri a personal twist by customizing shapes beyond the classic triangle — think rounds, cylinders, or even cute character shapes for kids. Use bento boxes for an elegant presentation or line them up on a wooden platter surrounded by small dipping sauces like soy sauce or wasabi mayo for an interactive feast that everyone will love.
Make Ahead and Storage
Storing Leftovers
If you happen to have leftovers, wrap each onigiri tightly in plastic wrap and place them in an airtight container to keep the rice moist and fresh. Store them in the refrigerator but try to consume within a day, as rice texture can become firmer when chilled.
Freezing
Onigiri freezes wonderfully and makes a great grab-and-go snack. After shaping and wrapping them individually, pop the rice balls in a freezer-safe bag. When you want to eat one, just thaw it in the fridge overnight or gently microwave it after unwrapping.
Reheating
Reheat your onigiri by microwaving for 30-45 seconds with a damp paper towel covering them to reproduce that soft, steamy freshness. This method helps recover the original tender texture and ensures the rice won’t dry out.
FAQs
Can I use different types of rice for onigiri?
Medium-grain rice is ideal because of its sticky texture, but you can experiment with short-grain rice as well. Long-grain varieties might not hold together as well due to their fluffier nature.
What other fillings can I add inside my onigiri?
Popular fillings include pickled plum (umeboshi), salted salmon, tuna mayo, and cooked vegetables. Feel free to customize your onigiri with ingredients you love to create new flavor combinations.
Is it okay to omit the nori wrap?
Absolutely! Onigiri can be eaten without nori, especially if you’re packing them for later, as the seaweed can get soggy. The rice balls still taste delicious on their own or with other wraps like shiso leaves.
How long can onigiri last at room temperature?
For safety, it’s best to consume onigiri within a few hours if left unrefrigerated, especially in warm environments. Otherwise, refrigerate to extend freshness and eat within one day.
Can I make onigiri vegan or gluten-free?
Yes! By choosing vegan fillings like pickled radish and ensuring the furikake seasoning is gluten-free, you can easily adapt this recipe to suit vegan and gluten-free diets without compromising flavor.
Final Thoughts
There is something wonderfully comforting about making and enjoying your own delicious onigiri. With the Delicious Onigiri: Japanese Rice Balls You Can Customize Today Recipe, you have an approachable, versatile dish that brings a touch of Japanese tradition right to your kitchen. Whether you’re sharing with family or packing lunch for yourself, these rice balls prove that simple ingredients and a bit of love can create meals that truly shine. Give it a try—you’re going to fall in love with every bite!
Print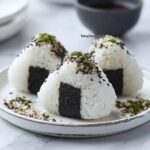
Delicious Onigiri: Japanese Rice Balls You Can Customize Today Recipe
- Prep Time: 10 minutes
- Cook Time: 25 minutes
- Total Time: 35 minutes
- Yield: 4 servings (4 onigiri)
- Category: Snack
- Method: No-Cook
- Cuisine: Japanese
- Diet: Gluten Free
Description
Delicious Onigiri are traditional Japanese rice balls that you can easily customize with your favorite seasonings. This recipe uses medium-grain rice mixed with savory furikake seasoning, formed into perfect triangles, and wrapped with strips of roasted nori seaweed. Sesame seeds add a lovely nutty finish. Perfect as a quick snack or part of a lunchbox, these onigiri are simple to make and enjoy fresh or packed for later.
Ingredients
Rice Mixture
- 2 cups cooked medium-grain rice (freshly cooked)
- 2 tablespoons furikake seasoning blend
- 1 teaspoon kosher salt (for seasoning rice and hands)
For Shaping and Wrapping
- 1 cup water (for wetting hands)
- 4 sheets roasted nori, cut into strips
- 2 tablespoons sesame seeds (optional)
Instructions
- Mix the Rice and Seasoning: In a mixing bowl, combine the freshly cooked medium-grain rice with 2 tablespoons of furikake seasoning. Stir gently until the rice is evenly coated with the flavorful seasoning.
- Prepare Your Hands: Wet your hands with the cup of water, then sprinkle a pinch of kosher salt over them. This prevents sticking and seasons the rice as you shape it.
- Shape the Onigiri: Scoop about 1/2 cup of the seasoned rice into your hands. Gently press the rice into a triangle shape, taking care not to compact it too tightly to keep a light texture.
- Refine the Shape: For a clean look, press the sides of the rice triangle against a flat surface to sharpen the edges and create a neat form.
- Wrap with Nori and Add Sesame Seeds: Take a strip of roasted nori and wrap it around the base of the formed rice triangle. Optionally, sprinkle sesame seeds on top for added texture and flavor.
- Serve or Store: Enjoy your onigiri immediately while fresh, or wrap each rice ball tightly in plastic wrap to keep for later consumption.
Notes
- Use freshly cooked medium-grain rice for the best texture; sushi rice or Japanese short-grain rice works well.
- Wetting your hands helps prevent rice from sticking while forming the balls.
- Furikake seasoning adds umami and saltiness—feel free to experiment with different flavors.
- Onigiri is best eaten the same day it’s made for optimal freshness.
- Sealed in plastic wrap, onigiri can be stored in the refrigerator for up to 24 hours.
- For variation, try adding fillings like pickled plum (umeboshi), tuna mayo, or grilled salmon inside the rice ball before shaping.

