
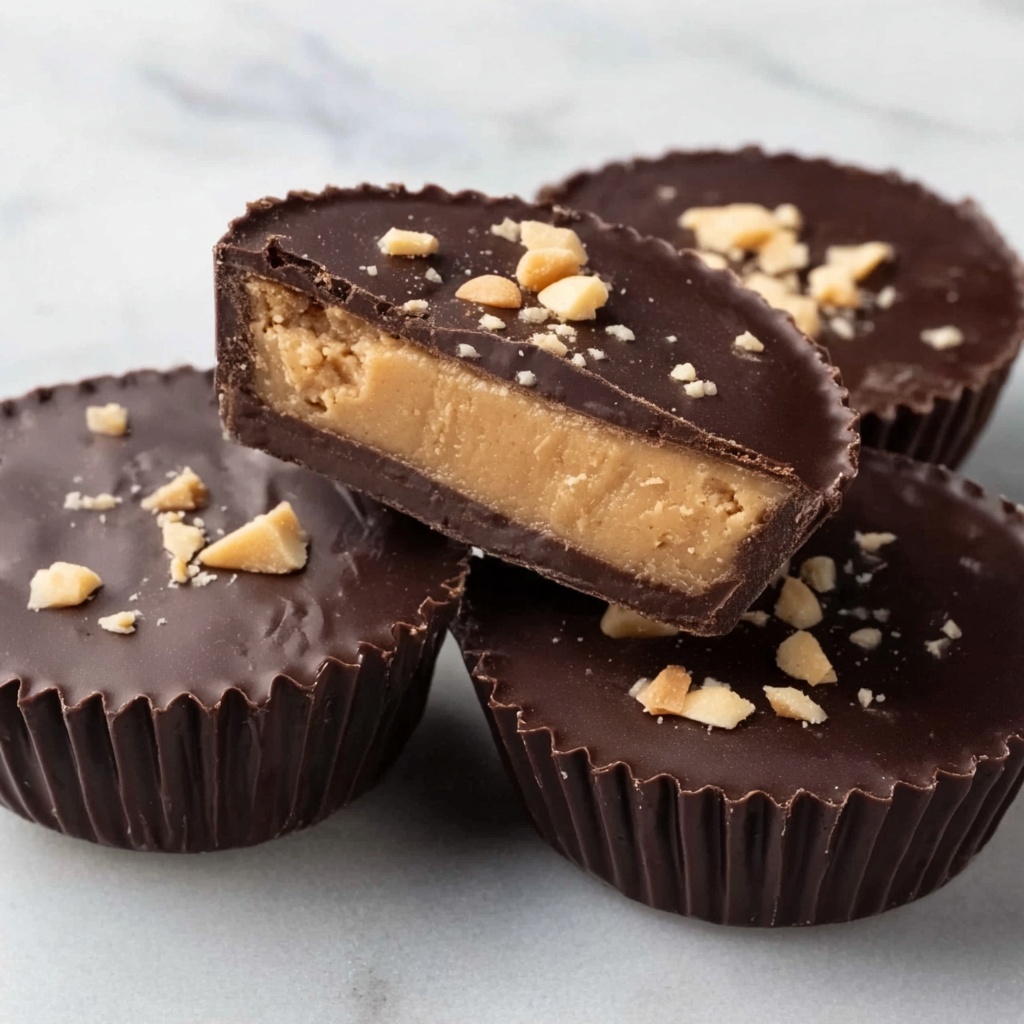
If you have a serious sweet tooth and a soft spot for that perfect blend of chocolate and peanut butter, you are going to absolutely love this Homemade Reese’s Peanut Butter Cups Recipe. With just a handful of wholesome ingredients and a simple step-by-step process, you can create these iconic treats that deliver the same nostalgic taste of the classic candy but with your own homemade touch. They are rich, creamy, and slightly salty-sweet—a delicious combo that melts in your mouth and keeps you coming back for more.
Ingredients You’ll Need
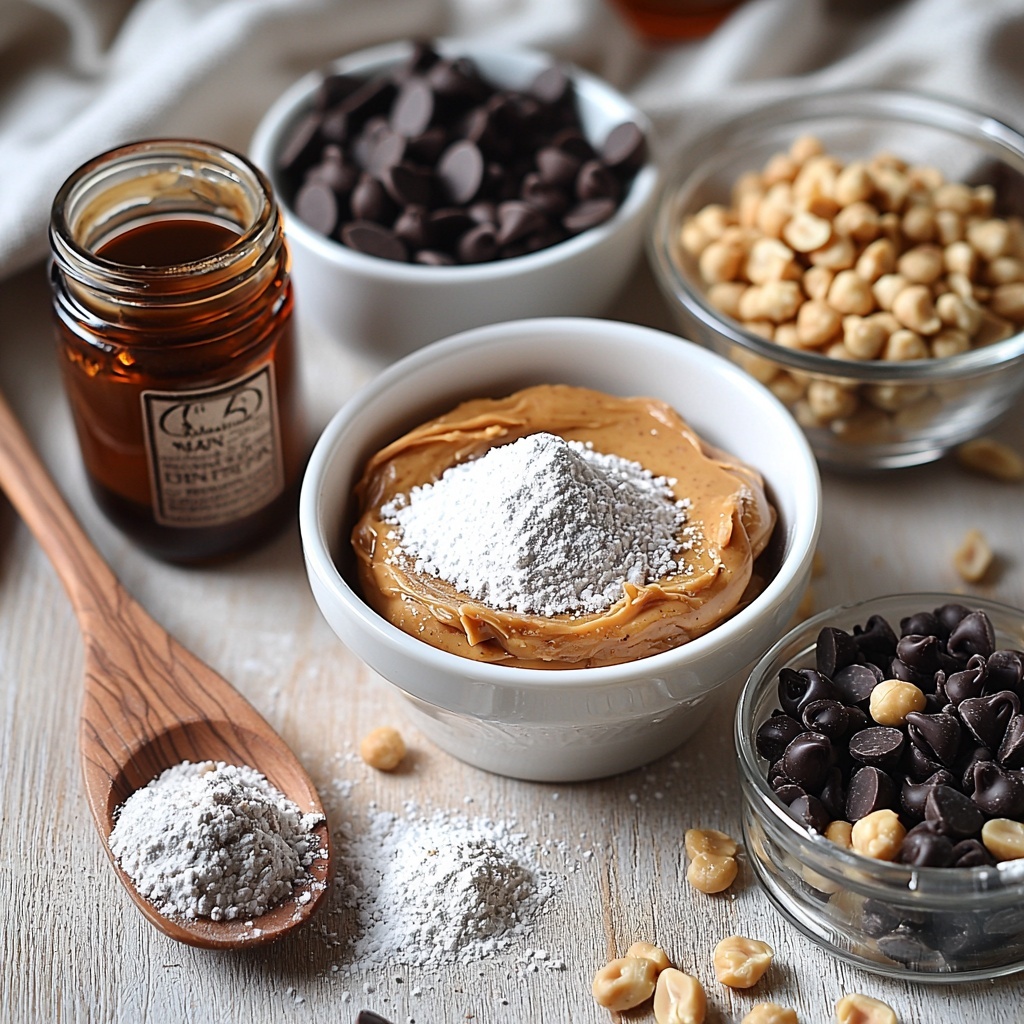
Gathering the right ingredients is the first step in making these delectable peanut butter cups. The simplicity here is the beauty—each component plays a crucial role in crafting the perfect balance of flavors and textures. From creamy peanut butter to silky chocolate, every ingredient shines through.
- 1 cup creamy peanut butter: Provides that signature, smooth and rich peanut flavor that’s central to the recipe.
- 1/4 cup powdered sugar: Adds just the right amount of sweetness while helping to thicken the peanut butter mixture for easy layering.
- 1/2 teaspoon vanilla extract: Brings a subtle warmth and depth to the peanut butter filling.
- 1 1/2 cups chocolate chips: Melts beautifully into a glossy chocolate shell that encases the peanut butter center.
- Optional: 1/4 cup chopped peanuts: Offers a delightful crunch and extra peanut punch when sprinkled on top.
How to Make Homemade Reese’s Peanut Butter Cups Recipe
Step 1: Prepare the Peanut Butter Filling
Start by combining the creamy peanut butter, powdered sugar, and vanilla extract in a mixing bowl. Stir the mixture until it’s completely smooth and well blended. This step is crucial because a silky filling ensures your peanut butter cups have that luscious texture that melts in your mouth.
Step 2: Melt the Chocolate
Next, melt the chocolate chips in a microwave-safe bowl or using a double boiler over simmering water. Stir frequently to achieve a smooth, velvety consistency with no lumps. The melted chocolate forms the delicious outer shell and sealing layer that gives these cups their classic look and taste.
Step 3: Prepare the Molds
Line a muffin tin with cupcake liners or use silicone molds to shape your peanut butter cups. These liners make it easy to remove each cup without sticking and offer a neat presentation. This also means less cleanup and a fun way to serve your treats.
Step 4: Create the Chocolate Base
Pour a small amount of melted chocolate into the bottom of each liner, just enough to cover the surface evenly. This base layer is what the peanut butter filling will rest on, giving each cup that perfect chocolate foundation.
Step 5: Add the Peanut Butter Layer
Spoon the prepared peanut butter mixture on top of the chocolate base in each cup. Spread it out gently to cover the chocolate evenly. This layer is the heart of your Homemade Reese’s Peanut Butter Cups Recipe—the creamy, dreamy center that is pure bliss.
Step 6: Seal with More Chocolate
Pour another layer of melted chocolate over the peanut butter to completely encase it. This sealing layer keeps the filling fresh and holds the cup together for that satisfying bite.
Step 7: Optional Topping for Extra Crunch
If you’re feeling a bit fancy or love a bit of texture, sprinkle chopped peanuts on top of the final chocolate layer while it’s still warm. This little touch adds a delightful crunch and highlights the peanut flavor even more.
Step 8: Chill Until Firm
Place the filled cups in the refrigerator for about 30 minutes to allow the chocolate to harden and the flavors to meld. Once set, your Homemade Reese’s Peanut Butter Cups Recipe is ready to be enjoyed!
How to Serve Homemade Reese’s Peanut Butter Cups Recipe
Garnishes
Serving these peanut butter cups as they are is wonderful, but a light dusting of cocoa powder or a drizzle of melted white chocolate can take presentation to the next level. Fresh mint leaves or a pinch of sea salt sprinkled on top also enhance the flavors beautifully.
Side Dishes
These peanut butter cups shine as a sweet treat alongside a cold glass of milk or a hot cup of coffee. For an indulgent dessert, serve them with vanilla ice cream or fresh berries to balance their richness.
Creative Ways to Present
For parties or gift-giving, arrange these peanut butter cups in decorative tins or wrap them individually in colorful wax paper tied with twine. You can also create mini versions using mini cupcake liners for bite-sized fun snacks everyone will adore.
Make Ahead and Storage
Storing Leftovers
Your homemade peanut butter cups will keep beautifully in an airtight container in the refrigerator for 3-4 days. This short refrigeration ensures they stay fresh and retain that perfect textural contrast between the creamy center and chocolate shell.
Freezing
You can freeze these treats for longer storage by placing them in a sealed, freezer-safe container separated by parchment paper to prevent sticking. They freeze well for up to 2 months and thaw quickly in the fridge before serving.
Reheating
Since these are best enjoyed cold or at room temperature, reheating is not recommended. Simply let frozen peanut butter cups thaw in the refrigerator for a few hours or overnight to bring back their delightful texture without melting.
FAQs
Can I use natural peanut butter for this recipe?
Yes! Natural peanut butter works just fine, but keep in mind it may make the filling a bit looser due to its oil content. You might want to add a touch more powdered sugar to maintain the right consistency.
What kind of chocolate chips should I use?
Choose good-quality semisweet or milk chocolate chips depending on your taste preference. These melt smoothly and provide that classic chocolate flavor that pairs perfectly with peanut butter.
Is it necessary to refrigerate the cups?
Yes, refrigerating for about 30 minutes is key to letting the chocolate set firmly and to keep the cups from melting or becoming too soft at room temperature.
Can I substitute powdered sugar with another sweetener?
Powdered sugar is ideal because it dissolves fully, creating a smooth filling. If you want to experiment, try finely ground coconut sugar or a mild powdered sweetener, but the texture might vary slightly.
How do I prevent the chocolate from melting too quickly?
Store the peanut butter cups in the refrigerator and avoid leaving them out at warm room temperatures for too long. A cool environment keeps the chocolate solid and maintains the perfect firmness.
Final Thoughts
There is something truly satisfying about making your own candy at home, especially when it’s as delicious and nostalgic as this Homemade Reese’s Peanut Butter Cups Recipe. Super simple to whip up, wonderfully indulgent, and sure to impress anyone you share them with, these peanut butter cups are a must-try for every chocolate and peanut butter lover out there. Treat yourself and maybe even a few lucky friends to these marvelous little bites of happiness!
Print
Homemade Reese’s Peanut Butter Cups Recipe
- Prep Time: 10 minutes
- Cook Time: 5 minutes
- Total Time: 40 minutes
- Yield: 12 servings
- Category: Dessert
- Method: No-Cook
- Cuisine: American
Description
Homemade Reese’s Peanut Butter Cups replicate the classic candy at home using simple ingredients. This recipe layers a rich peanut butter mixture between smooth melted chocolate to create a delicious treat perfect for satisfying sweet cravings without artificial additives.
Ingredients
Peanut Butter Mixture
- 1 cup creamy peanut butter
- 1/4 cup powdered sugar
- 1/2 teaspoon vanilla extract
Chocolate Layer
- 1 1/2 cups chocolate chips
Optional Topping
- 1/4 cup chopped peanuts
Instructions
- Prepare Peanut Butter Mixture: In a mixing bowl, combine the creamy peanut butter, powdered sugar, and vanilla extract. Stir well until the mixture is smooth and homogenous, ensuring there are no lumps.
- Melt Chocolate: Place the chocolate chips in a microwave-safe bowl or set up a double boiler. Heat the chocolate in short intervals, stirring regularly until it is fully melted and smooth without any lumps.
- Prepare Muffin Tin: Line a muffin tin with cupcake liners or silicone molds to hold the peanut butter cups, which will make removal easier after setting.
- Create Chocolate Base: Pour a small amount of melted chocolate into the bottom of each liner, just enough to cover the base. This forms the bottom layer of the peanut butter cup.
- Add Peanut Butter Layer: Spoon the prepared peanut butter mixture on top of the chocolate base in each liner. Spread the mixture evenly to create a smooth, flat layer.
- Seal with Chocolate: Cover the peanut butter layer with another layer of melted chocolate, fully sealing the peanut butter inside.
- Add Toppings (Optional): If desired, sprinkle chopped peanuts on the top of the chocolate layer for added texture and flavor.
- Chill: Place the muffin tin in the refrigerator for about 30 minutes or until the chocolate is firm and set.
- Serve: Once firm, remove the peanut butter cups from the liners and enjoy your homemade treats.
Notes
- Use creamy peanut butter for a smooth texture; natural peanut butter may need extra stirring.
- Choose good quality chocolate chips for the best taste and smooth melting.
- For a darker chocolate flavor, use semi-sweet or bittersweet chocolate chips.
- Refrigerate until firm to ensure the cups hold their shape.
- Store leftovers in an airtight container in the refrigerator for up to one week.
- Optional chopped peanuts add a nice crunch but can be omitted for a smoother texture.
