
“`html
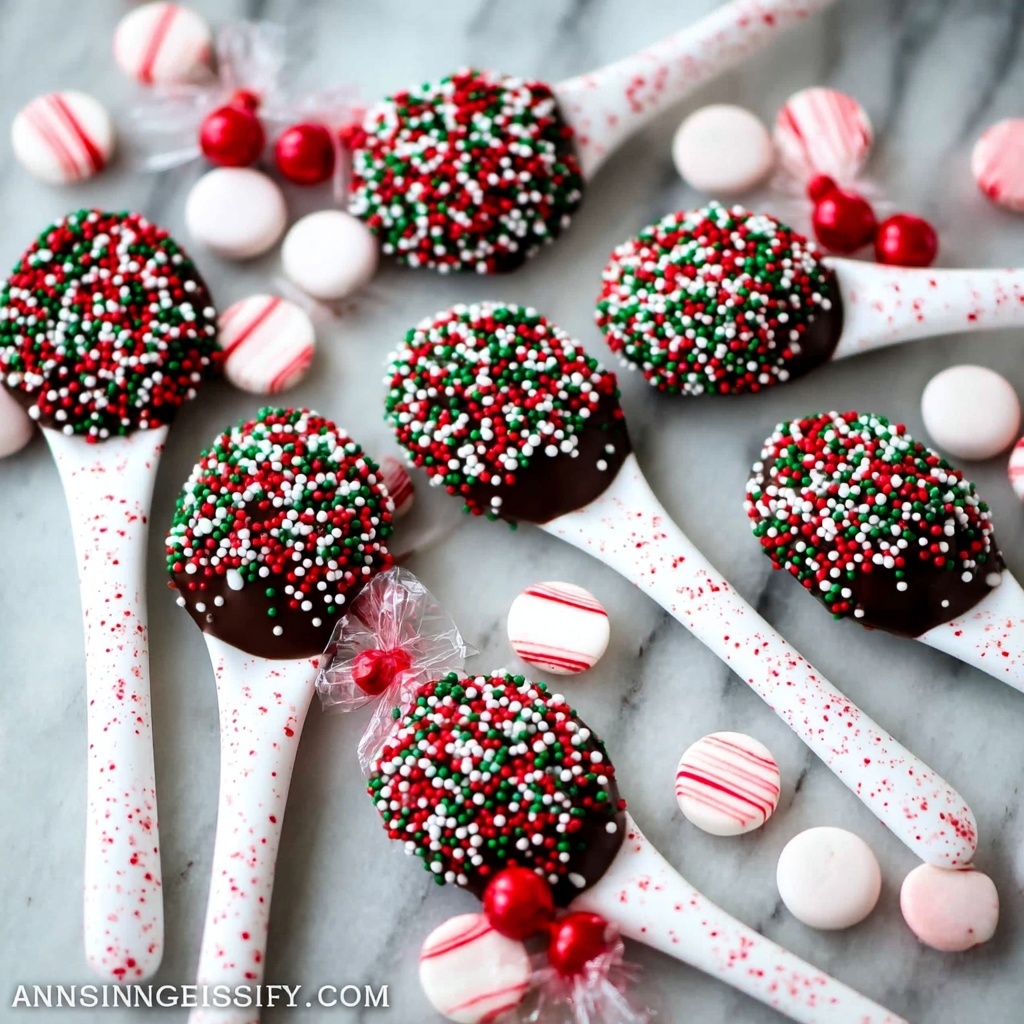
If you’re looking for a festive and delightful treat that combines the cool crunch of peppermint with a fun, edible utensil, this DIY Peppermint Candy Spoons Recipe is an absolute must-try. These charming candy spoons bring nostalgic Starlight Peppermint flavors together with a smooth, melty texture that’s perfect for stirring hot cocoa or just enjoying as a sweet little snack. Whether for holiday gatherings or just to brighten your day, making these spoons is as enjoyable as savoring them.

Ingredients You’ll Need
Gathering your ingredients for this DIY Peppermint Candy Spoons Recipe is a breeze, and each one plays a crucial role in creating that perfect balance of flavor and festive cheer. With minimal pantry staples, you’ll be amazed how these simple items turn into a crowd-pleasing treat.
- 1 bag Starlight Peppermint Candy: These classic peppermints give the spoons their signature cool burst and beautiful red-and-white swirled color.
- 1 bag Wilton Candy Melts: Provides that smooth, creamy coating to dip the spoons, lending richness and a beautiful finish.
- Holiday Sprinkles: Adds a whimsical, colorful crunch when sprinkled on the chocolate-covered spoons, making them as festive as they are tasty.
How to Make DIY Peppermint Candy Spoons Recipe
Step 1: Preheat the Oven and Prepare Peppermints
Start by preheating your oven to 300 degrees Fahrenheit. While it warms up, place your Starlight Peppermint candies into a zip-top bag and crush them into small pieces using a kitchen mallet or rolling pin. This crushing is key because it helps the candies melt evenly and fill the spoon molds perfectly.
Step 2: Fill the Spoon Molds with Crushed Peppermint
Using a teaspoon, carefully fill each spoon mold with the crushed peppermint pieces. Be sure to press extra at the top of the spoon head and the neck area where the spoon handle meets the bowl since those spots are prone to breaking. Filling these areas well will ensure your candy spoons hold up nicely once cooled.
Step 3: Melt the Candy in the Oven
Place the mold on a baking sheet and slide it into the oven. It typically takes about 10 minutes for the peppermints to melt fully, but keep a close eye as all ovens vary. Around the 8-minute mark, check your spoons and add more crushed peppermint to any spots that look thin or uneven—peppermint melts down a lot, so you may need to reinforce them before finishing the melt.
Step 4: Cool and Remove the Candy Spoons
Once melted and merged into smooth candy spoons, carefully remove the mold from the oven and allow it to cool completely. After cooling, gently separate the candy spoons from the mold. If any break during removal, simply patch those areas with more crushed peppermint and pop them back in the oven for a few more minutes to set.
Step 5: Optional Chocolate Dip and Decoration
If you want to take your spoons up a notch, melt the Wilton Candy Melts according to the package directions. Dip the spoon ends into the melted chocolate, then immediately dip into holiday sprinkles for extra color and texture. Place the spoons on wax paper and let the chocolate harden for a gorgeous final touch.
How to Serve DIY Peppermint Candy Spoons Recipe
Garnishes
These peppermint candy spoons shine beautifully on their own but pairing them with whipped cream or a light dusting of cocoa powder on your hot drinks elevates their charm. A sprig of fresh mint or a cinnamon stick in your cup alongside the spoon makes for a delightful sensory experience with every sip and stir.
Side Dishes
Serve these spoons alongside rich hot chocolate, creamy coffee, or even mulled wine for a refreshing peppermint twist. They also make a sweet companion to holiday cookies or fudgy brownies, creating an irresistible dessert spread that guests will rave about.
Creative Ways to Present
Think beyond the cup—arrange the spoons standing in clear mason jars filled with extra crushed candy or festive candy canes. Wrap each spoon in cellophane tied with a vibrant ribbon, turning them into perfect edible gifts or party favors that’ll bring smiles and peppermint joy.
Make Ahead and Storage
Storing Leftovers
If you have leftovers from your DIY Peppermint Candy Spoons Recipe, store them in an airtight container at room temperature. Keep them away from heat sources to prevent melting. Properly stored, these candy spoons will stay fresh and crisp for 3-4 days, ready to enjoy whenever you need a peppermint pick-me-up.
Freezing
While freezing candy spoons isn’t usually necessary, you can if you want to extend their freshness. Wrap each spoon individually in plastic wrap and place them in a freezer-safe bag or container. When you’re ready to enjoy, thaw them gently at room temperature to avoid condensation, which can affect texture.
Reheating
Generally, reheating peppermint candy spoons isn’t recommended, as it can cause them to lose shape or become sticky. Instead, enjoy them cold or at room temperature for the best crisp peppermint crunch. If you want to melt them for recipes, carefully reheat only the amount you plan to use.
FAQs
Can I use other types of mints for the DIY Peppermint Candy Spoons Recipe?
Absolutely! While Starlight Peppermint candies are traditional and provide that classic red-and-white look, feel free to experiment with other hard mints. Just keep in mind that color and flavor might vary slightly.
What type of mold works best for making candy spoons?
Plastic or silicone spoon molds designed for candy making work perfectly. Silicone molds are especially forgiving, making it easier to pop out the spoons without breaking them.
How long does it take for the candy spoons to set completely?
Once removed from the oven, let the spoons cool completely at room temperature. This usually takes about 20-30 minutes, depending on the room temperature and thickness of the spoons.
Can I skip the chocolate dip step?
Definitely! The chocolate dip and sprinkles are optional but add a lovely finishing touch. If you prefer a more straightforward peppermint flavor, the spoons are delicious just as they are.
Are these candy spoons safe to stir into hot drinks?
Yes! These peppermint candy spoons are designed to melt slowly in hot beverages like cocoa or coffee, adding a hint of peppermint and sweetness with every stir. They’re perfect for elevating your warm drinks during the holidays.
Final Thoughts
Making the DIY Peppermint Candy Spoons Recipe is such a joyful experience, from crushing the peppermint candies to watching them melt into perfect little spoons. Whether you’re serving them at a holiday party, gifting them to friends, or simply enjoying a cozy night in, these spoons bring instant festive magic. So, grab your candy melts and peppermint, and treat yourself to this fun, tasty project—you won’t regret it!
“`
Print
DIY Peppermint Candy Spoons Recipe
- Prep Time: 5 minutes
- Cook Time: 10 minutes
- Total Time: 15 minutes
- Yield: 8 peppermint candy spoons
- Category: Dessert
- Method: Baking
- Cuisine: American
Description
These DIY Peppermint Candy Spoons are festive, sweet, and perfect as holiday treats or edible stirrers for hot cocoa and coffee. Made by melting crushed peppermint candies in spoon molds and optionally decorated with chocolate and sprinkles, they offer a delightful peppermint flavor and a fun holiday presentation.
Ingredients
Ingredients
- 1 bag Starlight Peppermint Candy (about 12 oz)
- 1 bag Wilton Candy Melts (any color, about 8 oz)
- Holiday Sprinkles (as desired for decoration)
Instructions
- Preheat Oven: Preheat your oven to 300 degrees Fahrenheit to prepare for melting the peppermint candies safely without burning.
- Crush Peppermint Candies: Place the Starlight peppermint candies into a ziplock bag and crush them finely using a kitchen mallet or rolling pin to ensure even melting within the spoon molds.
- Fill Spoon Molds: Use a teaspoon to fill each cavity of a silicone spoon mold with the crushed peppermint. Add extra crushed peppermint near the top of the spoon section and at the neck where the spoon meets the handle, as these spots are prone to breaking.
- Melt Peppermints: Place the filled spoon molds on a baking sheet and put them into the preheated oven. Let the peppermint candies melt completely, checking around 8 to 10 minutes. When the melts look mostly liquefied, remove and carefully top up any thin areas with more crushed peppermint then return to the oven for a few more minutes.
- Cool Completely: Remove the spoon molds from the oven and allow the peppermint candy to cool and harden fully at room temperature to retain shape.
- Remove Candy Spoons: Carefully separate the sides of the mold and gently pop the peppermint candy spoons out. If any edges break, patch the spots by pressing on some additional crushed peppermint and melting again briefly in the oven.
- Optional Chocolate Decoration: Melt the Wilton Candy Melts according to the package instructions. Dip the ends of the peppermint spoons into the melted chocolate, then immediately dip into holiday sprinkles for a festive touch. Place the decorated spoons on wax paper and let them dry completely before using or gifting.
Notes
- Be sure to fill the spoon molds generously, especially at the neck area, to prevent breaks.
- The melting time can vary with different ovens; watch carefully to prevent burning.
- The candy spoons can be used as edible stirrers for hot drinks like cocoa or coffee.
- Store finished candy spoons in an airtight container at room temperature to prevent moisture from softening them.
- Use silicone molds for easy removal of the candy once hardened.


