
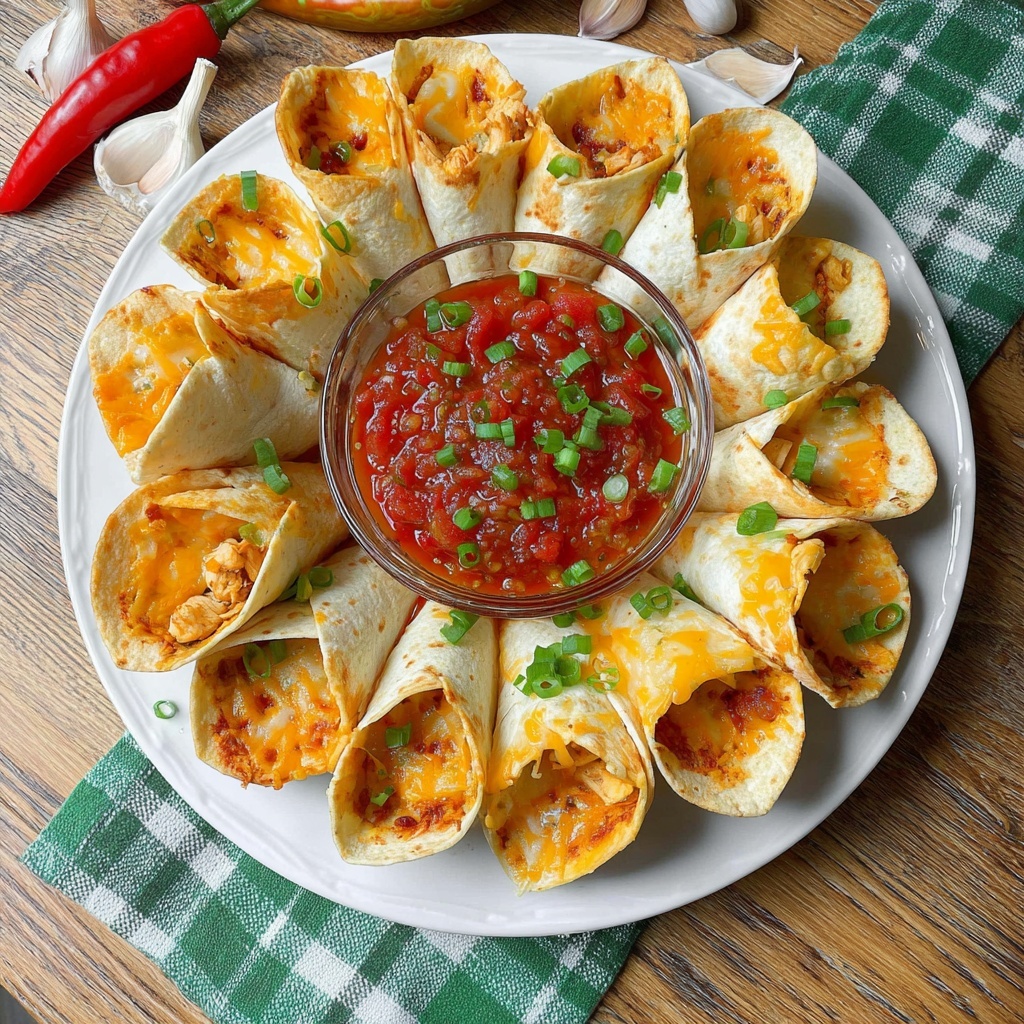
If you are looking for a show-stopping appetizer or a fun main dish to serve your friends and family, the Blooming Chicken Quesadilla Ring Recipe is an absolute must-try. This delightful dish combines tender shredded chicken, melty cheeses, and vibrant sautéed peppers and onions—all wrapped up in a crispy, golden tortilla ring that blooms open like a flower. It’s bursting with flavor and perfect for sharing at any gathering, offering a stunning presentation that tastes even better than it looks!
Ingredients You’ll Need
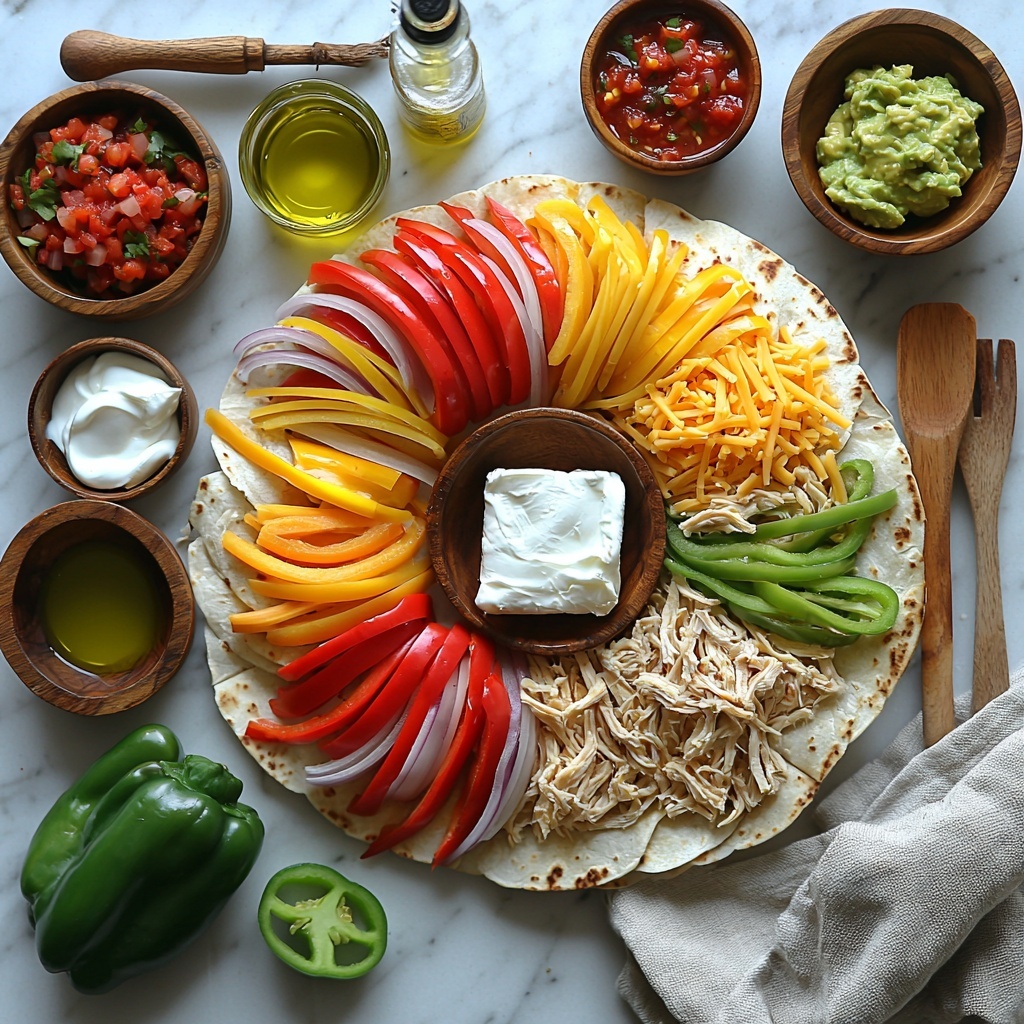
The beauty of this recipe lies in its straightforward and accessible ingredients, each bringing a unique texture and flavor that comes together in perfect harmony. From creamy cheese blends to crisp vegetables and seasoned chicken, every component is essential for creating that irresistible quesadilla ring.
- 2 tablespoons olive oil: For sautéing the vegetables to tender, caramelized perfection.
- 1 medium onion (thinly sliced): Adds sweetness and depth when cooked.
- 2 bell peppers (sliced): Choose a mix of colors for vibrant flavor and eye-catching presentation.
- 8 ounces cream cheese (room temperature): Gives the filling its creamy, rich texture.
- ¼ cup sour cream (or plain Greek yogurt): Adds tanginess that balances the richness.
- 1 tbsp lime juice: Brightens up the filling with citrusy zest.
- ¼ cup mozzarella cheese (shredded): For gooey, melty goodness.
- ¼ cup cheddar cheese (shredded): Delivers sharpness and color contrast.
- 1 ½ tbsp taco seasoning: Infuses a spicy, smoky kick to the chicken filling.
- 3 cups cooked chicken (shredded): Rotisserie or homemade—provides hearty, protein-packed substance.
- 12 medium flour tortillas (10″ – 12″ size): The sturdy base that holds everything together.
- Additional ¼ cup cheddar and ¼ cup mozzarella cheese (shredded): For topping and extra cheesiness.
- Cooking spray: Helps the tortillas crisp up beautifully in the oven.
- 3 green onions (thinly sliced): For a fresh, mild onion garnish that adds a pop of green.
- Salsa, guacamole, and sour cream: Essential dippables that elevate each bite.
How to Make Blooming Chicken Quesadilla Ring Recipe
Step 1: Prepare the Vegetables
Start by heating olive oil in a skillet over medium heat. Add the thinly sliced onion and colorful bell peppers, sautéing them until they soften and turn golden brown, which takes about 5 to 6 minutes. These cooked veggies will add a wonderful sweetness and slight char that bring incredible flavor and texture to your quesadilla ring.
Step 2: Make the Creamy Chicken Filling
While the veggies cook, combine cream cheese, sour cream, lime juice, mozzarella, cheddar, and taco seasoning in a large bowl. Stir them into a luscious, smooth mixture. Then gently fold in the shredded chicken and the cooled veggies, making sure everything is evenly coated with that rich, spiced cream cheese blend.
Step 3: Prep the Tortillas and Fill
Slice the tortillas in half to create smaller, manageable cones perfect for assembling the ring. Spoon about 1.5 to 2 tablespoons of chicken filling onto each tortilla half, spreading it evenly but leaving a small border near the edges—this helps with rolling without spillage.
Step 4: Roll and Arrange the Quesadilla Cones
Roll the filled tortillas into tight cones that hold together but aren’t overly squished. Position a small bowl in the center of your baking sheet or pizza tray. Arrange half the cones around the bowl with their pointed ends facing inward—this is your base layer that shapes the iconic ring.
Step 5: Layer and Cheese
Sprinkle half of the shredded cheddar and mozzarella cheese over the base layer of cones. Add the remaining cones on top to create a second layer, then sprinkle the rest of the cheese blend to ensure a melty, browned topping. Finally, remove the bowl carefully to reveal your beautiful blooming shape.
Step 6: Bake to Golden Perfection
Give the edges of the tortillas a light spritz with cooking spray to help them crisp up nicely. Bake the assembled quesadilla ring at 375℉ for 15 to 20 minutes until the cheese is bubbling and the tortilla edges are irresistibly crispy and golden brown.
Step 7: Garnish and Serve
After baking, transfer the quesadilla ring to a serving platter, garnish with thinly sliced green onions for a fresh touch, and place a bowl of your favorite salsa right in the center. Add sour cream and guacamole on the side for dipping—this completes the experience with cool, creamy contrast.
How to Serve Blooming Chicken Quesadilla Ring Recipe
Garnishes
Thinly sliced green onions are a fantastic garnish that adds a mild crunch and fresh herbal note. You can also sprinkle some chopped cilantro or even a dash of smoked paprika for color and a smoky hint that complements the filling wonderfully.
Side Dishes
The quesadilla ring stands out on its own but pairs beautifully with light, refreshing sides like a crisp mixed green salad, Mexican street corn (elote), or a simple black bean and corn salad. These add a fresh, vibrant contrast to the cheesy richness.
Creative Ways to Present
To amp up the wow factor, serve the quesadilla ring on a colorful platter surrounded by small bowls of various salsas, guacamole, and sour cream. Consider sprinkling extra shredded cheese or diced tomatoes on top just before serving for an extra pop of color and flavor. It also makes a delightful centerpiece for any party.
Make Ahead and Storage
Storing Leftovers
Store any leftover quesadilla ring in an airtight container in the refrigerator for up to 3 days. Keeping the fillings moist yet firm helps maintain the best texture for reheating.
Freezing
You can freeze the assembled and baked quesadilla ring by wrapping it tightly in plastic wrap and then aluminum foil, storing for up to one month. Freeze it before garnishing to preserve freshness.
Reheating
For best results, reheat leftovers in a preheated oven at 350℉ until warmed through and crispy again, about 10 to 15 minutes. Avoid microwaving if you want to keep that perfect crunch on the tortillas.
FAQs
Can I use other types of cheese for the quesadilla ring?
Absolutely! While mozzarella and cheddar work perfectly for their meltability and flavor, feel free to experiment with Monterey Jack, Pepper Jack, or even a blend of Mexican cheeses to suit your taste preferences.
Is it okay to use corn tortillas instead of flour tortillas?
Flour tortillas are recommended for this recipe because they’re more pliable and hold the filling better when rolled into cones. Corn tortillas tend to be less flexible and may crack during assembly or baking.
Can I make this recipe vegetarian?
Definitely! Simply swap the shredded chicken for cooked beans, sautéed mushrooms, or a medley of seasoned vegetables to keep the filling hearty and flavorful without meat.
How spicy is the Blooming Chicken Quesadilla Ring Recipe?
The spice level largely depends on the taco seasoning you use. If you prefer mild, use a seasoning blend with little to no chili powder. For more heat, choose a spicier mix or add fresh jalapeño slices to the filling.
Can I prepare the quesadilla ring ahead of time and bake it later?
Yes! You can assemble the ring up to the point before baking and refrigerate it overnight. Just add cooking spray right before baking for the best crispiness and bake as directed.
Final Thoughts
There is something truly magical about the Blooming Chicken Quesadilla Ring Recipe—its stunning shape, loaded filling, and perfect crispy texture all come together to create an unforgettable dish. Whether you’re cooking for a party or a cozy meal at home, this recipe is sure to impress and satisfy. Give it a try and watch your loved ones gather eagerly to share every cheesy, flavorful bite!
Print
Blooming Chicken Quesadilla Ring Recipe
- Prep Time: 15 minutes
- Cook Time: 20 minutes
- Total Time: 35 minutes
- Yield: 24 servings
- Category: Appetizer
- Method: Baking
- Cuisine: Tex-Mex
Description
This Blooming Chicken Quesadilla Ring is a fun and delicious appetizer perfect for gatherings. Layers of flour tortillas are filled with a savory mix of sautéed onions and bell peppers, seasoned shredded chicken, cream cheese, sour cream, and melted cheddar and mozzarella cheeses. Baked to golden perfection, this ring serves 24 and pairs wonderfully with salsa, guacamole, and sour cream for dipping.
Ingredients
Vegetables and Aromatics
- 1 medium onion, thinly sliced
- 2 bell peppers (red, yellow, green, or orange, sliced)
- 3 green onions, thinly sliced (for garnish)
Dairy
- 8 ounces cream cheese, at room temperature (1 brick, 250 grams)
- ¼ cup sour cream (or plain Greek yogurt)
- ¼ cup shredded mozzarella cheese
- ¼ cup shredded cheddar cheese
- Additional ¼ cup shredded cheddar cheese
- Additional ¼ cup shredded mozzarella cheese
Protein
- 3 cups cooked shredded chicken (rotisserie or homemade)
Other Ingredients
- 2 tablespoons olive oil
- 1 tablespoon lime juice
- 1 ½ tablespoons taco seasoning
- 12 medium flour tortillas (10″ – 12″)
- Cooking spray or oil (for brushing edges)
- Salsa (for serving)
- Guacamole (for serving)
- Sour cream (for serving)
Instructions
- Preheat Oven: Set your oven to 375℉ and line a large baking sheet or pizza tray with parchment paper or lightly grease it with foil to prevent sticking.
- Sauté Vegetables: Heat 2 tablespoons of olive oil in a large skillet over medium heat. Add the thinly sliced onion and bell peppers. Cook, stirring often, until softened and golden brown, about 5-6 minutes. Remove from heat and allow to cool.
- Prepare Chicken Filling: In a large bowl, combine the cream cheese, sour cream, lime juice, ¼ cup shredded mozzarella, ¼ cup shredded cheddar cheese, and taco seasoning. Mix until smooth and evenly blended.
- Combine Filling Ingredients: Add the shredded cooked chicken and cooled sautéed vegetables to the cheese mixture. Stir gently to combine evenly, ensuring all components are well incorporated.
- Prepare Tortillas: Slice each of the 12 flour tortillas in half, creating 24 halves.
- Fill Tortillas: Spoon about 1.5 to 2 tablespoons of the chicken mixture onto each tortilla half, spreading it evenly and leaving a small border around the edges to prevent filling from spilling.
- Roll Tortillas: Roll each filled tortilla half tightly into a cone shape. Ensure they are snug but not overly pressed to avoid filling leakage.
- Arrange Base Layer: Place a small round bowl in the center of the prepared baking sheet. Arrange half of the rolled tortilla cones around the bowl with points touching it to form the ring’s base.
- Add Cheese Layer: Sprinkle half of the remaining ¼ cup shredded cheddar and ¼ cup shredded mozzarella cheese over the base layer of cones.
- Arrange Top Layer: Place the remaining cones on top, aligning them evenly to form a second layer, then sprinkle the remaining cheddar and mozzarella cheeses on top. Remove the center bowl carefully.
- Prepare for Baking: Lightly coat the edges of the tortilla cones with cooking spray or brush with oil to promote crispiness during baking.
- Bake: Place the quesadilla ring in the oven on the middle rack. Bake for 15-20 minutes or until cheese is melted and edges of the tortillas turn crispy and golden brown.
- Garnish and Serve: Carefully transfer the baked quesadilla ring to a serving platter. Garnish with thinly sliced green onions if desired.
- Add Dips: Fill a small bowl with salsa and place it in the center of the ring. Serve with additional small bowls of sour cream and guacamole for dipping. Enjoy your delicious appetizer!
Notes
- For the chicken, rotisserie chicken works great for convenience, but homemade cooked shredded chicken is equally good.
- You can substitute the sour cream with plain Greek yogurt for a tangier flavor and added protein.
- Feel free to mix different colored bell peppers for a colorful presentation.
- Make sure cream cheese is at room temperature to ensure smooth mixing.
- If you prefer a spicier kick, increase the taco seasoning or add chopped jalapeños to the filling.
- Cooking spray can be replaced with a light brush of olive oil for crispier edges.
- Serve immediately for best texture; leftovers can be reheated but may lose some crispiness.


