

If you’re craving a fun, flavorful meal that feels both comforting and exciting, this Baked Chicken Tacos Recipe is exactly what you need. Imagine tender, seasoned shredded chicken wrapped in crispy, golden corn tortillas that have been baked to perfection and layered with a beautiful blend of Colby-jack and Pepper-Jack cheeses. Each bite bursts with a delightful combination of textures and tastes, all topped off with fresh salsa, guacamole, and a sprinkle of cilantro for that extra zing. It’s a guaranteed crowd-pleaser that’s quick to prepare and perfect for any casual get-together or weeknight dinner.
Ingredients You’ll Need
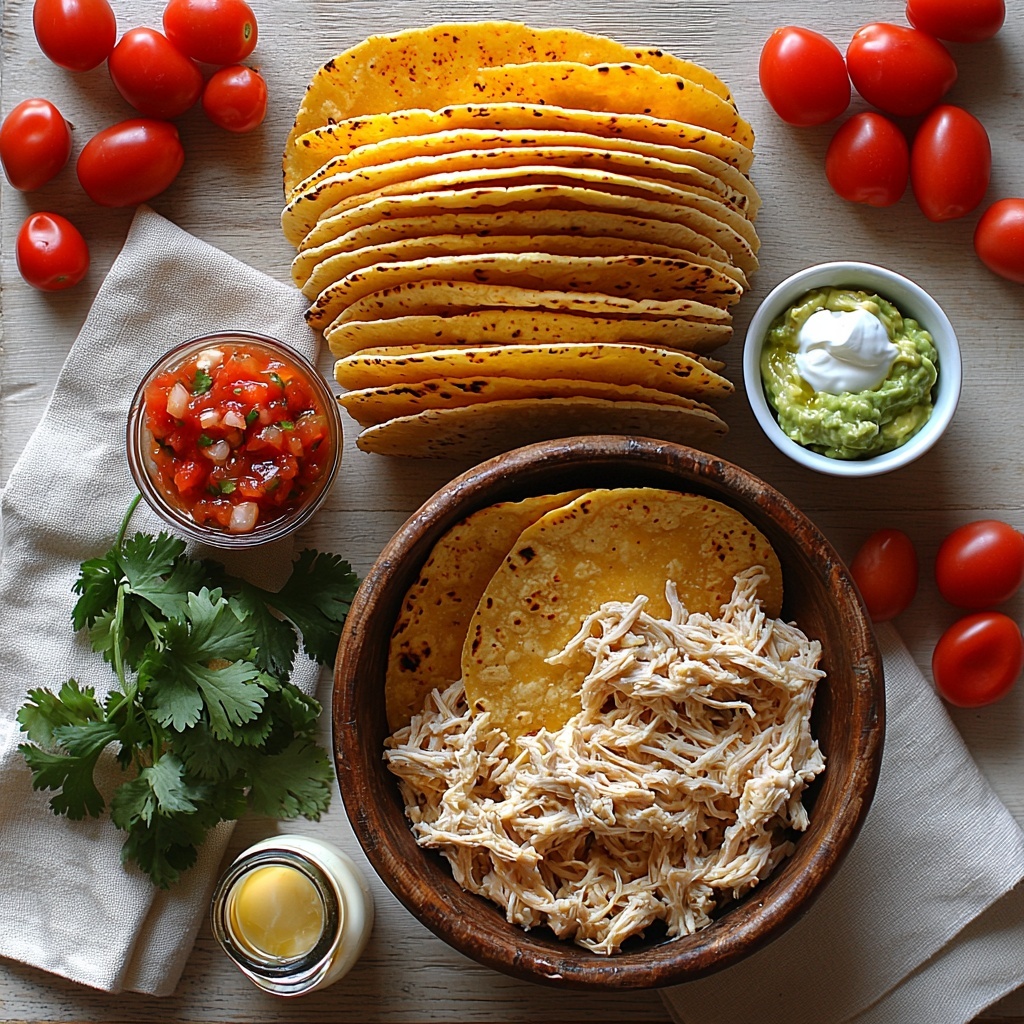
These ingredients are simple but essential, coming together to create a wonderful balance of savory, creamy, and fresh flavors. Each item plays a part—from the melty mix of cheeses adding richness, to the corn tortillas delivering that perfect crunch, and the toppings bringing refreshing brightness and creaminess.
- 1 lb. cooked, seasoned shredded chicken: The heart of your tacos, packed with flavor and protein.
- 1 ½ cups freshly grated Colby-jack cheese: Adds a mild, creamy meltiness that complements the chicken.
- 1 ½ cups freshly grated Pepper-Jack cheese: Provides a little kick and spice to keep things exciting.
- 20 street taco corn tortillas: Smaller than regular tortillas, these offer a wonderful crispy base when baked.
- Olive oil or olive oil cooking spray: Helps crisp the tortillas to golden perfection without extra heaviness.
- Salsa: Adds vibrant color and tangy brightness to cut through the richness.
- Diced tomato: Freshens up each bite with juicy bursts of flavor.
- Guacamole: Creamy and rich, offering a cool contrast to the spices.
- Sour cream: Adds smooth coolness and balances the heat.
- Cilantro: The finishing touch that brings freshness and herbaceous notes.
How to Make Baked Chicken Tacos Recipe
Step 1: Prepare Your Oven and Tortillas
Start by heating your oven to 425 degrees Fahrenheit. Line two large baking sheets with parchment paper to keep the tacos from sticking and to make clean-up a breeze. Lay your corn tortillas flat on the sheets, then brush both sides lightly with olive oil. This step is crucial because it helps the tortillas become beautifully crisp when baked, setting the stage for that perfect taco crunch.
Step 2: Add the Chicken and Cheese
Next, place about two tablespoons of the cooked, seasoned shredded chicken down the center of each tortilla. Then pile on two heaping tablespoons of the grated cheese blend — the marriage of creamy Colby-jack and spicy Pepper-Jack ensures every bite has layers of flavor. Don’t worry if it looks like a lot; it all melts beautifully inside the folded tacos.
Step 3: Bake, Fold, and Crisp
Bake these open-faced for about 2 minutes, just until the cheese starts to melt and bubble. Then, carefully remove the baking sheets from the oven and fold each tortilla in half, gently pressing them together to form the classic taco shape. Return them to the oven and bake for an additional 12 to 14 minutes. This step crisps the tortilla exterior to perfection, encasing the melty cheese and savory chicken inside a crunchy, golden shell. Once done, they’re ready to be dressed with your favorite fresh toppings.
How to Serve Baked Chicken Tacos Recipe
Garnishes
The beauty of this Baked Chicken Tacos Recipe is in how the fresh garnishes elevate every bite. Spoon on some tangy salsa, add a few diced tomatoes for juicy freshness, dollop creamy guacamole and sour cream, and sprinkle cilantro leaves atop for an herby pop of color. These garnishes add brightness, creaminess, and a vibrant texture contrast that make the tacos truly irresistible.
Side Dishes
To turn this into a full meal, consider simple sides like Mexican rice, refried beans, or a crisp, refreshing cabbage slaw. Each offers a complementary texture and flavor that pairs wonderfully with the rich, crispy tacos, while keeping the meal balanced and satisfying.
Creative Ways to Present
For a fun twist, serve your Baked Chicken Tacos Recipe in a large platter with multiple dips and toppings arranged like a festive taco bar. Let everyone customize their tacos with extra cheese, hot sauce, pickled jalapeños, or crunchy lettuce. You can even try mini taco boats as an appetizer version for parties — the crispy, folded tortillas work great for casual serving and easy picking.
Make Ahead and Storage
Storing Leftovers
Leftover tacos store well in an airtight container in the refrigerator for up to 3 days. To keep them crispy, try placing a paper towel between layers to absorb moisture. When ready to eat, a quick reheat in the oven or toaster oven will revive their crunch beautifully.
Freezing
You can freeze these tacos after they’ve been baked and cooled by wrapping each one individually in foil or plastic wrap, then placing them in a freezer-safe container or bag. They’ll keep for up to 2 months and make for a convenient, ready-made meal whenever hunger strikes.
Reheating
To reheat, preheat your oven to 350 degrees Fahrenheit and bake the frozen or refrigerated tacos for about 10 to 15 minutes until warmed through and crispy again. Avoid the microwave if possible, as it softens the tortillas and loses that signature crunch we love in this Baked Chicken Tacos Recipe.
FAQs
Can I use raw chicken instead of cooked for this recipe?
This recipe works best with pre-cooked, seasoned shredded chicken to keep the taco assembly quick and ensure even cooking. If you want to start with raw chicken, cook and season it thoroughly before shredding and assembling the tacos.
What if I don’t have Pepper-Jack cheese?
No worries! You can substitute Pepper-Jack with Monterey Jack or even a mild cheddar for a similar melty texture, though you’ll lose a bit of that spicy kick. You can always add some chili powder or hot sauce to bring back the heat.
Are corn tortillas the only option?
While this recipe shines with corn tortillas for their authentic flavor and crispness, you can experiment with flour tortillas too. Just note that they tend to soften rather than crisp, giving you a different texture but still delicious tacos.
How do I make these tacos dairy-free?
Simply skip the cheeses and consider adding avocado slices or a dairy-free cheese alternative to keep that creamy element. The chicken and toppings still create flavorful tacos that everyone will love.
Can I prepare this recipe for a large crowd?
Absolutely! This Baked Chicken Tacos Recipe is perfect for scaling up. Just multiply the ingredients accordingly and use multiple baking sheets in the oven. They’re great for parties because they’re easy to assemble and serve.
Final Thoughts
This Baked Chicken Tacos Recipe has quickly become one of my top go-to meals when I want something both delicious and easy to prepare. Its crispy texture, melty cheese, and vibrant toppings make each bite a little celebration. Trust me, once you try these tacos, you’ll find yourself reaching for them again and again, sharing the joy with friends and family. So, go on—give this recipe a whirl and treat yourself to some taco bliss tonight!
Print
Baked Chicken Tacos Recipe
- Prep Time: 10 minutes
- Cook Time: 15 minutes
- Total Time: 25 minutes
- Yield: 20 tacos
- Category: Dinner
- Method: Baking
- Cuisine: Mexican
- Diet: Gluten Free
Description
These Baked Chicken Tacos are a delicious and easy-to-make meal featuring seasoned shredded chicken, a blend of melted cheeses, and crispy corn tortillas baked to perfection. Topped with fresh salsa, diced tomatoes, guacamole, sour cream, and cilantro, they bring vibrant flavors and satisfying textures to your table in under 30 minutes.
Ingredients
Main Ingredients
- 1 lb. cooked, seasoned shredded chicken
- 1 ½ cups freshly grated Colby-jack cheese
- 1 ½ cups freshly grated Pepper-Jack cheese
- 20 street taco corn tortillas
- Olive oil or olive oil cooking spray
Toppings
- Salsa
- Diced tomato
- Guacamole
- Sour cream
- Cilantro
Instructions
- Preheat Oven and Prepare Tortillas: Heat your oven to 425 degrees Fahrenheit and line two large baking sheets with parchment paper. Lay the street taco corn tortillas flat on the baking sheets and brush both sides lightly with olive oil or olive oil cooking spray to ensure crispiness when baked.
- Assemble Tacos: Place approximately two tablespoons of the cooked, seasoned shredded chicken down the center of each tortilla. Top the chicken with two heaping tablespoons of the freshly grated Colby-jack and Pepper-Jack cheese mixture for a flavorful cheesy layer.
- Bake to Melt Cheese: Bake the assembled tacos in the preheated oven for about 2 minutes, just enough time for the cheese to melt nicely over the chicken without overcooking the tortillas.
- Fold and Crisp Tacos: Carefully remove the tacos from the oven and fold each tortilla in half, gently pressing them together to form a taco shape. Return the folded tacos to the baking sheets and bake for an additional 12 to 14 minutes, or until the tortillas become crispy and golden on the outside.
- Serve with Toppings: Remove the crispy baked chicken tacos from the oven and serve immediately. Enhance the flavor by adding your favorite toppings such as salsa, diced tomatoes, guacamole, sour cream, and fresh cilantro for a bright, fresh finish.
Notes
- For extra crispiness, make sure to evenly brush oil on both sides of the tortillas before baking.
- You can substitute Colby-jack and Pepper-Jack cheeses with Monterey Jack or cheddar if preferred.
- Use freshly cooked and well-seasoned chicken to enhance the taco flavor.
- Adjust baking times slightly based on your oven’s heat distribution.
- These tacos are best enjoyed fresh out of the oven for optimal texture and taste.


