

If you’ve ever missed the warm, comforting feeling of homemade bread while avoiding gluten, you’re in for a treat with this Classic Gluten-Free White Sandwich Bread Recipe. It’s the kind of bread that brings that soft, pillowy texture and subtle sweetness you crave, without any of the gluten. Perfect for sandwiches, toast, or just enjoying plain with a pat of butter, this recipe effortlessly combines simple pantry staples into a loaf that feels both familiar and wonderfully satisfying.

Ingredients You’ll Need
Getting the perfect loaf starts with straightforward, essential ingredients that each play their part in flavor, texture, and structure. Their simplicity is what makes this Classic Gluten-Free White Sandwich Bread Recipe so accessible and reliable every time.
- 2 cups gluten-free all-purpose flour: The base that holds your bread together and ensures it’s tender and light without gluten’s stretch.
- 1 tablespoon sugar: Adds a touch of sweetness and helps the yeast get going for that perfect rise.
- 1 teaspoon salt: Enhances flavor and balances the sweetness, making every bite more satisfying.
- 1 tablespoon active dry yeast: The magic ingredient that creates airy bubbles and gives your bread that classic rise.
- 1 cup warm water: Activates the yeast and moistens the dough, resulting in a soft crumb.
- 2 tablespoons olive oil: Keeps the bread tender and adds a subtle richness.
- 2 eggs: Help bind ingredients and contribute to a nice, golden crust.
How to Make Classic Gluten-Free White Sandwich Bread Recipe
Step 1: Prepare Your Oven and Pan
Start by preheating your oven to 375°F (190°C) and greasing a loaf pan thoroughly. This step ensures your bread doesn’t stick and bakes evenly with a golden crust. It sets the stage for everything that follows.
Step 2: Mix Dry Ingredients
In a large bowl, whisk together the gluten-free flour, sugar, salt, and active dry yeast. Combining these dry ingredients first allows the yeast to disperse evenly, which supports a consistent rise throughout the loaf.
Step 3: Add Wet Ingredients and Form Dough
Next, pour in the warm water, olive oil, and eggs. Stir gently but thoroughly until the mixture forms a smooth, slightly sticky dough. The warmth of the water is crucial here — it wakes up the yeast to start creating those lovely bubbles that give this Classic Gluten-Free White Sandwich Bread Recipe its texture.
Step 4: Transfer Dough to Pan
Carefully spoon the dough into your greased loaf pan. Use a spatula to smooth the top evenly, which helps your bread bake uniformly and develop that inviting crust we all love.
Step 5: Bake to Golden Perfection
Bake for about 40 minutes, or until the bread is a deep golden brown and sounds hollow when you tap the bottom of the pan. This auditory check is a baker’s secret to ensure the loaf is cooked through without drying out.
Step 6: Cool Before Slicing
Let the bread cool in the pan for 10 minutes, then move it to a wire rack to cool completely. This pause is key because it helps the loaf set properly, making slicing easier and cleaner without crumbling.
How to Serve Classic Gluten-Free White Sandwich Bread Recipe
Garnishes
This bread is beautiful on its own but can be elegantly enhanced with a sprinkle of seeds like sesame or poppy on the crust before baking. For serving, a slather of butter, honey, or a sprinkle of flaky sea salt brings out the bread’s subtle flavors perfectly.
Side Dishes
Pair your sandwich bread with fresh soups, vibrant salads, or hearty roasted veggies. Because this Classic Gluten-Free White Sandwich Bread Recipe has a mild taste, it complements everything from savory dips to sweet jams without overpowering either.
Creative Ways to Present
Transform this bread into finger sandwiches for your next gathering or toast slices and top them with avocado and a dash of chili flakes for a trendy brunch treat. You can also use it as the base for grilled cheese sandwiches that hold together beautifully thanks to the moist, tender crumb.
Make Ahead and Storage
Storing Leftovers
Keep leftover bread in an airtight container or wrapped tightly in plastic wrap at room temperature for up to three days. This helps maintain softness without drying out, making it easy to enjoy a fresh slice anytime.
Freezing
This Classic Gluten-Free White Sandwich Bread Recipe freezes wonderfully. Wrap the loaf tightly in plastic wrap and then in aluminum foil before placing it in a freezer bag. It will keep for up to two months without losing quality.
Reheating
To revive frozen or day-old bread, slice as needed and toast it lightly or warm in a 350°F oven for 5 to 10 minutes. This brings back the fresh-baked aroma and softness that makes homemade bread so irresistible.
FAQs
Can I use a different type of gluten-free flour?
Yes! A well-balanced gluten-free all-purpose flour blend is best for this recipe, but if you have a preferred mix that includes xanthan gum or another binder, it should work just fine to achieve a similar texture.
Do I need to let the dough rise before baking?
This recipe does not call for a traditional rise time because gluten-free dough behaves differently. The yeast activates during baking, giving the bread a good lift without extra waiting.
Can I make this bread dairy-free?
Absolutely. This recipe is already dairy-free if you stick to the olive oil and avoid butter or milk. It’s perfect for those with dairy sensitivities.
Will this bread taste like regular white bread?
While it won’t have the exact same texture as traditional wheat bread, this Classic Gluten-Free White Sandwich Bread Recipe is delightfully soft and mildly sweet, capturing the spirit of classic white bread in a gluten-free form.
Can I add herbs or spices to the dough?
Definitely! Feel free to mix in dried herbs like rosemary or thyme, or spices such as garlic powder, to customize the flavor and make this bread your own.
Final Thoughts
There is something genuinely heartwarming about baking your own bread, especially when it fits your dietary needs without sacrificing flavor or texture. This Classic Gluten-Free White Sandwich Bread Recipe invites you to enjoy homemade bread’s simple pleasure any day of the week. Give it a try — your kitchen will smell amazing, and your taste buds will thank you!
Print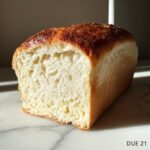
Classic Gluten-Free White Sandwich Bread Recipe
- Prep Time: 15 minutes
- Cook Time: 40 minutes
- Total Time: 55 minutes
- Yield: 1 loaf (approximately 10 slices)
- Category: Bread
- Method: Baking
- Cuisine: American
- Diet: Gluten Free
Description
A delicious and easy-to-make classic white sandwich bread recipe using gluten-free all-purpose flour. This bread is soft, golden brown, and perfect for sandwiches or toast.
Ingredients
Dry Ingredients
- 2 cups gluten-free all-purpose flour
- 1 tablespoon sugar
- 1 teaspoon salt
- 1 tablespoon active dry yeast
Wet Ingredients
- 1 cup warm water
- 2 tablespoons olive oil
- 2 eggs
Instructions
- Preheat Oven and Prepare Pan: Preheat your oven to 375°F (190°C). Grease a loaf pan to prevent sticking and ensure even baking.
- Mix Dry Ingredients: In a mixing bowl, combine the gluten-free all-purpose flour, sugar, salt, and active dry yeast. Stir well to evenly distribute the ingredients.
- Add Wet Ingredients and Form Dough: Add the warm water, olive oil, and eggs to the dry mix. Stir and mix thoroughly until a smooth dough forms without lumps.
- Transfer Dough to Loaf Pan: Pour or spoon the dough into the greased loaf pan. Use a spatula to smooth the top evenly for uniform baking.
- Bake the Bread: Place the loaf pan in the preheated oven and bake for 40 minutes or until the bread turns golden brown and sounds hollow when tapped on the bottom, indicating it is fully baked.
- Cool the Bread: Remove the bread from the oven and allow it to cool in the pan for 10 minutes. Then transfer the loaf onto a wire rack to cool completely before slicing.
Notes
- Use warm water (about 110°F/43°C) to activate the yeast properly.
- Make sure to grease the loaf pan well to prevent sticking.
- Allow the bread to cool completely before slicing to maintain its texture.
- This recipe yields one standard loaf suitable for sandwich making.
- For extra flavor, you can brush the top with melted butter after baking.


