

If you’ve ever missed the comfort of a perfectly soft, fluffy loaf of bread but need to avoid gluten, this Classic Gluten-Free White Sandwich Bread Recipe is about to become your new kitchen hero. It offers all the familiar warmth and texture of traditional sandwich bread without sacrificing taste or that irresistible crumb. Whether you’re making sandwiches, toast, or just craving a slice slathered with butter, this bread rises beautifully and bakes to a golden perfection that’s as satisfying to smell as it is to eat. Get ready to transform simple, humble ingredients into a loaf that feels like home.

Ingredients You’ll Need
These ingredients are straightforward but essential to getting that tender, moist crumb and light texture in your Classic Gluten-Free White Sandwich Bread Recipe. Each one plays a crucial role in the flavor, rise, and structure of the bread, ensuring you don’t miss a beat even without gluten.
- 2 cups gluten-free all-purpose flour: The base of your bread that provides a soft texture without gluten’s elasticity.
- 1 tablespoon sugar: Adds just enough sweetness to balance the flavors and feed the yeast for a good rise.
- 1 teaspoon salt: Enhances flavor and tightens the dough’s structure for better crumb.
- 1 tablespoon active dry yeast: The magic agent that makes your bread rise, lightening the loaf perfectly.
- 1 cup warm water: Activates the yeast and hydrates the flour, so the dough forms smoothly.
- 2 tablespoons olive oil: Provides moisture and richness that keeps the bread tender and flavorful.
- 2 eggs: Adds structure, moisture, and a slight richness that lifts the bread’s crumb and flavor.
How to Make Classic Gluten-Free White Sandwich Bread Recipe
Step 1: Preheat and Prepare Your Pan
Start by setting your oven to 375°F (190°C) and greasing your loaf pan thoroughly. This initial prep is key because it prevents sticking and helps the bread keep its perfect shape during baking.
Step 2: Combine Dry Ingredients
In a large mixing bowl, whisk together the gluten-free flour, sugar, salt, and yeast. This not only evenly distributes the yeast for an even rise but also ensures your bread will have consistent flavor and texture throughout.
Step 3: Add Wet Ingredients and Mix
Next, pour in the warm water, olive oil, and eggs to the dry mix. Stir everything until you get a smooth dough. The warmth of the water activates the yeast, and the eggs and oil enrich the dough, contributing to the soft crumb you love.
Step 4: Transfer and Smooth
Pour your batter into the greased loaf pan and smooth the top gently with a spatula. This step helps the bread rise evenly in the oven, giving you that classic sandwich shape everyone loves.
Step 5: Bake to Golden Perfection
Bake for about 40 minutes, or until the bread is deep golden brown and sounds hollow when you tap the bottom. This sound test is a simple way to check that it’s cooked through, avoiding any gummy texture inside.
Step 6: Cool Before Slicing
Once out of the oven, let the loaf cool in the pan for 10 minutes. Then transfer it to a wire rack to cool completely. This resting period helps set the crumb and makes slicing easier without squishing your perfect loaf.
How to Serve Classic Gluten-Free White Sandwich Bread Recipe
Garnishes
A sprinkle of sesame seeds or a light brush of melted butter right after baking can add a lovely touch. These simple finishes not only make the bread visually inviting but also introduce subtle flavors that elevate the entire experience.
Side Dishes
This bread shines alongside hearty soups, fresh salads, or even a creamy bowl of chili. Its mild flavor and soft texture make it a versatile companion that soaks up broths without falling apart.
Creative Ways to Present
Try toasting slices and topping them with avocado and a sprinkle of chili flakes for a quick snack, or use the bread as the base for a gourmet grilled cheese sandwich loaded with your favorite cheese and veggies. This Classic Gluten-Free White Sandwich Bread Recipe is incredibly adaptable to any mealtime mood.
Make Ahead and Storage
Storing Leftovers
Keep your leftover bread in an airtight container or a sealed bag at room temperature. It will stay fresh for about two days, but for optimal softness, try to consume it quickly or consider freezing.
Freezing
Wrap your loaf tightly in plastic wrap and then foil before placing it in the freezer. It can last up to three months frozen without losing much texture or flavor. Just thaw it overnight at room temperature when you’re ready to enjoy.
Reheating
To bring back that just-baked warmth, pop individual slices into a toaster or the whole loaf in an oven preheated to 350°F for about 10 minutes. It refreshes the crust and softens the crumb beautifully.
FAQs
Can I substitute the olive oil for another fat?
Absolutely! You can use melted butter, avocado oil, or even a neutral oil like canola. Keep in mind that olive oil adds a subtle flavor that complements the bread nicely.
Is this recipe suitable for people with egg allergies?
You can try replacing eggs with flax eggs (1 tablespoon ground flaxseed mixed with 3 tablespoons water per egg) to maintain structure, although the texture may vary slightly from the original.
Can I use a gluten-free flour blend other than all-purpose?
All-purpose blends specifically designed for gluten-free baking work best for structure and rise, but you can experiment with blends containing rice flour, tapioca starch, or potato starch. Just be sure your mix includes xanthan gum or a similar binder.
How can I tell if the bread is done baking?
Look for a golden brown crust and a hollow sound when tapping the bottom of the loaf. You can also insert a toothpick or skewer; it should come out clean without wet batter.
Can I make this bread without eggs to make it vegan?
While the eggs add richness and help bind the dough, you can try vegan egg substitutes like applesauce or commercial egg replacers. Texture may be slightly different but still delicious.
Final Thoughts
Embracing gluten-free baking doesn’t mean giving up on delicious, comforting bread. This Classic Gluten-Free White Sandwich Bread Recipe brings a warm, fresh loaf right to your kitchen’s countertop with simple ingredients and straightforward steps. I encourage you to dive in, enjoy the aroma that fills your home, and savor every chewy, tender slice that you made all by yourself. Baking gluten-free bread this good really is possible, and I promise it’s worth every bite.
Print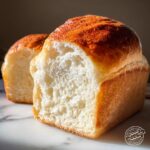
Classic Gluten-Free White Sandwich Bread Recipe
- Prep Time: 10 minutes
- Cook Time: 40 minutes
- Total Time: 55 minutes
- Yield: 1 loaf (approximately 8 slices)
- Category: Bread
- Method: Baking
- Cuisine: American
- Diet: Gluten Free
Description
This Classic White Sandwich Bread is a gluten-free, soft, and fluffy loaf perfect for sandwiches. Made with simple ingredients like gluten-free flour, eggs, and olive oil, it offers a delicious homemade bread experience with a tender crumb and golden crust. Ideal for those seeking a gluten-free baking option without compromising on taste or texture.
Ingredients
Dry Ingredients
- 2 cups gluten-free all-purpose flour
- 1 tablespoon sugar
- 1 teaspoon salt
- 1 tablespoon active dry yeast
Wet Ingredients
- 1 cup warm water
- 2 tablespoons olive oil
- 2 eggs
Instructions
- Preheat Oven and Prepare Pan: Preheat your oven to 375°F (190°C). Grease a loaf pan thoroughly to prevent sticking and allow for easy bread removal after baking.
- Mix Dry Ingredients: In a large mixing bowl, combine the gluten-free all-purpose flour, sugar, salt, and active dry yeast. Whisk or stir to evenly distribute the ingredients.
- Add Wet Ingredients: Pour in the warm water, olive oil, and eggs into the dry mixture. Mix thoroughly until a smooth, cohesive dough forms without lumps.
- Transfer Dough to Pan: Spoon the dough into the prepared loaf pan. Use a spatula to smooth the top surface to ensure even rising and baking.
- Bake the Bread: Place the loaf pan in the preheated oven and bake for 40 minutes, or until the bread is golden brown on top and sounds hollow when tapped, indicating it is fully baked.
- Cool the Bread: Remove the bread from the oven and let it cool in the pan for about 10 minutes to set. Then transfer it to a wire rack to cool completely before slicing to avoid a gummy texture.
Notes
- Ensure the water is warm, not hot, to activate the yeast properly without killing it.
- You can substitute olive oil with any neutral oil or melted butter if preferred.
- Allow the bread to cool completely before slicing for best texture.
- Store leftover bread in an airtight container for up to 3 days or freeze for longer storage.


