
“`html
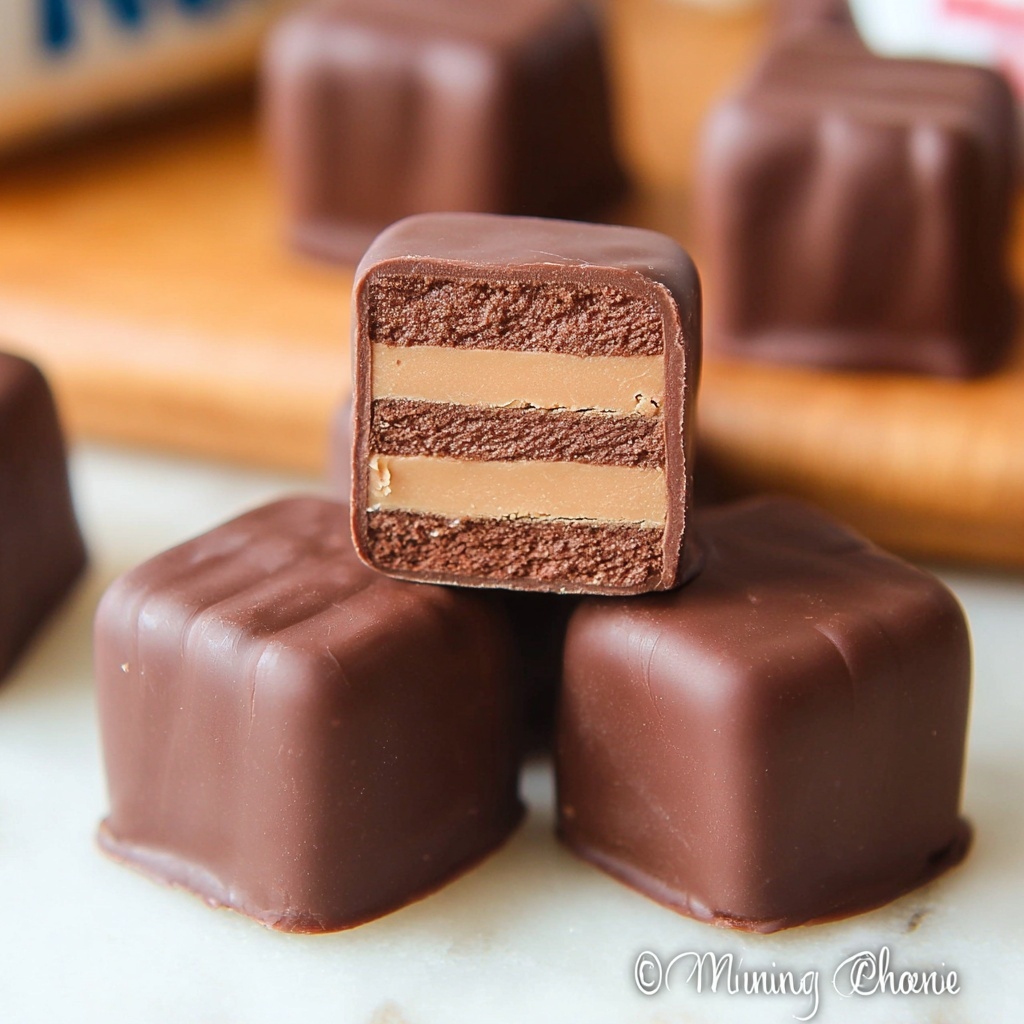
If you’re looking for a melt-in-your-mouth treat that combines creamy sweetness and rich chocolate in a way that feels truly special, this Cool Whip Candy Recipe is the answer you’ve been craving. With its luscious layers of smooth melted chocolate and fluffy whipped topping, this homemade candy is unexpectedly easy to make but impressively decadent — perfect for sharing with friends, gifting, or sneaking a bite yourself when no one’s looking.

Ingredients You’ll Need
The beauty of this Cool Whip Candy Recipe lies in its simplicity and the few quality ingredients that elevate it. Each item plays a pivotal role: the chocolate chips bring that silky smooth base, the whipped topping adds irresistible creaminess, and the melting wafers provide a glossy, protective shell that finishes the candy with flair.
- Milk chocolate chips (11.5 ounces): Choose good quality chips for creamy flavor and easy melting.
- Frozen whipped topping (8 ounces, thawed): This adds lightness and fluffiness to the candy mixture.
- Ghirardelli chocolate melting wafers (10 ounces): Perfect for dipping and coating your candy with a smooth, hard finish.
- Vegetable oil (2 tablespoons, divided): Helps melt the chocolate to a glossy texture that’s easy to work with.
- Parchment paper: Essential for lining the pan to easily remove your candy once chilled.
How to Make Cool Whip Candy Recipe
Step 1: Prepare Your Workspace
Line an 8×8-inch pan with parchment paper. This simple step ensures your candy won’t stick and makes clean-up a breeze. Having everything prepped before melting the chocolate helps keep the process smooth and enjoyable.
Step 2: Melt the Milk Chocolate Chips
Place the chocolate chips in a large microwave-safe bowl. Microwave on 50% power for 1 minute, then stir. Add 1 tablespoon of vegetable oil and continue microwaving in 30-second bursts, stirring between each, until the chocolate is silky and smooth. This gentle melting process preserves the chocolate’s shine and texture.
Step 3: Blend in the Whipped Topping
Gently fold the thawed whipped topping into the melted chocolate using a rubber spatula. Take your time to stir thoroughly until the mixture is fully combined and thickened. This blend is what gives the candy its signature creamy and fluffy texture.
Step 4: Pour and Smooth the Mixture
Scrape the entire chocolate and whipped topping mixture into the prepared 8×8 pan. Use the spatula to press down and spread the mixture evenly to the edges and corners, creating a smooth, flat surface for even chilling and cutting later.
Step 5: Chill Thoroughly
Place the pan in the refrigerator for at least 6 hours or ideally overnight. This chilling step is crucial as it allows the candy to set firmly, making it easier to cut and dip in the next steps.
Step 6: Cut into Candy Pieces
Once fully chilled, lift the candy out by holding the parchment paper. Use a sharp knife to cut the block into approximately 1½-inch squares by making 5 cuts across each side. This creates perfectly sized pieces ideal for dipping.
Step 7: Prepare for Chocolate Dipping
Arrange the cut candy pieces on a large baking dish and pop them back into the fridge to keep chilled while you melt the dipping chocolate. This helps the candies maintain their shape during coating.
Step 8: Melt the Chocolate Wafers for Coating
In a microwave-safe bowl, heat the Ghirardelli chocolate melting wafers on 50% power for 1 minute. Stir thoroughly and pour in the remaining 1 tablespoon of vegetable oil. Continue microwaving in 30-second intervals, stirring each time, until the chocolate is smooth and glossy — perfect for coating those candies.
Step 9: Dip Each Candy Piece
Using two forks or specialized dipping tools, carefully dip each chilled candy piece into the melted chocolate, making sure it’s fully covered. Lift and let excess drip before placing each coated piece back on the parchment-lined baking sheet.
Step 10: Final Chill Before Enjoying
Return the dipped candies to the refrigerator for about 30 minutes. This final chilling solidifies the chocolate shell, resulting in a perfect balance of soft inside and firm outside — a hallmark of this Cool Whip Candy Recipe.
How to Serve Cool Whip Candy Recipe
Garnishes
Sprinkle a tiny pinch of sea salt or crushed nuts over the chocolate coating before it sets for an added layer of flavor and texture. You can also dust with finely grated coconut or drizzle contrasting white chocolate for visual appeal. These garnishes make the candy feel extra special while adding delightful complexity.
Side Dishes
Serve this Cool Whip Candy Recipe alongside robust coffee or a rich cup of hot cocoa. The creamy candy pairs beautifully with the bitterness of coffee, making the perfect after-dinner indulgence. It also complements fruit platters or a cheese board if you want an eclectic dessert spread.
Creative Ways to Present
Package your candies in small glass jars tied with a festive ribbon for charming edible gifts. Alternatively, arrange them on decorative plates with fresh berries or mint leaves for a stunning dessert table centerpiece everyone will admire. These little touches turn homemade candy into a memorable treat.
Make Ahead and Storage
Storing Leftovers
Keep your leftover Cool Whip Candy in an airtight container in the refrigerator. Stored this way, the candies maintain their texture and flavor for up to one week, making it easy to enjoy them bit by bit without losing that fresh homemade taste.
Freezing
You can freeze this candy for longer storage. Place pieces in a single layer on a baking sheet to freeze solid, then transfer them to a freezer-safe bag or container. When wrapped well, the candy can last up to three months and can be thawed in the fridge overnight before serving.
Reheating
This candy is best enjoyed cold or at room temperature. If you prefer a slightly softer bite, leave the candy out for 10 to 15 minutes before serving. Avoid reheating as it may change the texture and cause the chocolate shell to become sticky or melt unevenly.
FAQs
Can I use whipped cream instead of frozen whipped topping?
Whipped cream can work in a pinch, but the frozen whipped topping provides more stability and a consistent texture when combined with chocolate. It’s less likely to make the candy mixture too runny.
What type of chocolate works best for dipping?
Chocolate melting wafers like Ghirardelli’s are ideal because they melt smoothly and harden well. Using standard chocolate chips without added oil can result in a grainy texture, so adding vegetable oil is important for a glossy finish.
Is it necessary to use vegetable oil in the recipe?
Yes, the vegetable oil thins the melted chocolate slightly, creating a smooth texture that’s easier to mix with whipped topping and dip candy pieces. It helps avoid clumps and ensures a shiny coating.
Can I add flavors or mix-ins to the candy?
Absolutely! Adding a splash of vanilla extract or peppermint oil during mixing can transform the flavor. You can also fold in chopped nuts or dried fruit for a fun twist on this Cool Whip Candy Recipe.
How long does the candy need to chill before cutting?
A minimum of 6 hours is essential to let the candy firm up completely. Chilling overnight yields the best results, making clean cuts easier and ensuring the candy holds its shape while dipping.
Final Thoughts
This Cool Whip Candy Recipe is one of those delightful little secrets that’s easy enough for any home cook to make yet feels like a gourmet treat. Its creamy center and glossy chocolate shell will quickly become a favorite for holidays, parties, or simple everyday indulgence. I encourage you to give it a try—you might just find a new go-to sweet that everyone asks for again and again.
“`
Print
Cool Whip Candy Recipe
- Prep Time: 15 minutes
- Cook Time: 15 minutes
- Total Time: 6 hours 30 minutes
- Yield: 36 pieces
- Category: Candy
- Method: No-Cook
- Cuisine: American
Description
Cool Whip Candy is a decadent no-bake treat featuring a smooth milk chocolate and whipped topping base, covered in a glossy chocolate coating. Perfectly chilled to set, these bite-sized candies offer a silky texture with rich chocolate flavor, ideal for parties or holiday gifting.
Ingredients
Base
- 11.5 ounces milk chocolate chips (one package)
- 8 ounces frozen whipped topping, thawed at room temperature
- 1 tablespoon vegetable oil (divided)
Coating
- 10 ounces Ghirardelli chocolate melting wafers
- 1 tablespoon vegetable oil (divided)
Instructions
- Prepare the Pan: Line an 8×8 inch pan with parchment paper to prevent sticking and for easy removal later.
- Melt the Base Chocolate: Place the milk chocolate chips in a large microwave-safe bowl. Microwave at 50% power for 1 minute. Stir well, then add 1 tablespoon vegetable oil. Continue microwaving at 50% power in 30-second intervals, stirring between each, until the chocolate is smooth and silky. Remove from microwave.
- Combine with Whipped Topping: Add the thawed whipped topping to the melted chocolate. Stir thoroughly with a rubber spatula until fully combined into a thick mixture.
- Transfer to Pan: Pour the chocolate and whipped topping mixture into the prepared 8×8 pan. Scrape down the sides of the bowl to get all the mixture out.
- Shape the Candy Base: Use the spatula to press the mixture evenly across the pan, smoothing it flat and flushing it against the edges and into the corners.
- Chill the Base: Place the pan in the refrigerator and chill for 6 hours or overnight to allow the mixture to firm up completely.
- Cut into Pieces: Remove the chilled candy block by lifting the parchment paper out of the pan. Use a sharp knife to score 5 cuts on each side, creating approximately 1.5-inch square pieces.
- Prep for Dipping: Arrange each piece on a large baking dish and return to the refrigerator while preparing the chocolate coating.
- Melt the Coating Chocolate: Place the Ghirardelli chocolate wafers in a microwave-safe bowl. Microwave at 50% power for 1 minute, stir, then add the remaining 1 tablespoon vegetable oil. Continue microwaving at 50% power in 30-second intervals, stirring after each, until the chocolate is smooth and glossy. Remove from microwave.
- Dip the Candy Pieces: Using two forks or dipping tools, individually dip each chilled candy piece into the melted chocolate, ensuring it is fully coated. Place the dipped candies back on the baking dish.
- Set the Coating: After all pieces are dipped, return the baking dish to the refrigerator and chill for 30 minutes to let the chocolate coating harden before serving.
Notes
- Ensure the whipped topping is fully thawed at room temperature to mix smoothly without lumps.
- Using parchment paper helps remove the candy block easily without breaking.
- Microwave heating times may vary; stir frequently to avoid burning chocolate.
- If preferred, temper the coating chocolate for a shinier finish and better snap.
- Store finished candies refrigerated in an airtight container for up to one week.


