

“`html
If you’ve ever wanted to dive into a classic Japanese comfort food that’s as fun to make as it is to eat, then this Delicious Onigiri: Japanese Rice Balls You Can Customize Recipe is going to become your new kitchen favorite. These rice balls are delightfully simple, yet bursting with flavor, and the best part is just how customizable they are – whether you like them plain, with a savory filling, or wrapped in crunchy nori. Perfect for lunchboxes, picnics, or a quick snack, onigiri offers a hands-on experience that brings a little bit of Japan right to your table.
Ingredients You’ll Need
Creating these charming rice balls might feel fancy, but the ingredients are straightforward and essential. Each element plays its own role in building the perfect balance of taste, texture, and that subtle crunch that makes onigiri uniquely satisfying.
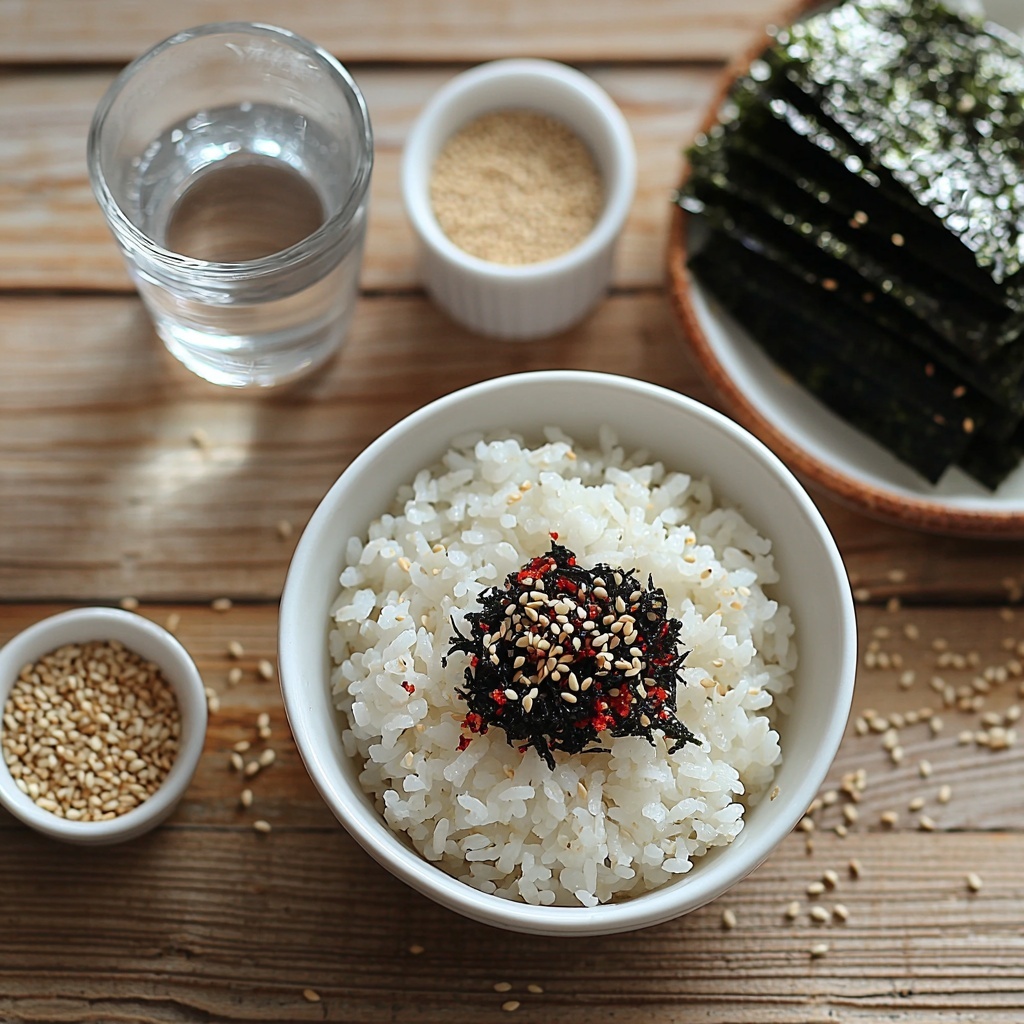
- 2 cups Cooked Rice: Opt for freshly cooked medium-grain rice for that ideal sticky yet fluffy texture.
- 2 tablespoons Furikake: This seasoning blend brings an umami punch with seaweed, sesame, and salty notes to your rice.
- 1 cup Water: Wetting your hands while shaping keeps the rice from sticking, making the process smooth and enjoyable.
- 1 teaspoon Kosher Salt: Adding salt enhances the rice’s natural sweetness and balances flavors beautifully.
- 4 sheets Roasted Nori: Cut into strips, nori wraps add a crisp layer of flavor and texture to the rice balls.
- 2 tablespoons Sesame Seeds (Optional): Sprinkle these on top for a toasty, nutty finish that’s as tasty as it is decorative.
How to Make Delicious Onigiri: Japanese Rice Balls You Can Customize Recipe
Step 1: Combine Rice and Furikake
Start by placing the freshly cooked rice in a mixing bowl and gently mixing in the furikake seasoning. This step infuses your rice with those savory umami flavors that onigiri is known for, ensuring every bite sings with subtle complexity.
Step 2: Prepare Your Hands for Shaping
Wet your hands with water to prevent sticking, then sprinkle a pinch of kosher salt on your palms. This small trick not only helps in shaping the onigiri but also seasons the outside for an extra layer of flavor.
Step 3: Shape the Rice Balls
Scoop about half a cup of the seasoned rice and gently press it into a triangle shape using your hands. The trick is not to compact the rice too tightly—you want it to hold together but still feel light and fluffy.
Step 4: Refine the Shape
If you prefer clean edges, press the sides of your rice triangle against a flat surface, making the onigiri even more manageable and visually appealing.
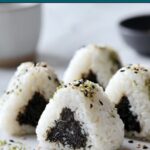
Step 5: Wrap with Nori and Add Sesame Seeds
Wrap a strip of roasted nori around the base of each rice ball, adding that classic seaweed crunch. If you like, sprinkle sesame seeds on top for a nutty hint that complements the savory rice beautifully.
Step 6: Serve or Store
Your onigiri can be enjoyed immediately—simple, fresh, and delicious—or wrapped individually in plastic wrap if you want to save them for later. Both ways are wonderful!
How to Serve Delicious Onigiri: Japanese Rice Balls You Can Customize Recipe
Garnishes
Garnishes take your onigiri from basic to spectacular. Try sprinkling additional furikake, finely chopped scallions, or a small dab of wasabi for a spicy kick. Each garnish adds its own personality without overwhelming the delicate rice base.
Side Dishes
Onigiri pairs beautifully with miso soup, pickled vegetables, or a simple seaweed salad. These sides complement the rice balls without stealing attention, creating a balanced and satisfying meal.
Creative Ways to Present
Think beyond the traditional triangle shape—try rolling your rice into balls for a playful bite-sized snack, or mold them around fillings like tuna salad or umeboshi. Serving on a platter with colorful garnishes elevates any gathering or lunchbox moment.
Make Ahead and Storage
Storing Leftovers
If you have any onigiri left over, wrap them tightly in plastic wrap and keep them refrigerated. They’ll stay fresh for up to one day, preserving the rice’s softness and flavor.
Freezing
Freezing is a great option for longer storage—place wrapped onigiri in an airtight container or freezer bag and freeze for up to one month. Just be sure to thaw them thoroughly before reheating for best texture.
Reheating
To reheat, unwrap the onigiri and microwave on a microwave-safe plate for 30 to 60 seconds until warm. Alternatively, you can steam them gently to bring back moisture and softness without drying out the rice.
FAQs
What type of rice is best for onigiri?
Medium-grain rice is ideal because it has the perfect stickiness to hold shape without becoming mushy. Sushi rice or Japanese short-grain rice works wonderfully.
Can I add fillings inside my onigiri?
Absolutely! Popular fillings include tuna mayo, pickled plum (umeboshi), grilled salmon, or miso. Get creative—just add a spoonful in the center before shaping your rice ball.
How do I keep the nori crispy?
Wrap the nori around the onigiri right before eating to keep it from getting soggy. Alternatively, store the rice balls and nori separately and assemble before serving.
Is there a vegetarian version of this recipe?
Yes! Simply skip meat fillings and enjoy the basic furikake seasoning or use vegetable-based fillings like pickled radish or avocado for a delicious vegetarian onigiri.
Can onigiri be made vegan?
Definitely. Use vegan-friendly furikake (some contain fish flakes, so check the label), and choose vegetable or seaweed fillings to match your dietary preferences.
Final Thoughts
I hope this Delicious Onigiri: Japanese Rice Balls You Can Customize Recipe inspires you to get hands-on in your kitchen and explore the joy of making your own personalized Japanese rice balls. It’s a simple recipe with endless possibilities that’s perfect to share with family and friends. Give it a try and savor each bite of this delightful, comforting classic!
“`
Print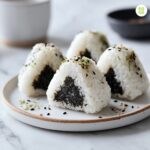
Delicious Onigiri: Japanese Rice Balls You Can Customize Recipe
- Prep Time: 10 minutes
- Cook Time: 25 minutes
- Total Time: 35 minutes
- Yield: 4 servings
- Category: Snack
- Method: No-Cook
- Cuisine: Japanese
- Diet: Gluten Free
Description
Delicious Onigiri are traditional Japanese rice balls that you can easily customize at home. Made with seasoned medium-grain rice and wrapped with crispy nori, these bite-sized treats are perfect for a quick snack or a light meal. This simple recipe uses furikake seasoning and optional sesame seeds to add extra flavor and texture.
Ingredients
Main Ingredients
- 2 cups Cooked Medium-Grain Rice (freshly cooked)
- 2 tablespoons Furikake (Japanese seasoning blend)
- 1 teaspoon Kosher Salt
- 4 sheets Roasted Nori (cut into strips)
- 1 cup Water (for wetting hands)
- 2 tablespoons Sesame Seeds (optional)
Instructions
- Prepare the Rice: In a mixing bowl, combine the freshly cooked medium-grain rice with furikake seasoning until well incorporated, ensuring the rice is evenly flavored.
- Wet and Salt Your Hands: Dip your hands into water to moisten them, then sprinkle a pinch of kosher salt onto your palms. This prevents the rice from sticking and adds flavor.
- Shape the Onigiri: Scoop about half a cup of the seasoned rice and gently mold it into a compact triangle shape using your hands. Press firmly enough to hold the shape but not so hard as to compress the rice too much.
- Refine the Shape: Optionally, press the sides of the rice triangle against a flat surface to make clean edges and uniform shape.
- Wrap with Nori: Take a strip of roasted nori and wrap it around the base of each rice triangle. Sprinkle sesame seeds on top if using for an extra nutty flavor and appealing look.
- Serve or Store: Enjoy your onigiri immediately fresh, or wrap each rice ball individually in plastic wrap to keep them moist and fresh for later consumption.
Notes
- Use freshly cooked medium-grain rice for the best texture; sushi rice or calrose rice works well.
- Adjust the amount of furikake according to your taste preference.
- Keep your hands wet while shaping to prevent rice from sticking.
- Onigiri is best eaten the same day for optimal freshness, but can be stored wrapped for a few hours.
- You can customize onigiri with fillings such as pickled plum, salmon flakes, or tuna mayo inside the rice before shaping.

