

If there is one dessert that carries the warmth of family gatherings and the cozy aroma of autumn, it has to be Grandma’s Old Fashioned Apple Pie Recipe. This timeless classic fills your kitchen with the sweet, spiced scent of baked apples and cinnamon while delivering that perfectly flaky crust that feels like a warm hug from the past. Whether you’re a seasoned baker or trying your hand at pie-making for the first time, this recipe brings together simple, wholesome ingredients to create a truly unforgettable dessert that tastes like nostalgia on a plate.
Ingredients You’ll Need
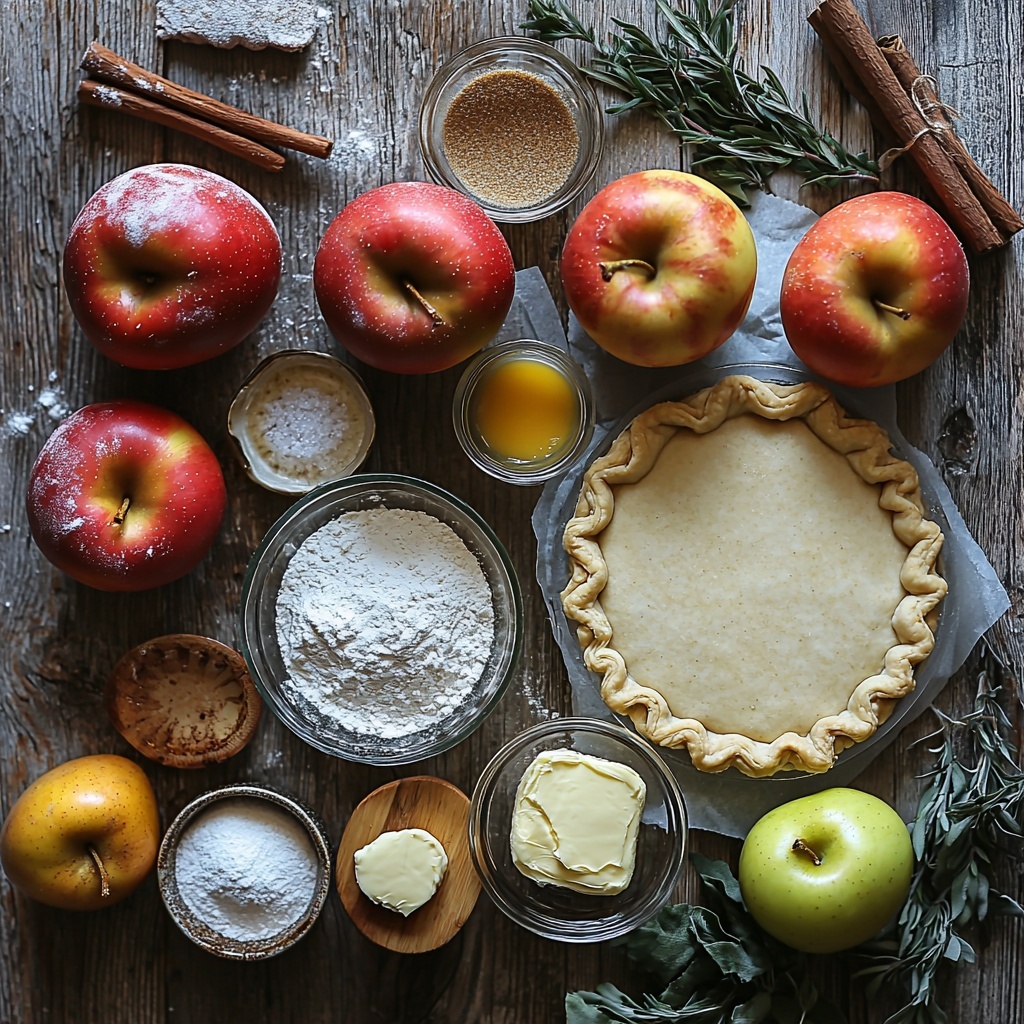
Getting your ingredients right is the first step toward pie perfection, and each element in this recipe plays a special role. From tart and sweet apples to that rich buttery crust, every ingredient works together to balance flavor, texture, and color beautifully.
- 6 large baking apples: Combining Rome and Granny Smith apples gives the pie a perfect blend of sweetness and tartness with a firm texture that holds up while baking.
- ½ cup granulated sugar: Adds just the right amount of sweetness to enhance the natural flavors of the apples without overpowering them.
- ¼ cup all-purpose flour: Helps thicken the juicy filling so your pie won’t be runny after baking.
- 2 teaspoons ground cinnamon: Infuses the pie with that warm, cozy spice that defines the classic apple pie taste.
- ½ teaspoon salt: Balances the sweetness and deepens the overall flavor.
- 2 tablespoons butter: Dotted on top of the filling before baking, butter adds richness and a decadent finish.
- 2 discs of pie dough: The foundation of any great pie, homemade or store-bought dough gives you that flaky, buttery crust every apple pie deserves.
- 1 egg, beaten: Used as an egg wash for the crust, it creates a gorgeous golden shine and helps seal the edges.
How to Make Grandma’s Old Fashioned Apple Pie Recipe
Step 1: Make the Pie Filling
Start by peeling, coring, and slicing your apples into even ¼ to ½ inch thick pieces. Tossing them gently in the sugar, flour, cinnamon, and salt mixture allows the spices and sweetness to coat every slice uniformly. Letting the apples rest for at least 30 minutes is key, as they release their juices and develop a juicy, flavorful filling that’s anything but dry.
Step 2: Prepare the Pie Dough
While your apples are resting, preheat your oven to 350°F (175°C) and lightly flour your workspace. Roll out one disc of dough to about 12 inches, turning it carefully to prevent sticking. Transfer this dough into your pie plate, pressing it gently against the sides for an even shell. Roll out the second disc and keep it ready while you fill the pie – patience and care here give you that perfectly shaped crust everyone admires.
Step 3: Fill and Assemble the Pie
Pour the apple mixture into your prepared pie crust, then dot the entire surface with small butter pieces. Moisten the edge of the bottom crust with water, then carefully place the second dough disc over the filling. Press the edges together, trim any excess dough, and flute the edges for that charming, homemade look. Don’t forget to cut vents in the top crust to let steam escape, then brush it with the beaten egg for a glossy, golden finish without sealing those vents shut.
Step 4: Bake to Perfection
Pop your pie into the oven and bake for 1 to 1½ hours, rotating it halfway for even coloring. You’ll know it’s done when the crust turns a beautiful golden brown and the filling bubbles up through the vents. Let it cool for at least one hour before slicing to let the juices set—trust me, patience here makes every bite melt in your mouth.
How to Serve Grandma’s Old Fashioned Apple Pie Recipe
Garnishes
For those extra special touches, a scoop of vanilla ice cream on a warm slice takes this pie to a whole new level. Fresh whipped cream or a sprinkle of cinnamon sugar right before serving also complements the pie’s flavors beautifully.
Side Dishes
Pair your slice with a cup of hot apple cider or a robust cup of coffee to round out the experience. For a cozy brunch, serve alongside crispy bacon or creamy cheddar cheese to create a delightful contrast with the sweet pie.
Creative Ways to Present
Want to impress your guests? Cut smaller, bite-sized pieces and serve them in mini tart dishes or even atop puff pastry cups. Drizzling caramel sauce over each serving or sprinkling chopped nuts adds a lovely crunch and visual appeal.
Make Ahead and Storage
Storing Leftovers
If you happen to have leftover pie (and who wouldn’t?), wrap it tightly in plastic wrap or store it in an airtight container in the refrigerator. It will stay delicious for up to 4 days, making easy grab-and-go dessert moments.
Freezing
You can freeze this pie before or after baking. To freeze unbaked pie, assemble it and wrap tightly with layers of plastic and foil. For baked pie, cool completely before wrapping. Frozen pies will keep well for up to 3 months and can be thawed overnight in the fridge.
Reheating
When you’re ready to enjoy your pie again, reheat slices in a warm oven at 350°F (175°C) for about 15 minutes. This helps refresh the crust’s crispness and revives that freshly baked flavor.
FAQs
Can I use other types of apples for Grandma’s Old Fashioned Apple Pie Recipe?
Absolutely! While Rome and Granny Smith apples offer the perfect balance of tartness and firmness, feel free to experiment with your favorites like Honeycrisp or Braeburn for unique flavor twists.
Is it okay to use store-bought pie dough?
Yes, using store-bought dough can save time and still yield great results. Just choose a high-quality crust and handle it gently while rolling to keep the texture flaky.
How do I prevent the pie crust edges from burning?
Cover the edges with foil or a pie crust shield halfway through baking. This protects the crust from over-browning while allowing the filling to cook thoroughly.
Can Grandma’s Old Fashioned Apple Pie Recipe be made vegan?
With a few swaps, yes! Use a plant-based butter substitute and an egg wash alternative like almond milk mixed with maple syrup to create a vegan-friendly pie that’s just as delicious.
What is the secret to a flaky crust in this apple pie?
The key lies in keeping your dough cold, rolling it out gently, and using small pieces of butter throughout. Also, avoid overworking the dough to maintain those flaky layers.
Final Thoughts
There is something truly magical about Grandma’s Old Fashioned Apple Pie Recipe in the way it brings people together and fills the home with cozy comfort. Baking this pie is more than just making dessert—it’s a way to celebrate family traditions and create delicious memories. So grab your rolling pin, pick your apples, and dive into this wonderful classic. I promise, once you taste that rich, spiced filling with the buttery crust, it will quickly become one of your all-time favorites too.
Print
Grandma’s Old Fashioned Apple Pie Recipe
- Prep Time: 30 minutes
- Cook Time: 1 hour 15 minutes
- Total Time: 1 hour 45 minutes
- Yield: 8 servings
- Category: Dessert
- Method: Baking
- Cuisine: American
Description
Grandma’s Old Fashioned Apple Pie is a timeless dessert featuring a buttery, flaky crust filled with a cinnamon-spiced apple mixture. This classic pie recipe blends tart and sweet apples for a perfect balance of flavors and is baked to golden perfection. Serve it warm with a scoop of vanilla ice cream for a comforting treat that evokes nostalgia and home-baked goodness.
Ingredients
Filling
- 6 large baking apples (a mix of Rome and Granny Smith works best)
- ½ cup granulated sugar
- ¼ cup all-purpose flour
- 2 teaspoons ground cinnamon
- ½ teaspoon salt
- 2 tablespoons butter
Pie Dough
- 2 discs of pie dough (see my recipe for pie dough)
Egg Wash
- 1 egg, beaten (for egg wash)
Instructions
- Make the Pie Filling: Peel, core, and slice the apples into ¼–½ inch thick slices. Place them in a large mixing bowl.
- Combine Ingredients: Add sugar, flour, cinnamon, and salt to the sliced apples. Toss gently to coat the apples evenly.
- Let Apples Rest: Let the mixture sit for at least 30 minutes, allowing the apples to release some of their juices for a flavorful filling.
- Prepare the Pie Dough: Preheat your oven to 350°F (175°C). Generously flour your counter and rolling pin. Remove one disc of dough from the refrigerator and roll it out to about 12 inches, rotating as needed to prevent sticking. Use a bench scraper if the dough sticks to the counter.
- Line the Pie Plate: Transfer the rolled dough to a pie plate, pressing it evenly along the sides to form the bottom crust.
- Roll Out Top Dough: Roll out the second disc of dough similarly and set it aside while you fill the pie.
- Fill the Pie: Pour the apple mixture into the prepared pie crust. Dot the top with small pieces of butter to enhance flavor and moisture.
- Seal the Pie: Lightly moisten the exposed edge of the bottom crust with water. Carefully place the top crust over the apples, press the edges together, and tuck them neatly under. Trim any excess dough if necessary.
- Decorate the Edges: Flute the edges with your fingers for a decorative finish that also helps seal the pie.
- Prepare for Baking: Cut a few small vents in the top crust to allow steam to escape during baking. Brush the crust lightly with the beaten egg wash, being careful not to seal the vents.
- Bake the Pie: Bake for 1 to 1½ hours, rotating the pie halfway through, until the crust is golden brown and the filling bubbles through the vents, indicating it’s cooked through.
- Cool and Serve: Allow the pie to cool for at least one hour before slicing to set the filling. Serve warm with vanilla ice cream for a classic, comforting dessert.
Notes
- Mixing Rome and Granny Smith apples balances sweetness and tartness perfectly.
- Letting the apples sit with sugar and spices helps to develop deeper flavors and a better filling texture.
- Ensure vents are cut in the top crust to prevent it from becoming soggy due to trapped steam.
- Rotate the pie halfway through baking to promote even cooking and browning.
- Allow the pie to cool fully before slicing to avoid a runny filling.
- Use cold butter when dotting the filling to add richness and moisture as it melts during baking.


