

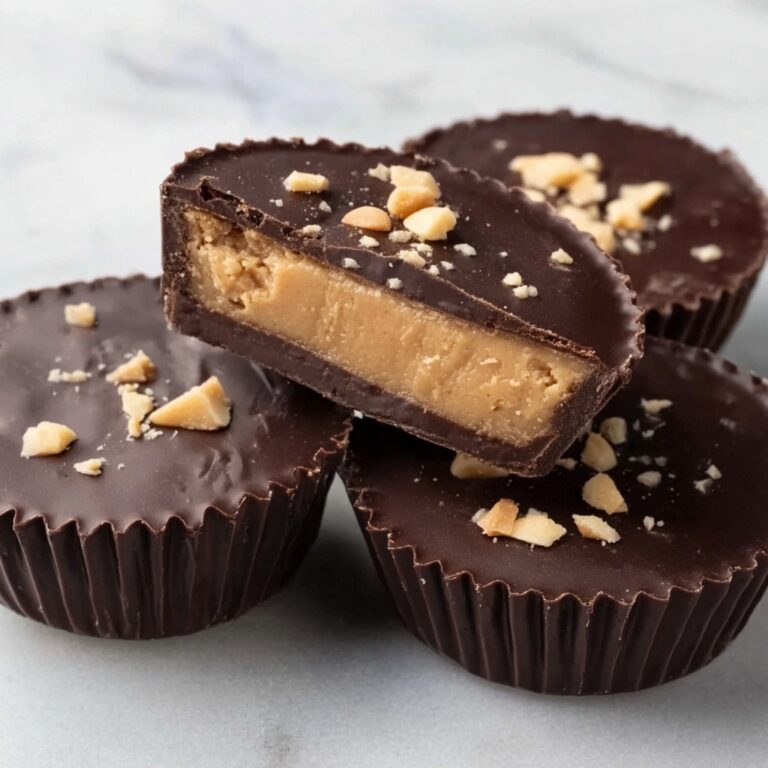
If you have a craving for something indulgent yet homemade, look no further than this Homemade Chocolate Peanut Butter Cups Recipe. It combines the rich, velvety taste of chocolate with the creamy, slightly salty peanut butter filling to recreate that classic candy experience right in your own kitchen. What makes this recipe truly special is how easily you can customize and control every ingredient, resulting in a treat that feels personal and freshly made. Whether you want a snack, dessert, or gift, these cups offer a perfect balance of flavors and textures that will satisfy your sweet tooth and comfort soulfully.
Ingredients You’ll Need
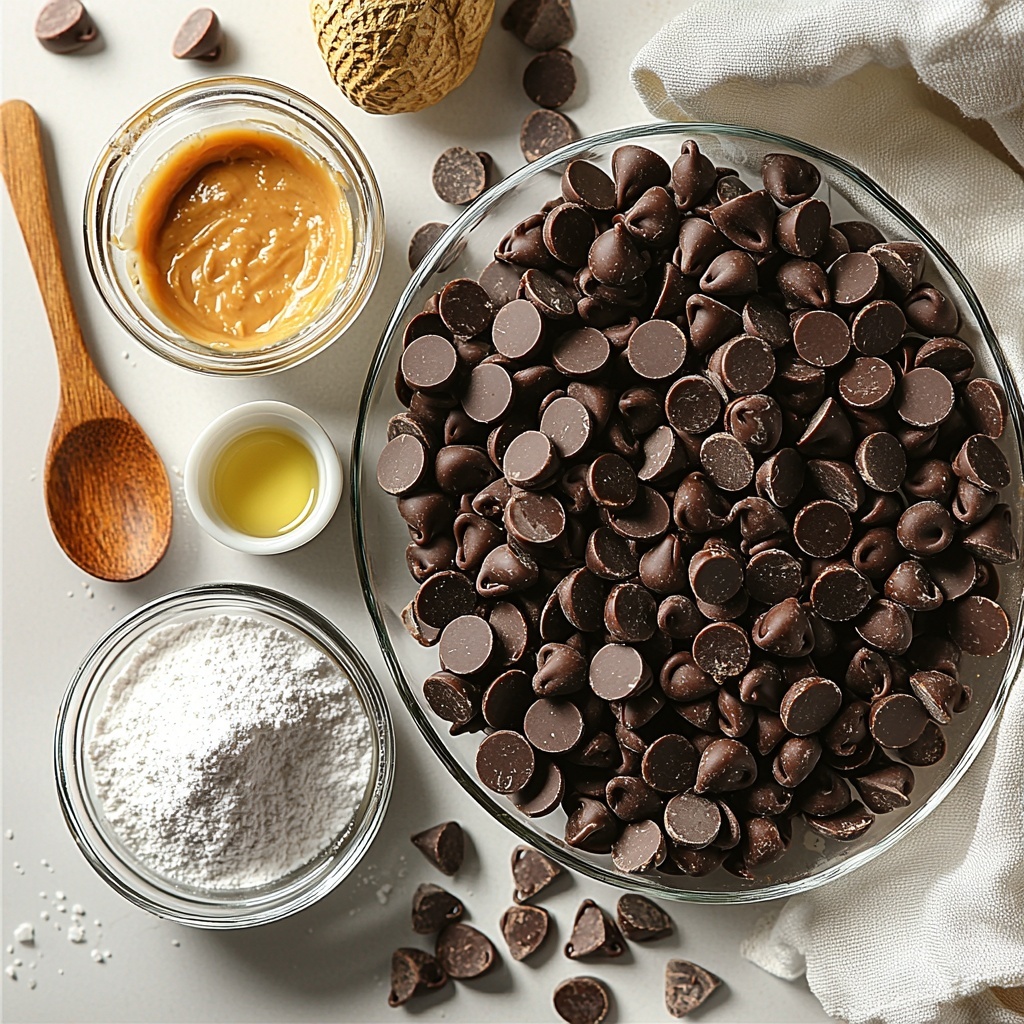
Gathering the right ingredients is the key to making your Homemade Chocolate Peanut Butter Cups Recipe shine. Each component plays a vital role in delivering the signature texture, flavor, and appearance that make this treat irresistible. These pantry staples are simple yet essential for a perfect blend of chocolatey richness and peanut buttery goodness.
- 16 ounces chocolate chips (divided): Semi-sweet or milk chocolate chips provide the smooth, luscious outer shell and help create that satisfying snap.
- 3 teaspoons coconut oil (divided, optional): Adds glossiness and a silky texture to the melted chocolate, making it easier to work with and likelier to set beautifully.
- ½ cup creamy peanut butter: Using shelf-stable peanut butter ensures the filling stays firm and creamy, offering a smooth yet rich contrast inside.
- ¼ cup powdered sugar: Sweetens and thickens the peanut butter filling, making it perfect to shape into sturdy discs.
- ½ teaspoon vanilla extract: A hint of warmth and depth that elevates the peanut butter mixture beyond just sweetness.
- ¼ teaspoon table salt: Balances the sweetness and enhances the complex flavors of the peanut butter and chocolate combo.
How to Make Homemade Chocolate Peanut Butter Cups Recipe
Step 1: Prepare the Pan
Start by lining a muffin tin with silicone or paper liners—either 6-cup sized or 12 mini cupcake liners depending on the size you want your peanut butter cups. This prevents sticking and makes removal easier, giving your treats a neat finish.
Step 2: Assemble the Chocolate Base
Place 1 cup of the chocolate chips in a small heat-safe bowl. Microwave for 30 seconds at a time, stirring in between, until mostly melted but with a few chunks remaining. Stir continuously off the heat so the residual heat melts the chocolate completely. Add 1 teaspoon of coconut oil to the mixture and stir until it’s glossy. This chocolate base is the foundation for your cups.
Step 3: Form the Chocolate Base Layer
Using a spoon, add about ½ tablespoon of the melted chocolate into each muffin cup. Spread it into an even, thin layer, which will harden to form the crunchy exterior. Pop the tray into the fridge or freezer for 5 minutes so this chocolate layer can set firmly.
Step 4: Prepare the Peanut Butter Filling
While the base chills, mix together the peanut butter, powdered sugar, vanilla extract, and salt in a medium bowl with a hand mixer on medium speed. The goal is to create a smooth, thick filling that holds its shape like soft cookie dough. If you’re using natural peanut butter, feel free to add an extra tablespoon or two of powdered sugar to get the texture just right.
Step 5: Shape Peanut Butter Discs
Once the chocolate base is hardened, take the muffin tin out of the fridge or freezer. Using about a tablespoon of peanut butter mixture per cup, shape each into a small disc slightly smaller than the chocolate base. Set each peanut butter disc gently on top of the chocolate layer, leaving room for the final chocolate coating.
Step 6: Melt Remaining Chocolate
Transfer the leftover 1½ cups of chocolate chips to a clean heat-safe bowl and microwave again in 30-second intervals, stirring well until almost melted but with a few chunks. Stir off the heat to melt completely, then add the remaining 2 teaspoons of coconut oil and mix till smooth and glossy—this will help the chocolate encase the peanut butter filling seamlessly.
Step 7: Cover the Peanut Butter
Drizzle about 2 teaspoons of the melted chocolate over each peanut butter disc. Use the back of a spoon to smooth the chocolate, letting the excess drip down the sides to fully cover the filling. This step seals in the creamy peanut butter and gives the cups their classic look and indulgent taste.
Step 8: Harden the Peanut Butter Cups
Return the tray back to the fridge for around an hour or pop it in the freezer for 10–15 minutes if you want to speed up the process. When the chocolate hardens, the cups are ready to be enjoyed or stored for later.
Step 9: Store and Serve
Carefully remove your homemade peanut butter cups from the liners and enjoy immediately or store them in an airtight container in the refrigerator for up to 5 days. Before eating, let them sit at room temperature for 5 to 10 minutes to soften just enough for the best flavor and texture.
How to Serve Homemade Chocolate Peanut Butter Cups Recipe
Garnishes
To elevate these peanut butter cups for a special occasion, you can sprinkle crushed peanuts, a pinch of sea salt, or even a drizzle of white chocolate on top once the final chocolate layer is still slightly wet. These little touches bring added texture and a gourmet feel.
Side Dishes
Serve your chocolate peanut butter cups alongside a scoop of vanilla ice cream or fresh berries for a refreshing contrast. They also pair fabulously with a hot cup of coffee or a cold glass of milk to balance their sweetness.
Creative Ways to Present
Package these treats in small clear gift boxes tied with colorful ribbons to gift friends and family. Or arrange them on a pretty platter with other homemade confections for a festive dessert table. Mini cupcake liners in different colors also add charm and make portion sizes evident.
Make Ahead and Storage
Storing Leftovers
Keep your Homemade Chocolate Peanut Butter Cups Recipe fresh by storing leftovers in an airtight container in the refrigerator. This ensures the chocolate remains firm and the peanut butter filling keeps its texture. They stay delicious for up to 5 days, making them a convenient treat to nibble on throughout the week.
Freezing
These cups freeze beautifully. Just place them in a single layer on a baking sheet to flash freeze for an hour, then transfer to a freezer-safe container with parchment paper between layers. Frozen peanut butter cups can last up to 2 months and gently thaw well for a convenient indulgence anytime.
Reheating
To enjoy your peanut butter cups after refrigeration or freezing, avoid microwaving directly as it may melt unevenly. Instead, let them sit at room temperature for 5-10 minutes to soften naturally and bring out the best flavor and creaminess.
FAQs
Can I use natural peanut butter for this recipe?
Yes, you can! Just keep in mind that natural peanut butter tends to be a bit runnier, so add an extra tablespoon or two of powdered sugar to thicken the filling to the right consistency for shaping.
Is coconut oil necessary in this Homemade Chocolate Peanut Butter Cups Recipe?
While not absolutely essential, coconut oil helps give the melted chocolate a glossy finish and smoother texture. It also aids in quick setting and makes the chocolate easier to work with, but you can omit it if you prefer.
Can I substitute chocolate chips with chopped chocolate?
Absolutely. Chopped chocolate melts more evenly and can offer a richer taste. Use the same amount called for in the recipe for best results.
How do I prevent the peanut butter cups from melting too fast?
Store them in the refrigerator or freezer and avoid leaving them out in warm rooms. The chocolate shell acts as a barrier, but peanut butter fillings can soften quickly if left at room temperature too long.
Can I make this recipe vegan or dairy-free?
Yes! Use dairy-free chocolate chips and choose a vegan-friendly peanut butter. Ensure your powdered sugar is vegan, as some brands process it with bone char. Coconut oil keeps this version smooth and creamy.
Final Thoughts
I absolutely love how this Homemade Chocolate Peanut Butter Cups Recipe brings together two of the most beloved flavors in such a simple and rewarding way. Making these at home lets you customize every bite and savor the satisfaction of crafting your own sweet treats. Give it a try—you may just find your new favorite homemade candy that steals the spotlight at any get-together or quiet night in!
Print
Homemade Chocolate Peanut Butter Cups Recipe
- Prep Time: 20 minutes
- Cook Time: 10 minutes
- Total Time: 1 hour 10 minutes
- Yield: 12 servings
- Category: Dessert
- Method: No-Cook
- Cuisine: American
Description
This Homemade Chocolate Peanut Butter Cups recipe combines rich, glossy chocolate with a creamy, sweet peanut butter filling to create an irresistible treat. Perfectly portioned in muffin liners, these cups are easy to make at home using simple ingredients and a microwave. Whether for a special occasion or a sweet snack, these peanut butter cups offer a delightful balance of chocolate and peanut butter flavors.
Ingredients
Chocolate Layer
- 16 ounces chocolate chips (divided; approximately 2½ cups or chopped chocolate)
- 3 teaspoons coconut oil (divided, optional)
Peanut Butter Filling
- ½ cup creamy peanut butter (shelf-stable is best)
- ¼ cup powdered sugar
- ½ teaspoon vanilla extract
- ¼ teaspoon table salt
Instructions
- Prepare Pan: Line a 6-cup muffin tin with silicone or paper liners. Alternatively, use 12-cup mini cupcake liners for smaller peanut butter cups.
- Assemble Chocolate Base: Place 1 cup of chocolate chips into a heat-safe bowl and microwave in 30-second intervals, stirring after each, until mostly melted with a few chunks remaining. Stir continuously to melt completely. Add 1 teaspoon coconut oil and stir until glossy and well combined.
- Form Chocolate Base: Spoon about ½ tablespoon of melted chocolate into each muffin cup, spreading into a thin, even layer. Chill in the fridge or freezer for 5 minutes to harden.
- Prepare Peanut Butter Filling: While chocolate sets, mix ½ cup creamy peanut butter, ¼ cup powdered sugar, ½ teaspoon vanilla extract, and ¼ teaspoon salt in a medium bowl using a handheld mixer on medium speed until smooth and well combined. For natural peanut butter, add 1-2 tablespoons powdered sugar to thicken. The mixture should be firm enough to shape like soft cookie dough.
- Shape Peanut Butter Discs: Remove muffin tin from fridge or freezer. Use about 1 tablespoon peanut butter mixture per cup, shaping into small discs slightly smaller than the chocolate base. Place each disc into muffin cups on top of the chocolate layer.
- Melt Remaining Chocolate: Place remaining 1½ cups chocolate chips into a clean heat-safe bowl and microwave in 30-second intervals, stirring after each until mostly melted with a few chunks remaining. Stir thoroughly to fully melt. Add remaining 2 teaspoons coconut oil and stir until smooth and glossy.
- Cover Peanut Butter: Pour about 2 teaspoons melted chocolate over each peanut butter disc, smoothing with the back of a spoon and allowing excess to drip down sides, fully encasing the peanut butter.
- Harden Peanut Butter Cups: Return tray to fridge to harden for about 1 hour or place in freezer for 10-15 minutes to set faster.
- Store and Serve: Once hardened, remove peanut butter cups from muffin tin and liners if desired. Store in an airtight container in the refrigerator for up to 5 days. Let sit at room temperature for 5-10 minutes before eating for the best flavor and texture.
Notes
- Use shelf-stable peanut butter for best texture; natural peanut butter requires extra powdered sugar to thicken the filling.
- Coconut oil is optional but helps to create a smoother, glossier chocolate coating.
- Chilling the chocolate layers separately ensures distinct, firm layers in the final peanut butter cups.
- Store in the refrigerator to keep the chocolate from melting, especially in warm climates.
- Allowing the cups to sit at room temperature before eating improves flavor and chewiness.

