
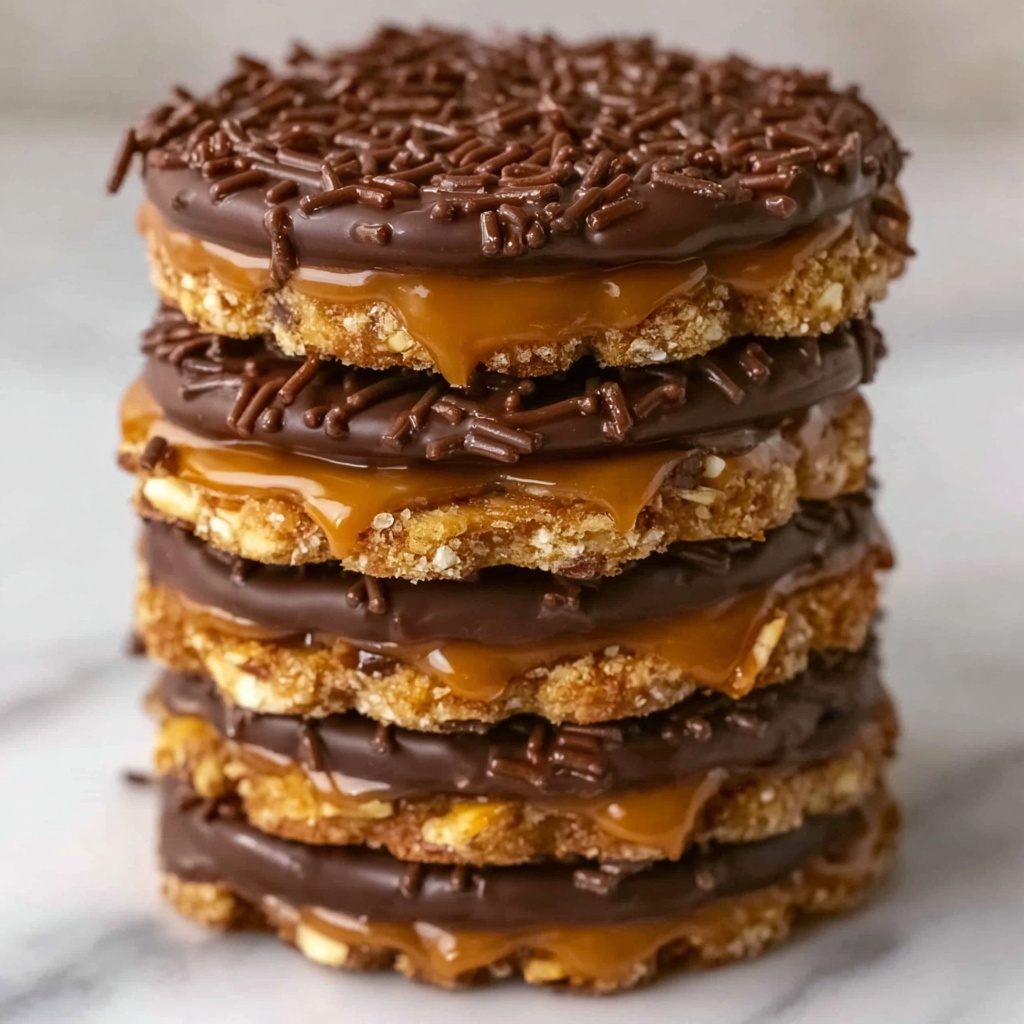
If you have a sweet tooth and love cookies that combine the perfect crunch with gooey caramel and rich chocolate, you are in for a treat with this Homemade Samoas (Girl Scout Cookies) Recipe. These delightful cookies capture the iconic flavors of the classic Samoas, featuring a buttery cookie base topped with toasted coconut and luscious caramel, all beautifully wrapped in a smooth chocolate drizzle. Whether you’re making them for a special occasion or just because, this recipe promises a deliciously rewarding baking experience that brings those nostalgic flavors right to your kitchen.
Ingredients You’ll Need
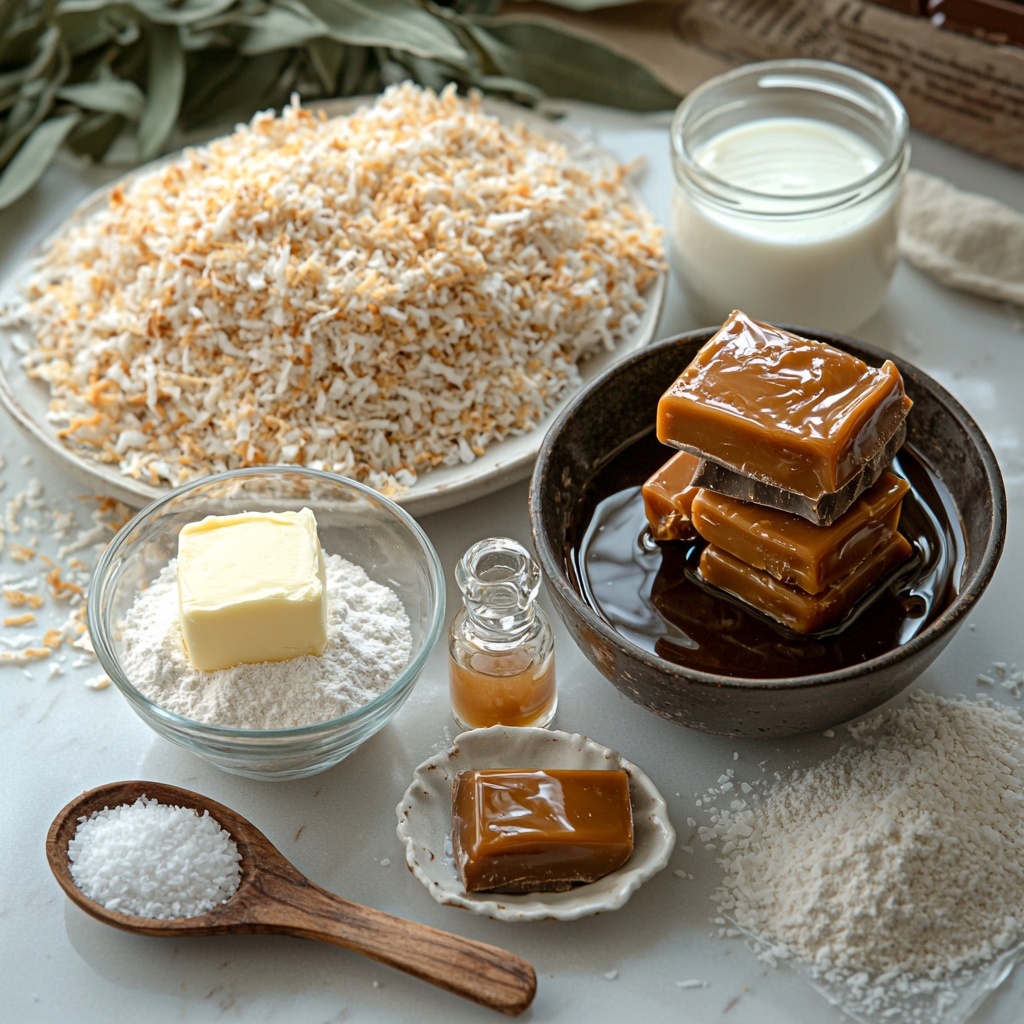
Gathering simple, quality ingredients is the key to nailing this recipe. Each one plays an essential role in creating the perfect balance of texture and flavor, from the tender cookie bite to the luscious caramel and crunchy toasted coconut.
- 1 cup unsalted butter, softened: Provides the rich, creamy base that gives the cookies their tender crumb.
- 1/2 cup granulated sugar: Adds just the right amount of sweetness to the dough.
- 2 cups all-purpose flour: The foundation for the cookie, creating structure and a pleasant chew.
- 1/4 teaspoon baking powder: Gives a slight lift, so the cookies aren’t dense.
- 1/2 teaspoon salt: Enhances all the flavors, balancing sweetness perfectly.
- 1/2 teaspoon vanilla extract: Brings a warm, inviting aroma and depth to the cookie base.
- 2 tablespoons milk: Helps bind the dough and keep it moist without being sticky.
- 3 cups sweetened shredded coconut: Toasted for a nutty crunch and signature Samoas flavor.
- 12 oz chewy caramels: Melted to create a gooey, sticky topping that clings to the coconut.
- 3 tablespoons milk (for caramel): Soften caramels and create a smooth, spreadable texture.
- 1/4 teaspoon salt (for caramel): Adds subtle salty notes to balance the sweetness.
- 8 oz semisweet chocolate, melted: Used to dip the cookie bottoms and drizzle the tops, giving that irresistible finishing touch.
How to Make Homemade Samoas (Girl Scout Cookies) Recipe
Step 1: Prepare the Oven and Dough
First things first, preheat your oven to 350 degrees Fahrenheit, and line your baking sheets with parchment paper to prevent sticking. Then, cream together the softened butter and sugar until the mixture is light, fluffy, and airy—this step is essential to create tender cookies with a delicious crumb.
Step 2: Mix Dry Ingredients and Combine
Next, whisk together the all-purpose flour, baking powder, and salt. Gradually add this into the butter and sugar mixture, mixing until just combined. This ensures the dough maintains a nice, tender texture without becoming tough.
Step 3: Add Vanilla and Milk
To bring it all together, stir in the vanilla extract and milk. This helps the dough come together smoothly and keeps the cookies moist and flavorful throughout baking.
Step 4: Roll Out and Cut the Cookies
Roll your dough out on a lightly floured surface to about 1/4 inch thickness. Use a 2-inch circular cutter to cut out your cookies, then carefully cut out the smaller center circle to create that classic ring shape reminiscent of Samoas.
Step 5: Bake and Cool
Bake the cookies for 10 to 12 minutes, keeping an eye out for lightly golden edges — that’s your cue they’re ready. Once baked, allow them to cool completely before moving on to the next layer of deliciousness.
Step 6: Toast the Coconut
While your cookies cool, spread the shredded coconut on a baking sheet and toast in the oven at 350 degrees Fahrenheit for about 10 minutes. Be sure to stir occasionally so the coconut toasts evenly, transforming it into a fragrant and crunchy topping.
Step 7: Prepare the Caramel Mixture
Melt the chewy caramels with 3 tablespoons of milk and a pinch of salt in a microwave-safe bowl. Stir continuously until the mixture is smooth and creamy, creating the glue that holds the toasted coconut to the cookies.
Step 8: Combine Coconut and Caramel
Mix the toasted coconut into the warm caramel until every shred is coated beautifully. This rich, sticky mixture is what will give your Samoas that signature chewy, sweet bite.
Step 9: Assemble Your Cookies
Spread a generous layer of the caramel-coconut mixture on top of each cooled cookie, taking care to cover the surface evenly without spilling over the edges.
Step 10: Dip Cookie Bottoms in Chocolate
Dip each cookie’s bottom into melted semisweet chocolate, allowing excess to drip off before placing them on parchment paper. This creates a luscious chocolate base that contrasts perfectly with the caramel topping.
Step 11: Drizzle Remaining Chocolate
Using a spoon or a piping bag, drizzle the remaining melted chocolate over the tops of the cookies in an appealing zigzag pattern. This step isn’t just decorative—it adds an extra layer of flavor and texture that makes these cookies utterly irresistible.
Step 12: Let the Cookies Set
Allow your cookies to set at room temperature until the chocolate firms up, or pop them into the refrigerator for quicker results. Once the chocolate is firm, your homemade Samoas are ready to be enjoyed!
How to Serve Homemade Samoas (Girl Scout Cookies) Recipe
Garnishes
For a little extra pizzazz, sprinkle some finely chopped toasted pecans or a pinch of flaky sea salt on top of the chocolate drizzle just before it sets. The contrast of textures and the subtle saltiness can really elevate your cookies to gourmet status.
Side Dishes
These cookies pair delightfully with a chilled glass of milk, a hot cup of coffee, or even a creamy vanilla ice cream. The richness of the Samoas is balanced beautifully by these familiar, comforting beverages and desserts.
Creative Ways to Present
Try arranging your Homemade Samoas (Girl Scout Cookies) Recipe on a decorative platter lined with a few coconut flakes or chocolate shavings for a stunning presentation. You can also stack them tall to create a cookie tower centerpiece, perfect for parties or holiday gatherings where they’re sure to be the star of the show!
Make Ahead and Storage
Storing Leftovers
Keep your cookies fresh by storing them in an airtight container at room temperature. They should maintain their chewy and crunchy textures for up to one week, making them a convenient treat to enjoy throughout the week.
Freezing
If you want to keep your Homemade Samoas (Girl Scout Cookies) Recipe longer, freeze them in a single layer on parchment-lined baking sheets first. Once frozen, transfer to an airtight container or freezer bag. They will keep for up to three months without losing their delightful texture or flavor.
Reheating
If you like your cookies a little softer, pop them into the microwave for about 10-15 seconds, just enough to warm the caramel slightly but not melt the chocolate completely. This little trick revives that fresh-baked sensation and makes the treat even more indulgent.
FAQs
Can I substitute any ingredients in the Homemade Samoas (Girl Scout Cookies) Recipe?
Absolutely! For example, you can use light brown sugar instead of granulated sugar for a deeper caramel flavor in the cookie base. Just be cautious with substitutions like dairy-free butter or alternative chocolates, as they may alter the texture or taste slightly.
Is it necessary to toast the coconut?
Yes, toasting the coconut enhances its natural flavor and gives it the crunch that is essential for authentic Samoas. Raw coconut would taste too mild and might not hold up as well when mixed with caramel.
Can I make these cookies gluten-free?
While this recipe uses all-purpose flour, you can substitute with a gluten-free flour blend designed for baking. Just make sure the blend includes xanthan gum or another binding agent for best results, as it helps replicate the texture of traditional flour.
How do I prevent the chocolate from melting when assembling?
Work quickly when dipping the cookie bottoms in chocolate, and place them immediately on parchment paper to set. If your kitchen is warm, refrigerate the cookies briefly after dipping to help the chocolate firm up fast and prevent smudging.
What’s the best way to store these cookies for gift-giving?
Use a sturdy, decorative tin lined with parchment paper. Layer the cookies gently with a piece of parchment or wax paper between each layer to avoid sticking. This way, they stay beautiful and delicious when gifted or transported.
Final Thoughts
Making your own Samoas from scratch is such a satisfying experience, and this Homemade Samoas (Girl Scout Cookies) Recipe truly delivers that melt-in-your-mouth magic that everyone loves. It’s the perfect blend of crunchy, chewy, caramel, and chocolate that will quickly become your new favorite cookie to bake and share. So go ahead, gather your ingredients, and treat yourself to a batch—you deserve it!
Print
Homemade Samoas (Girl Scout Cookies) Recipe
- Prep Time: 20 minutes
- Cook Time: 30 minutes
- Total Time: 50 minutes
- Yield: 24 cookies
- Category: Dessert
- Method: Baking
- Cuisine: American
Description
These Homemade Samoas replicate the classic Girl Scout Cookies with buttery cookie bases topped with a luscious blend of toasted coconut and caramel, finished with rich semisweet chocolate dips and drizzles. This recipe yields a delightful combination of crispy, chewy, and chocolatey textures that are perfect for any occasion.
Ingredients
Cookie Dough
- 1 cup unsalted butter, softened
- 1/2 cup granulated sugar
- 2 cups all-purpose flour
- 1/4 teaspoon baking powder
- 1/2 teaspoon salt
- 1/2 teaspoon vanilla extract
- 2 tablespoons milk
Topping
- 3 cups sweetened shredded coconut
- 12 oz chewy caramels
- 3 tablespoons milk
- 1/4 teaspoon salt
- 8 oz semisweet chocolate, melted
Instructions
- Make the Cookies: Preheat your oven to 350°F (175°C) and line baking sheets with parchment paper to prevent sticking.
- Cream Butter and Sugar: In a mixing bowl, cream together the softened butter and granulated sugar until the mixture is light and fluffy, ensuring a smooth dough.
- Combine Dry Ingredients: Add the all-purpose flour, baking powder, and 1/2 teaspoon salt into the creamed mixture and mix until fully incorporated.
- Add Wet Ingredients: Stir in vanilla extract and 2 tablespoons milk to form a cohesive dough.
- Shape Cookies: Roll the dough out to approximately 1/4 inch thickness on a floured surface. Use a 2-inch round cutter to cut out circles, then use a smaller cutter to cut out the centers of each circle to create a ring shape.
- Bake: Place the cookies on the prepared baking sheets and bake for 10-12 minutes or until the edges are lightly golden. Remove from oven and allow them to cool completely on a wire rack.
- Toast Coconut: Spread shredded coconut evenly on a baking sheet and toast in the oven at 350°F (175°C) for about 10 minutes, stirring occasionally to prevent burning and ensure even toasting.
- Melt Caramel Mixture: Combine chewy caramels, 3 tablespoons milk, and 1/4 teaspoon salt in a microwave-safe bowl. Microwave in short intervals, stirring between each, until the caramel melts into a smooth sauce.
- Mix Topping: Stir the toasted coconut into the melted caramel until thoroughly combined.
- Assemble Cookies: Spread the caramel-coconut mixture generously over the top of each cooled cookie ring.
- Add Chocolate: Dip the bottom of each cookie into the melted semisweet chocolate, then place on parchment paper to set. Use the remaining melted chocolate to drizzle over the tops of the cookies for decoration.
- Let Set: Allow the cookies to sit at room temperature until the chocolate hardens. Refrigerate them to speed up the setting process if desired.
Notes
- For best results, ensure the butter is softened but not melted before creaming with sugar.
- Use parchment paper to prevent cookies from sticking during baking and setting chocolate.
- Toast the coconut carefully and stir frequently to avoid burning.
- If caramels are too stiff, add a little extra milk to help melt them smoothly.
- Store finished cookies in an airtight container at room temperature or refrigerated for longer freshness.
