

There are desserts that comfort you, and then there are the magic moments when flavor and texture collide in a spectacular way—this Molten Peanut Butter Lava Cake: Rich & Decadent Dessert Recipe is exactly that kind of treat. Picture a warm, tender chocolate cake with a molten peanut butter center that flows like liquid gold the second you break it apart. Each bite delivers a perfectly balanced hug of bittersweet chocolate and creamy peanut butter, making this dessert a fabulous showstopper for any occasion or a cozy night in that deserves a special finish.
Ingredients You’ll Need
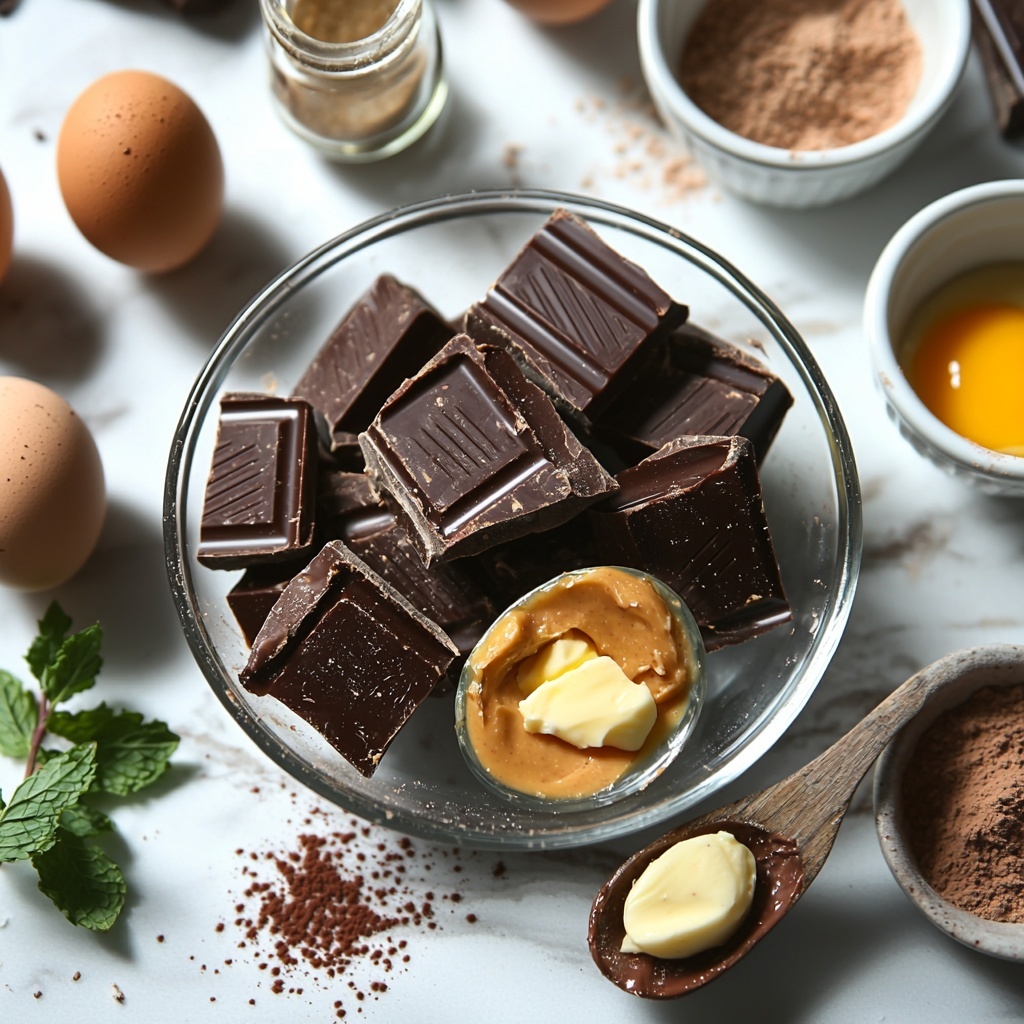
Getting ready to make this dessert is a breeze because the ingredients are straightforward and each plays a vital role in creating that luscious molten texture and rich flavor combination. From the butter’s richness to the chocolate’s depth and peanut butter’s creamy punch, these essentials come together beautifully.
- 1/2 cup unsalted butter: Provides a silky richness that helps achieve a tender crumb and adds depth of flavor.
- 4 ounces semi-sweet chocolate, chopped: Delivers the perfect bittersweet chocolate intensity that balances the sweetness.
- 1/2 cup creamy peanut butter: Offers a smooth, nutty richness that contrasts deliciously with the chocolate.
- 3/4 cup powdered sugar: Sweetens the batter perfectly while keeping the texture velvety.
- 2 large eggs: Add structure and moisture essential for that tender cake exterior enveloping the molten center.
- 2 large egg yolks: Boost richness and help create a luxuriously dense texture.
- 1 teaspoon vanilla extract: Enhances all the flavors with warmth and depth.
- 1/4 teaspoon salt: Balances sweetness and highlights the chocolate and peanut butter notes.
- 1/4 cup all-purpose flour: Lightly binds the batter for just enough body without weighing it down.
- 2 tablespoons unsweetened cocoa powder: Adds an extra chocolate punch and deepens the color to envy-worthy.
- Butter and cocoa powder for greasing ramekins: Prevent sticking and add a subtle hint of flavor to the cake edges.
How to Make Molten Peanut Butter Lava Cake: Rich & Decadent Dessert Recipe
Step 1: Prepare Your Ramekins and Preheat Oven
Start by preheating your oven to a hot 425°F to get that perfect quick bake that firms up the cake’s edges while keeping the center molten. Then, generously butter four 6-ounce ramekins and dust them lightly with cocoa powder, which prevents sticking and adds a lovely chocolate hint right at the crust. Tap out any excess cocoa powder for an even surface—details here matter!
Step 2: Melt Butter and Chocolate
In a heatproof bowl over a double boiler or microwaving in 30-second intervals, melt together the unsalted butter and chopped semi-sweet chocolate. Stir continuously until you have a smooth, glossy mixture that promises intense chocolate goodness. This smooth base is crucial because it forms the luscious outer shell and molten center alike.
Step 3: Incorporate Peanut Butter and Sweetness
Whisk in creamy peanut butter until completely blended, creating a velvety texture that sings with nutty flavor. Next, sift in powdered sugar and whisk until the mixture is perfectly smooth and glossy—this step strikes the right balance of sweetness and consistency.
Step 4: Add Eggs, Vanilla, and Salt
Beat in eggs, one at a time, along with the additional egg yolks, to build a rich, silky batter that holds everything together without losing tenderness. Stir in vanilla extract and a pinch of salt to enhance all the flavors, making your molten peanut butter lava cake truly unforgettable.
Step 5: Gently Fold in Dry Ingredients
Sift the all-purpose flour and cocoa powder over your wet mixture and fold carefully until just combined. This gentle folding ensures the cake remains light and airy around the molten center, so don’t overmix — that’s the secret to keeping it tender but stable.
Step 6: Fill Ramekins and Bake
Divide your batter evenly among the prepared ramekins, placing them on a baking sheet for stability. Bake for 11 to 13 minutes until the edges are set but the center still jiggles slightly—that’s the telltale sign your lava cake is perfectly molten and ready to wow anyone lucky enough to indulge.
Step 7: Invert and Serve Warm
Once out of the oven, let the cakes rest for just a minute to settle, then carefully run a knife around the edges and invert each ramekin onto a serving plate. This step reveals the perfectly domed, rich cake with its molten heart waiting to spill out as soon as you cut in.
How to Serve Molten Peanut Butter Lava Cake: Rich & Decadent Dessert Recipe
Garnishes
The beautiful thing about this dessert’s rich and creamy center is how easily it welcomes all kinds of garnishes. A sprinkle of flaky sea salt boosts the peanut flavor, while a light dusting of powdered sugar adds elegance. Fresh berries, like raspberries or strawberries, can cut through the richness with a juicy pop, and a dollop of whipped cream or a scoop of vanilla ice cream brings creamy contrast that melts blissfully on contact.
Side Dishes
This Molten Peanut Butter Lava Cake: Rich & Decadent Dessert Recipe shines best on its own, but pairing it with a simple fresh fruit salad or a crisp green salad with tangy vinaigrette balances the indulgence for a full dessert course. For coffee or tea lovers, a bittersweet espresso or a delicate herbal tea also complements the cake’s richness beautifully.
Creative Ways to Present
Presentation can elevate this dessert to a memorable centerpiece. Serve the cakes right in their ramekins if you want a rustic touch, or plate them on elegant dessert plates adorned with drizzle lines of caramel or chocolate sauce. Adding edible flowers or finely chopped roasted peanuts around the plate creates a beautiful texture and aesthetic vibe that will impress guests and loved ones alike.
Make Ahead and Storage
Storing Leftovers
If you find yourself with any leftovers—though honestly, that rarely happens—store them covered in the refrigerator for up to two days. Keep in mind that the molten center will firm up, so these cakes are truly best enjoyed fresh for that signature gooey experience.
Freezing
This molten peanut butter lava cake freezes well before baking. Prepare the batter and pour it into greased ramekins, then wrap them tightly with plastic wrap and aluminum foil before freezing. When ready to enjoy, simply bake from frozen, adding a couple of extra minutes to the baking time to reach that perfect molten center.
Reheating
To reheat and revive the molten magic, pop the cake back in a preheated 350°F oven for about 5 to 7 minutes. Avoid the microwave as it tends to toughen the cake and can harden the gooey center. The oven method gently warms everything back up without sacrificing texture or flavor.
FAQs
Can I use natural peanut butter instead of creamy?
Absolutely! Using natural peanut butter will give your lava cake a more robust peanut flavor. Just be aware that natural versions can sometimes separate; give it a good stir before measuring. Adding a sprinkle of flaky sea salt on top really elevates that natural peanut taste.
How do I know when the lava cakes are done baking?
Look for edges that are firm and set, while the centers should still jiggle slightly when you gently shake the baking sheet. Overbaking will cause the molten center to set and lose that gooey appeal, so timing is crucial—usually 11 to 13 minutes does the trick.
Can I make this dessert gluten-free?
Definitely! You can substitute all-purpose flour with a gluten-free blend measuring 1:1. Just ensure your cocoa powder and other ingredients don’t contain any gluten additives. The outcome will still be wonderfully decadent and molten.
Is it possible to make this vegan or dairy-free?
Transforming this recipe into a vegan or dairy-free option requires some tweaks, like using vegan butter and dairy-free chocolate, plus egg substitutes such as flax eggs. While it’s doable, the texture and molten effect might be slightly different, but still delicious in its own right!
Can I prepare the batter ahead and bake later?
You can prepare the batter a few hours in advance and refrigerate it in the ramekins, covered tightly. Bring them to room temperature before baking, and adjust baking time by a minute or two to ensure a perfect molten center.
Final Thoughts
This Molten Peanut Butter Lava Cake: Rich & Decadent Dessert Recipe truly is a delightful indulgence that brings pure joy with every bite. Whether you’re treating yourself after a long day or impressing friends at your next gathering, this dessert is easy to make yet extravagantly satisfying. Trust me, once you try it, it becomes an instant favorite you’ll want to come back to again and again—so go ahead, bake it, share it, and savor every molten moment!
Print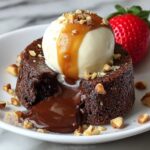
Molten Peanut Butter Lava Cake: Rich & Decadent Dessert Recipe
- Prep Time: 10 minutes
- Cook Time: 12 minutes
- Total Time: 22 minutes
- Yield: 4 servings
- Category: Dessert
- Method: Baking
- Cuisine: American
- Diet: Vegetarian
Description
This Molten Peanut Butter Lava Cake is a rich and decadent dessert that combines the luscious flavors of semi-sweet chocolate and creamy peanut butter. Featuring a warm, gooey center and a perfectly baked exterior, this easy-to-make treat is ideal for impressing guests or indulging in a comforting sweet. The cakes bake in just over ten minutes, making it a quick gourmet option for chocolate and peanut butter lovers.
Ingredients
Main Ingredients
- 1/2 cup unsalted butter
- 4 ounces semi-sweet chocolate, chopped
- 1/2 cup creamy peanut butter
- 3/4 cup powdered sugar
- 2 large eggs
- 2 large egg yolks
- 1 teaspoon vanilla extract
- 1/4 teaspoon salt
- 1/4 cup all-purpose flour
- 2 tablespoons unsweetened cocoa powder
For Greasing
- Butter for greasing ramekins
- Cocoa powder for dusting ramekins
Instructions
- Preheat and Prepare Ramekins: Preheat your oven to 425°F (220°C). Generously grease four 6-ounce ramekins with butter and lightly dust them with cocoa powder, tapping out any excess to prevent sticking.
- Melt Butter and Chocolate: In a heatproof bowl, melt the unsalted butter and chopped semi-sweet chocolate together either over a double boiler or in the microwave using 30-second intervals, stirring between intervals until the mixture is smooth and fully combined.
- Add Peanut Butter: Whisk the creamy peanut butter into the melted chocolate and butter mixture until smooth and completely integrated.
- Mix in Sugar and Eggs: Incorporate the powdered sugar by whisking it into the mixture thoroughly. Next, beat in the two large eggs and two egg yolks one at a time, ensuring each is fully combined before adding the next.
- Flavor and Fold in Dry Ingredients: Stir in the vanilla extract and salt to enhance flavor. Gently fold in the all-purpose flour and unsweetened cocoa powder just until the batter is combined, being careful not to overmix.
- Divide and Bake: Evenly distribute the batter among the prepared ramekins, placing them on a baking sheet for easy handling. Bake in the preheated oven for 11 to 13 minutes, or until the edges are set but the centers remain soft and molten.
- Release and Serve: Remove the ramekins from the oven and let them rest for 1 minute. Carefully run a knife around the edges of each cake to loosen them, then invert onto serving plates. Serve immediately to enjoy the warm, gooey centers at their best.
Notes
- For a stronger peanut flavor, use natural peanut butter instead of creamy.
- Add a pinch of flaky sea salt on top of the cakes just before serving to enhance the flavor contrast.
- Do not overbake as the molten centers will firm up quickly once cooled.
- These lava cakes are best enjoyed fresh from the oven to experience the warm, gooey texture.


