
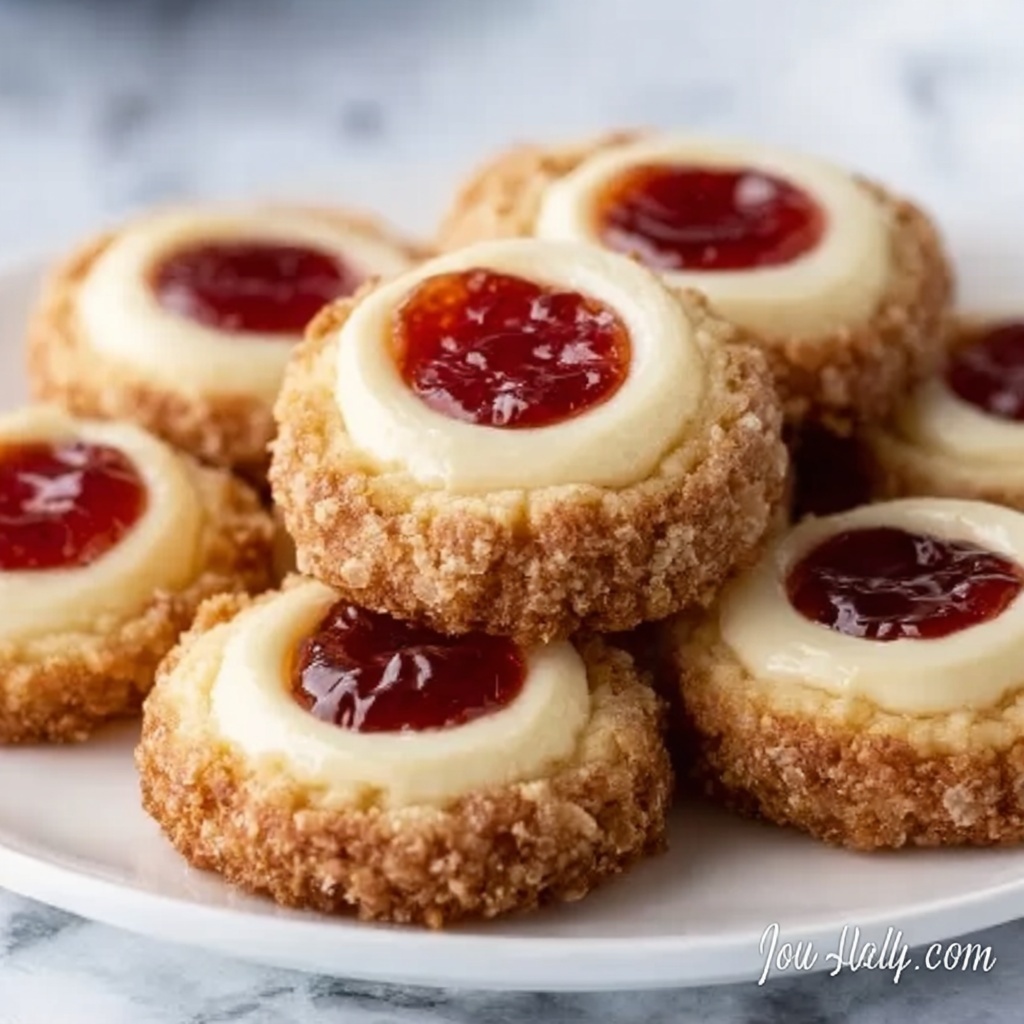
If you are searching for a delightful treat that marries the crumbly goodness of classic cookies with the creamy richness of cheesecake, then this Mouthwatering Cheesecake Thumbprint Cookies Recipe is your new best friend in the kitchen. These cookies are not only irresistibly soft and buttery but also flaunt a luscious cheesecake center topped with a burst of fruity jam. Perfect for sharing with loved ones or indulging in a cozy moment alone, these gems bring joy in every bite and are surprisingly easy to make. Once you try this Mouthwatering Cheesecake Thumbprint Cookies Recipe, you’ll find it hard to stop at just one.
Ingredients You’ll Need
The beauty of this recipe lies in its simplicity. Each ingredient plays a crucial role, from creating a tender cookie base to achieving that silky cheesecake filling and vibrant jam topping. Gather these essentials and prepare to whip up some magic.
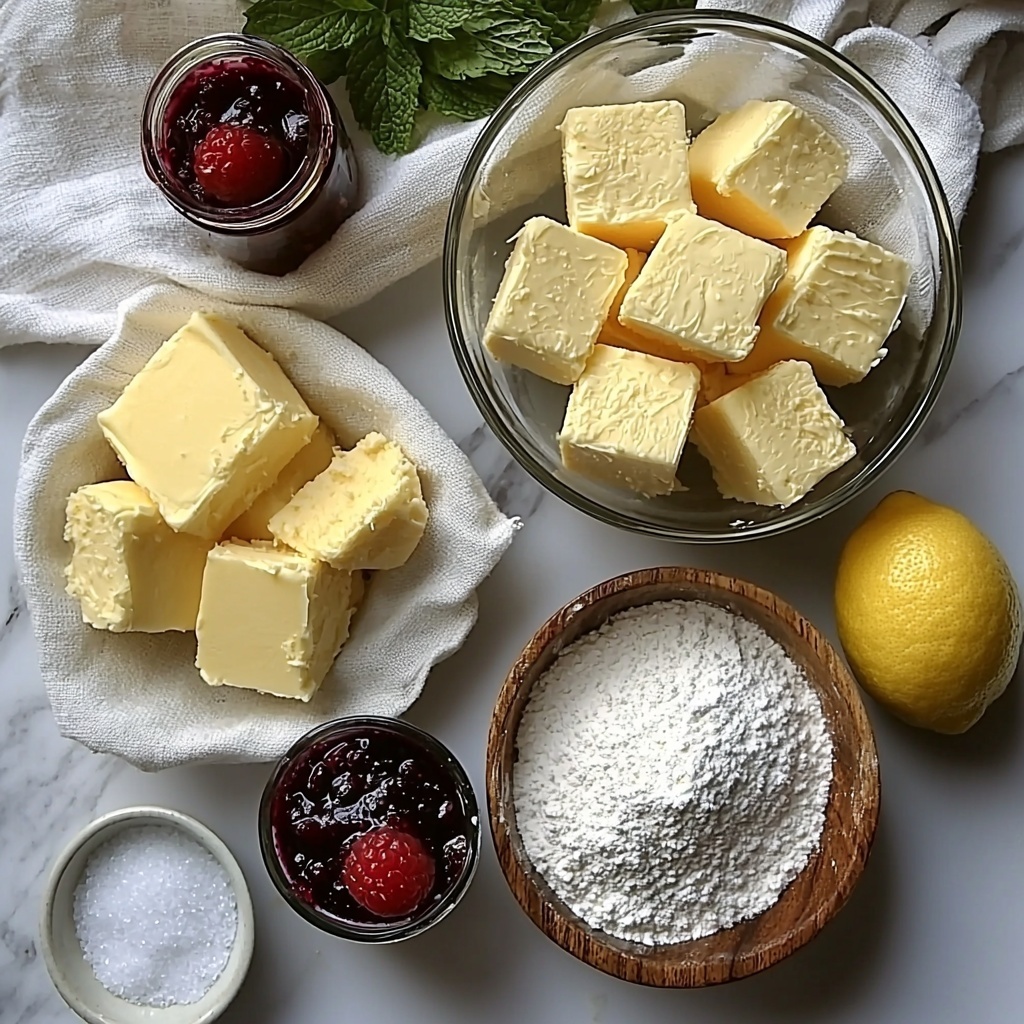
- 1 cup unsalted butter, softened: Provides a creamy, rich base and tender texture to the cookie dough.
- 1/2 cup granulated sugar: Adds sweetness and contributes to the cookie’s light crumb.
- 1/4 cup light brown sugar, packed: Imparts a subtle caramel flavor and moisture.
- 2 large egg yolks, room temperature: Helps bind the dough and enriches the flavor.
- 2 teaspoons vanilla extract: Enhances overall aroma and sweetness.
- 2 1/2 cups all-purpose flour: The structure of the cookie that gives it its shape.
- 1/2 teaspoon fine salt: Balances sweetness and intensifies flavors.
- 6 ounces cream cheese, softened: The star of the cheesecake filling, delivering a smooth and tangy center.
- 1/3 cup powdered sugar: Adds sweetness and smooth texture to the cheesecake mixture.
- 1 large egg yolk, room temperature: Adds richness and helps thicken the cheesecake filling.
- 1 teaspoon vanilla extract: Brings warmth and complements the cream cheese.
- 1 teaspoon fresh lemon juice or 1/2 teaspoon lemon zest: Brightens the cheesecake filling with a hint of citrus freshness.
- 1/3 cup raspberry, strawberry, or mixed berry jam (or pie filling): Provides a sweet-tart topping that perfectly contrasts the creamy filling.
How to Make Mouthwatering Cheesecake Thumbprint Cookies Recipe
Step 1: Prepare the Cookie Dough
Start by lining two baking sheets with parchment paper so your cookies won’t stick and clean-up is a breeze. Then, beat the softened butter with both granulated and light brown sugar until the mixture is creamy and fluffy—this step sets the foundation for a tender, melt-in-your-mouth cookie.
Step 2: Incorporate Egg Yolks and Vanilla
Next, add the egg yolks and vanilla extract into your fluffy butter mixture. Mix everything until fully combined, making sure to scrape down the sides of the bowl to keep ingredients evenly distributed for that perfect cookie texture.
Step 3: Combine Dry Ingredients
Whisk together your flour and salt in a separate bowl. Slowly add this dry mixture to the wet components while mixing on low speed. Be cautious not to overmix—this maintains a soft, tender dough instead of a tough one.
Step 4: Shape the Dough Balls
Use a tablespoon to scoop portions of dough and roll each into smooth balls between your palms. Lay the dough balls evenly spaced on your prepared baking sheets to give them room to spread just right.
Step 5: Chill the Dough
Pop those trays into the refrigerator for at least 30 minutes. Chilling firms up the dough, helping the cookies hold their shape during baking and enhancing their buttery flavor.
Step 6: Make the Cheesecake Filling
While the dough chills, beat together the softened cream cheese and powdered sugar until smooth and creamy. Stir in the remaining egg yolk, vanilla, and lemon juice or zest until the mixture turns thick and silky—this filling is what makes these thumbprint cookies truly melt-in-your-mouth.
Step 7: Create Thumbprints in the Dough
Preheat your oven to 350°F (175°C). Remove one tray of dough from the fridge and gently press a small well in the center of each dough ball using your thumb or the back of a half-teaspoon measure. If cracks show around the edges, gently smooth them with your fingers to avoid any breaks.
Step 8: Fill with Cheesecake Mixture
Spoon or pipe a generous amount of the luscious cheesecake filling into each thumbprint, filling it almost to the top but being careful not to overflow it—this keeps the filling perfectly set as it bakes.
Step 9: Add the Jam Topping
Top each filled thumbprint with a small dollop of your favorite berry jam or pie filling. For an artistic touch, use a toothpick to gently swirl the jam into the cream cheese layer, creating a pretty marbled effect that looks almost too good to eat.
Step 10: Bake to Perfection
Bake your cookies one sheet at a time for 11 to 13 minutes. You’ll know they’re ready once the edges turn a lovely light golden color and the cheesecake center looks set but still slightly soft—this ensures a tender bite and creamy center.
Step 11: Cooling Time
Allow the cookies to cool on the baking sheet for 5 minutes to firm up the centers, then transfer them to a wire rack to cool completely. Cooling fully helps the flavors meld beautifully and the cheesecake filling to achieve that perfect luscious texture.
Step 12: Final Touch and Storage
Once cooled, you can serve the cookies just as they are, or add an extra tiny swirl of jam on top to brighten them up visually. Remember to store any leftovers in an airtight container in the refrigerator and bring them to room temperature before enjoying to experience the best flavor and texture.
How to Serve Mouthwatering Cheesecake Thumbprint Cookies Recipe
Garnishes
To make your Mouthwatering Cheesecake Thumbprint Cookies Recipe truly pop, sprinkle a touch of powdered sugar over the top or add fresh berries around the serving plate. A light dusting of finely chopped fresh mint can also add a refreshing contrast and make your presentation look like it came straight from a bakery.
Side Dishes
These cookies shine alongside a hot cup of tea or coffee, which balances their sweetness wonderfully. For a special occasion, serve with a side of vanilla ice cream or whipped cream to complement the creamy cheesecake filling and fruity topping.
Creative Ways to Present
Consider arranging the cookies on a tiered dessert stand for an elegant touch at your next gathering. You could also package them in cellophane bags tied with colorful ribbons for gift-giving, turning this Mouthwatering Cheesecake Thumbprint Cookies Recipe into a thoughtful homemade present that everyone will love.
Make Ahead and Storage
Storing Leftovers
After enjoying these cookies fresh, store any leftovers in an airtight container in the refrigerator. This preserves the cheesecake filling’s creaminess and keeps the cookie dough soft without becoming soggy. Just allow them to come back to room temperature before serving for that fresh-baked feel.
Freezing
You can freeze these Mouthwatering Cheesecake Thumbprint Cookies Recipe dough balls before baking. Place them on a tray to freeze individually, then transfer to a freezer-safe bag for up to 3 months. When ready, thaw in the refrigerator and bake as directed. Baked cookies also freeze well—wrap them tightly and thaw at room temperature.
Reheating
Warm refrigerated or frozen cookies in a low oven (around 300°F) for 5 to 7 minutes, or microwave them for about 10 seconds to bring back their soft texture and melt-in-your-mouth cheesecakiness. Just be careful not to overheat the cheesecake filling to avoid drying it out.
FAQs
Can I substitute cream cheese with a lighter option?
While full-fat cream cheese delivers the best texture and flavor for the filling, you can use light cream cheese to reduce calories. Just note the texture might be slightly less creamy and rich, but the cookies will still be delicious.
What jams work best for these thumbprint cookies?
Berry jams like raspberry, strawberry, or mixed berry are classic choices because their tartness complements the sweet cheesecake filling beautifully. However, feel free to experiment with flavors like apricot or cherry for a different twist.
Do I need to chill the dough before baking?
Yes, chilling the dough is important because it helps the cookies maintain their shape and prevents excessive spreading in the oven. It also enhances the flavors by allowing the ingredients to meld better.
Can I make these cookies gluten-free?
To make a gluten-free version, substitute the all-purpose flour with a gluten-free flour blend designed for baking. Keep an eye on the dough’s consistency and adjust if needed, but otherwise, the recipe should work well.
How long do these cookies stay fresh?
Stored properly in an airtight container in the refrigerator, they stay fresh for about 5 days. Beyond that, the cheesecake filling might begin to lose its perfect texture, so it’s best to enjoy them within that timeframe.
Final Thoughts
There is something so comforting and joyful about sinking your teeth into these luscious, creamy, and fruit-topped cookies. The Mouthwatering Cheesecake Thumbprint Cookies Recipe offers a beautiful blend of textures and flavors that’s impossible to resist. Whether you’re baking for an everyday treat or a special occasion, these cookies guarantee smiles all around. Give this recipe a try—you deserve a little deliciousness in your life!
Print
Mouthwatering Cheesecake Thumbprint Cookies Recipe
- Prep Time: 20 minutes
- Cook Time: 13 minutes
- Total Time: 1 hour 5 minutes
- Yield: 24 servings
- Category: Dessert
- Method: Baking
- Cuisine: American
Description
These mouthwatering Cheesecake Thumbprint Cookies combine a tender buttery cookie base with a luscious cheesecake filling and a sweet dollop of berry jam. Perfectly chilled and baked to golden edges, the cookies feature a creamy, tangy center with a hint of lemon zest for brightness. Ideal for dessert tables, afternoon tea, or special occasions, these charming cookies offer a delightful texture contrast and irresistible flavor in every bite.
Ingredients
Cookie Dough
- 1 cup unsalted butter, softened
- 1/2 cup granulated sugar
- 1/4 cup light brown sugar, packed
- 2 large egg yolks, room temperature
- 2 teaspoons vanilla extract
- 2 1/2 cups all-purpose flour
- 1/2 teaspoon fine salt
Cheesecake Filling
- 6 ounces cream cheese, softened (brick style, full-fat)
- 1/3 cup powdered sugar
- 1 large egg yolk, room temperature
- 1 teaspoon vanilla extract
- 1 teaspoon fresh lemon juice or 1/2 teaspoon lemon zest
Topping
- 1/3 cup raspberry, strawberry, or mixed berry jam (or pie filling)
Instructions
- Prepare baking sheets: Line two baking sheets with parchment paper and set aside to prevent sticking and ease cookie removal.
- Make cookie dough: In a large bowl, beat softened butter with granulated sugar and brown sugar on medium speed for 2–3 minutes until light and fluffy, creating an airy texture in the dough.
- Add egg yolks and vanilla: Blend in the egg yolks and vanilla extract until fully combined, ensuring an even and flavorful base.
- Combine dry ingredients: Whisk flour and salt in a separate bowl; gradually add this mixture to the wet ingredients on low speed just until a soft, thick dough forms, careful not to overmix for tender cookies.
- Shape dough balls: Scoop dough into 1-tablespoon portions and roll into smooth balls between your palms. Place spaced evenly on prepared baking sheets.
- Chill dough: Refrigerate the dough balls for 30 minutes to 2 hours until firm; chilling helps cookies hold their shape during baking.
- Make cheesecake filling: Beat softened cream cheese and powdered sugar until smooth. Add egg yolk, vanilla, and lemon juice or zest and mix until thick and creamy.
- Preheat oven and form thumbprints: Heat oven to 350°F (175°C). Remove one tray of chilled dough and gently press a small well into the center of each ball using your thumb or a measuring spoon, smoothing any cracks.
- Fill cookie centers: Spoon or pipe cheesecake filling into each thumbprint nearly to the top, taking care not to overfill.
- Add jam topping: Place a small dollop of jam or pie filling atop the cheesecake layer. Optionally swirl with a toothpick for a marbled effect.
- Bake cookies: Bake one sheet at a time for 11–13 minutes until edges are lightly golden and filling is set but not browned; centers will remain soft.
- Cool cookies: Let cookies cool on the baking sheet for 5 minutes, then transfer to a wire rack to cool completely; cheesecake centers will firm up as they cool.
- Serve and store: Serve as is or garnish with extra jam swirls. Store leftovers in an airtight container in the refrigerator and bring to room temperature before serving for optimal texture and flavor.
Notes
- Ensure all eggs and dairy are at room temperature for better mixing and texture.
- Chilling dough is crucial to prevent spreading and maintain shape.
- Use full-fat cream cheese for the richest filling.
- Handle the dough gently when making thumbprints to avoid cracks; smooth with fingers if needed.
- Swirling jam into the cheesecake adds a pretty marbled look but is optional.
- Cookies can be stored refrigerated up to 5 days or frozen for longer storage.
- Let refrigerated cookies sit at room temperature before serving to soften the cheesecake center.


