

If you love the idea of a colorful, creamy dessert that comes together without firing up the oven, you are in absolute for a treat with this No-Bake Purple Cheesecake Recipe. This stunning cheesecake combines a buttery, crunchy crust with a luscious purple-hued cream cheese filling that’s smooth, slightly sweet, and irresistibly velvety. Whether you’re aiming to impress guests or just craving something special for yourself, this cake delivers a visual pop and delightful flavor all in one chill, no-bake package.
Ingredients You’ll Need
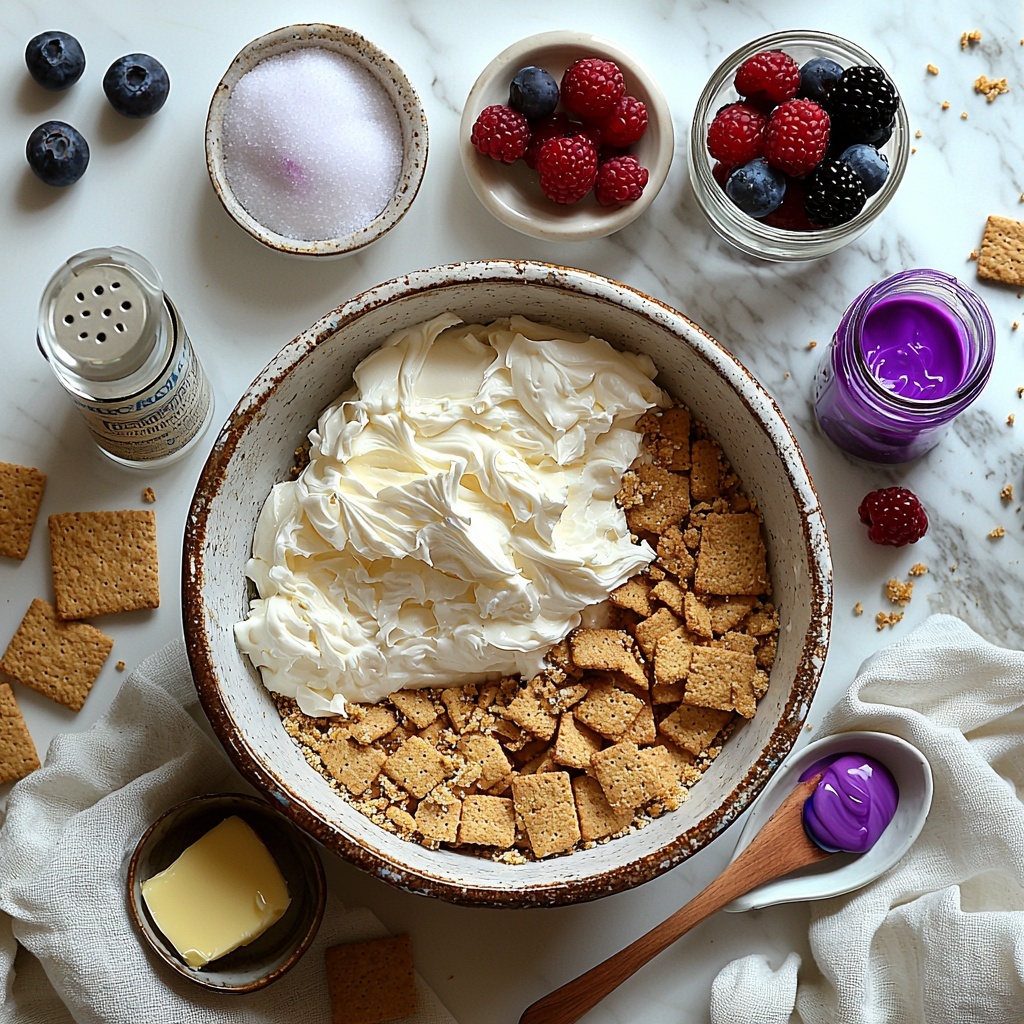
Gathering these simple but essential ingredients is the first step to creating your enchanting No-Bake Purple Cheesecake Recipe. Each one plays a starring role: the biscuits form a crisp, buttery base, the cream cheese brings that classic cheesecake richness, and the purple food coloring gives it its signature vibrant color that makes every slice a showstopper.
- 300 g crushed biscuits: Use graham crackers or a similar biscuit for a crunchy, sweet base that holds the cheesecake perfectly.
- 100 g melted butter: This adds richness and helps bind the biscuit crumbs into a firm crust.
- 600 g cream cheese, room temperature: The creamy heart of your cheesecake, it ensures a smooth, tangy filling.
- 200 g granulated sugar: Sweetens the filling just enough without overpowering.
- 1 tsp vanilla extract: Introduces a lovely depth of flavor and balances the cheese’s tang.
- 250 ml heavy cream: Whipped to soft peaks, it lightens the filling for that melt-in-your-mouth texture.
- Purple gel food coloring: Adds the magical purple hue that makes this cheesecake truly unique.
- Optional fresh red berries: Perfect for adding a fruity contrast and bright garnish.
How to Make No-Bake Purple Cheesecake Recipe
Step 1: Prepare the Crust
First things first, mix your crushed biscuits with the melted butter until every crumb is coated. Press this mixture firmly into the bottom of a springform pan to create an even, compact base. This crust will set in the fridge, giving you the perfect sturdy foundation for your purple cheesecake topping.
Step 2: Make the Cream Cheese Filling
In a large bowl, beat the cream cheese with sugar and vanilla until completely smooth and creamy. This ensures there are no lumps and creates the luscious texture cheesecake lovers crave.
Step 3: Whip the Heavy Cream
Whip the heavy cream separately until stiff peaks form. This airy cream will be gently folded into the cream cheese mixture, giving your cheesecake a delectably light and fluffy consistency.
Step 4: Combine and Color the Filling
Carefully fold the whipped cream into the cream cheese base to maintain that lightness. Then, add your purple gel food coloring slowly, blending until you reach that perfect shade of purple you’ve been dreaming of.
Step 5: Assemble and Chill
Pour the vibrant filling over the chilled crust and smooth the top with a spatula. Refrigerate your masterpiece for at least 4 hours or, better yet, overnight, so it can set fully and develop the best flavor and texture.
Step 6: Add Final Touches
Before serving, feel free to top your No-Bake Purple Cheesecake Recipe with some freshly whipped cream or a white chocolate ganache for an elegant finish. If you like, scatter a handful of fresh red berries on top for a pop of color and a tart contrast.
How to Serve No-Bake Purple Cheesecake Recipe
Garnishes
The garnish is your chance to elevate this cheesecake into a showpiece. Think dollops of whipped cream piped artistically or drizzling a decadent white chocolate ganache. Fresh red berries or edible flowers also add a garden freshness and beautiful visual appeal that perfectly complements the purple filling.
Side Dishes
Keep it simple yet chic by serving this cheesecake with a side of fresh fruit compote or a light citrus salad. These bright, fruity companions cut through the richness of the cheesecake and provide a delightful balance of flavors on your plate.
Creative Ways to Present
For a fun twist, slice your No-Bake Purple Cheesecake Recipe into individual jars or clear glasses layered with crumbled crust and fruit. Alternatively, serve thin slices atop colorful dessert plates with a drizzle of berry coulis to match the color theme—every bite becomes a feast for the eyes and the palate.
Make Ahead and Storage
Storing Leftovers
Your cheesecake stays fresh and creamy when stored in the refrigerator, ideally covered with plastic wrap or in an airtight container to prevent it from absorbing other fridge odors. It’s best eaten within 3 to 4 days for optimal taste and texture.
Freezing
If you want to save any leftovers or prepare in advance, this cheesecake freezes well. Wrap it tightly in plastic wrap and foil before placing it in the freezer. Thaw overnight in the refrigerator before serving, and the texture will be just as delightful as the day you made it.
Reheating
This dessert is meant to be served chilled, so there’s no need to reheat before enjoying. Simply bring it out of the fridge a few minutes prior to slicing to make cutting easier and enhance its creamy texture.
FAQs
Can I use different biscuits for the crust?
Absolutely! While graham crackers are classic, you can use digestive biscuits, vanilla wafers, or even crushed Oreos for a twist in flavor and color.
Is it possible to make this recipe vegan?
Yes, by substituting cream cheese with a vegan cream cheese alternative and using coconut cream or another plant-based heavy cream replacement, you can create a delicious vegan version.
How do I get that perfect purple color?
Start by adding a few drops of purple gel food coloring and mix well, then add more if needed until you achieve your desired jewel tone. Gel colors give deeper saturation than liquid ones.
Can I add other flavors to the filling?
Definitely! Lemon zest, almond extract, or even mashed blueberries can complement or enhance the purple color and the cheesecake’s flavor profile.
How long does the cheesecake take to set?
For the best results, refrigerate for at least 4 hours, though overnight chilling allows the flavors to meld and the texture to firm up perfectly.
Final Thoughts
There is something truly magical about this No-Bake Purple Cheesecake Recipe. It’s simple enough to whip up on a whim yet impressive enough to wow any crowd. The gorgeous purple shade, creamy filling, and buttery crust join forces in a dessert experience that’s as delightful to eat as it is to look at. Give it a try—you’ll quickly understand why it’s become such a beloved favorite in my recipe collection!
Print
No-Bake Purple Cheesecake Recipe
- Prep Time: 20 minutes
- Cook Time: 0 minutes
- Total Time: 4 hours 20 minutes
- Yield: 8 servings
- Category: Dessert
- Method: No-Cook
- Cuisine: French-inspired
- Diet: Vegetarian
Description
A vibrant and creamy no-bake purple cheesecake featuring a crunchy biscuit crust and a smooth cream cheese filling tinted with natural gel food coloring, perfect for an elegant dessert without the oven.
Ingredients
For the Crust
- 300 g crushed biscuits (such as graham crackers)
- 100 g melted butter
For the Filling
- 600 g cream cheese at room temperature
- 200 g powdered sugar
- 1 tsp vanilla extract
- 250 ml heavy cream
- Purple gel food coloring (to taste)
For Decoration (Optional)
- Red fruits (such as raspberries or strawberries)
- Whipped white cream or white chocolate ganache
Instructions
- Prepare the Crust: Mix the crushed biscuits with melted butter until evenly combined. Press this mixture firmly into the base of a springform pan to form a compact crust. Refrigerate for 15 minutes to allow the crust to set and harden.
- Make the Filling: In a large bowl, beat the cream cheese until smooth. Add the powdered sugar and vanilla extract, and continue beating until fully incorporated and creamy.
- Whip the Cream: In a separate bowl, whip the heavy cream until stiff peaks form. Gently fold the whipped cream into the cream cheese mixture, ensuring it is well combined but still light and airy.
- Add Color: Add a few drops of purple gel food coloring to the mixture, stirring gently until the desired purple shade is achieved.
- Assemble the Cheesecake: Pour the colored filling over the chilled crust and spread it evenly using a spatula. Smooth the surface carefully.
- Chill the Cheesecake: Refrigerate the cheesecake for at least 4 hours, preferably overnight, to allow it to fully set and develop flavor.
- Decorate: Before serving, optionally decorate the top with whipped white cream or white chocolate ganache and garnish with fresh red fruits for a beautiful finish.
Notes
- Ensure the cream cheese is at room temperature for a smoother filling without lumps.
- Do not overwhip the heavy cream, as it can separate and form butter.
- If purple gel coloring is not available, natural alternatives like blueberry or blackberry juice can be used, though the color may be less vibrant.
- The cheesecake must be refrigerated properly to maintain its shape and freshness.
- This recipe is gluten-friendly if gluten-free biscuits are used.


