

If you have a soft spot for rich, fudgy chocolate and crave a creamy frozen treat without the fuss of an ice cream maker, then this No Churn Chocolate Brownie Ice Cream Recipe is your new best friend. It’s a delightfully simple way to enjoy homemade ice cream, combining luscious whipped cream and sweetened condensed milk with cocoa and decadent brownie chunks for a dreamy dessert experience that’s perfect any time of year.
Ingredients You’ll Need
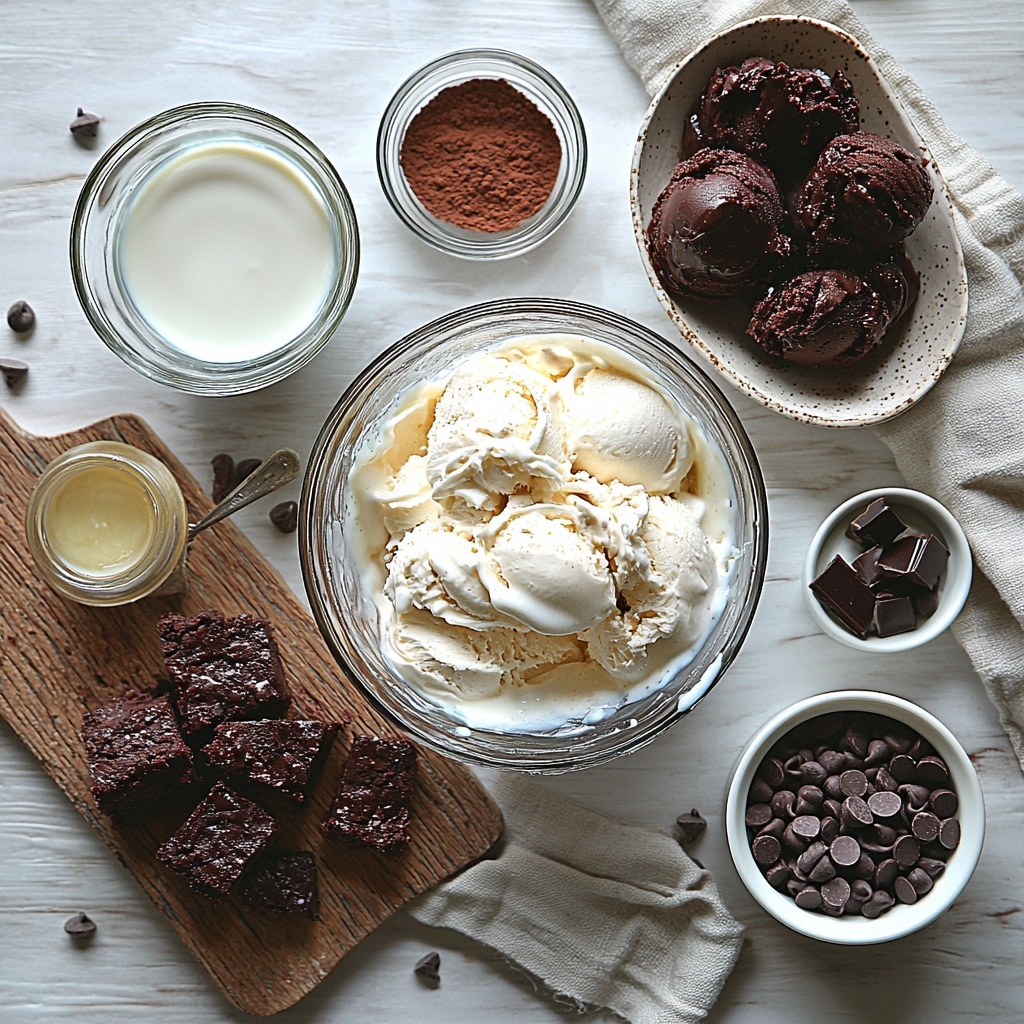
This recipe uses straightforward ingredients that come together effortlessly to create a velvety texture and deep chocolate flavor. Each component plays an essential role in balancing creaminess, sweetness, and that irresistible fudgy bite.
- 2 cups heavy whipping cream: This is what gives the ice cream its rich, creamy texture and helps it whip up to beautiful stiff peaks.
- 1 can (14 ounces) sweetened condensed milk: Adds sweetness and body without needing to churn or add ice crystals.
- 1/2 cup unsweetened cocoa powder: Provides that rich, intense chocolate flavor with a slightly bittersweet edge.
- 1 teaspoon pure vanilla extract: Boosts the overall flavor and complements the chocolate perfectly.
- 1/4 teaspoon salt: Balances sweetness and amplifies the chocolate notes.
- 1 1/2 cups fudgy brownie pieces, baked and cooled: The star ingredient adding chewy, gooey bites of brownie bliss.
- 1/2 cup semi-sweet chocolate chips or chunks: For pops of melty chocolate dispersed throughout the ice cream.
How to Make No Churn Chocolate Brownie Ice Cream Recipe
Step 1: Whip the Cream
Start by placing your heavy whipping cream in a large mixing bowl, making sure it’s cold for the best whipping results. Beat it using an electric mixer until firm, stiff peaks form—this will be the cloud-like base of your ice cream that gives it its signature creaminess without churning.
Step 2: Combine Cocoa Mixture
In a separate bowl, whisk together the sweetened condensed milk, unsweetened cocoa powder, pure vanilla extract, and a pinch of salt. Stir until the mixture is smooth and silky, eliminating any lumps so the chocolate flavor will be consistent and rich throughout.
Step 3: Fold Ingredients Together
Gently fold the cocoa mixture into the whipped cream. Take care to do this slowly and with care to avoid deflating the fluffy cream. Once combined, fold in the fudgy brownie pieces and semi-sweet chocolate chips evenly so that every scoop promises a bit of deliciousness in every bite.
Step 4: Freeze Until Firm
Transfer your delightful batter into a loaf pan or a freezer-safe container, smoothing the top with a spatula. Cover tightly with plastic wrap or a lid and pop it into the freezer. Let it firm up for at least 6 hours to develop that luscious, scoopable texture that makes this No Churn Chocolate Brownie Ice Cream Recipe so irresistible.
How to Serve No Churn Chocolate Brownie Ice Cream Recipe
Garnishes
Top with a sprinkle of crushed nuts, a drizzle of warm chocolate fudge sauce, or even a few fresh berries for a pop of color and flavor. A dollop of whipped cream can add that extra touch of indulgence that complements the chocolate beautifully.
Side Dishes
This ice cream pairs wonderfully with fresh fruit like strawberries or raspberries, or alongside a warm brownie or chocolate lava cake for a truly decadent dessert duo. You can also serve it with crispy waffle cones or freshly baked cookies for a fun, textural contrast.
Creative Ways to Present
Try scooping this ice cream into small dessert glasses and layering with brownie crumbles and chocolate sauce to create an elegant parfait. Another idea is to sandwich the ice cream between two brownie squares for a homemade ice cream brownie sandwich that’s sure to dazzle your guests.
Make Ahead and Storage
Storing Leftovers
Keep any leftover No Churn Chocolate Brownie Ice Cream Recipe stored tightly covered in the freezer for up to 2 weeks. This helps maintain its rich flavor and creamy texture without drying out or absorbing other freezer odors.
Freezing
This recipe is designed to be frozen and served straight from the freezer. Because it contains no additives or preservatives beyond the original ingredients, freezing times beyond 2 weeks may compromise flavor and texture. Always cover it well to prevent ice crystals from forming.
Reheating
Unlike cooked desserts, this ice cream isn’t meant to be reheated. Let it sit at room temperature for about 5 minutes before scooping to soften it slightly so every spoonful is perfectly scoopable and creamy without melting too quickly.
FAQs
Can I use store-bought brownies for this recipe?
Absolutely! Using homemade or store-bought brownies works just fine as long as they are fully cooled before mixing so they don’t melt into the ice cream base.
Do I need an ice cream maker for this No Churn Chocolate Brownie Ice Cream Recipe?
Nope! That’s the beauty of a no churn recipe—you just mix, freeze, and enjoy without any special equipment.
Can I substitute the cocoa powder with melted chocolate?
You can, but keep in mind that melted chocolate may affect the texture slightly. Cocoa powder keeps the mixture smooth and consistent, so it’s the preferred choice for this recipe.
Is this recipe suitable for vegetarians?
Yes, it uses no animal gelatin or non-vegetarian ingredients, making it a perfect treat for vegetarians.
How long should I let the ice cream sit before scooping?
Letting it sit at room temperature for about 5 minutes softens it just enough for smooth scooping without losing its firm texture.
Final Thoughts
This No Churn Chocolate Brownie Ice Cream Recipe is a deliciously simple way to bring homemade magic to your freezer. With minimal effort and straightforward ingredients, you get maximum indulgence packed with chocolate and chewy brownie bits. Trust me, once you try it, it’ll become your go-to dessert for any occasion.
Print
No Churn Chocolate Brownie Ice Cream Recipe
- Prep Time: 15 minutes
- Cook Time: 0 minutes
- Total Time: 6 hours 15 minutes
- Yield: 8 servings
- Category: Dessert
- Method: No-Cook
- Cuisine: American
- Diet: Vegetarian
Description
This No Churn Chocolate Brownie Ice Cream is a rich and creamy homemade frozen dessert that blends fudgy brownie chunks with velvety chocolate ice cream. Made without an ice cream maker, it combines whipped heavy cream, sweetened condensed milk, and cocoa powder for an easy, indulgent treat perfect for summer or any time you crave chocolatey goodness.
Ingredients
Ice Cream Base
- 2 cups heavy whipping cream, cold
- 1 can (14 ounces) sweetened condensed milk
- 1/2 cup unsweetened cocoa powder
- 1 teaspoon pure vanilla extract
- 1/4 teaspoon salt
Add-ins
- 1 1/2 cups fudgy brownie pieces, baked and cooled
- 1/2 cup semi-sweet chocolate chips or chunks
Instructions
- Whip the Cream: In a large mixing bowl, beat the cold heavy whipping cream with an electric mixer until stiff peaks form, creating a fluffy base for the ice cream.
- Mix Chocolate Base: In a separate bowl, whisk together the sweetened condensed milk, unsweetened cocoa powder, pure vanilla extract, and salt until smooth and fully combined.
- Combine Mixtures: Gently fold the chocolate mixture into the whipped cream, taking care not to deflate the airy texture of the whipped cream for a creamy consistency.
- Add Brownie and Chocolate Chips: Fold in the fudgy brownie pieces and semi-sweet chocolate chips evenly through the mixture to add texture and bursts of chocolate.
- Freeze: Transfer the blended mixture into a loaf pan or any freezer-safe container. Smooth the top surface, cover tightly with plastic wrap or a lid, and freeze for at least 6 hours until firm.
- Serve: Before serving, let the ice cream sit at room temperature for about 5 minutes to soften slightly for easier scooping and maximum flavor enjoyment.
Notes
- Use homemade or store-bought brownies; ensure they are completely cooled before folding in to prevent melting.
- For extra richness, drizzle chocolate fudge sauce over the mixture before freezing.
- Store the ice cream tightly covered in the freezer for up to 2 weeks to maintain freshness.


