

If you’re anything like me and love the perfect blend of rich, velvety cake with melty chocolate surprises, then get ready to fall head over heels for this Red Velvet Chocolate Chip Cake Recipe. It’s a luscious, moist red velvet cake bursting with mini chocolate chips in every bite, crowned with a dreamy cream cheese frosting that’s so smooth and tangy, it practically melts on your tongue. Whether it’s for a special occasion or just because, this cake is the ultimate showstopper that balances sweetness and texture flawlessly, making every slice feel like a little celebration.
Ingredients You’ll Need
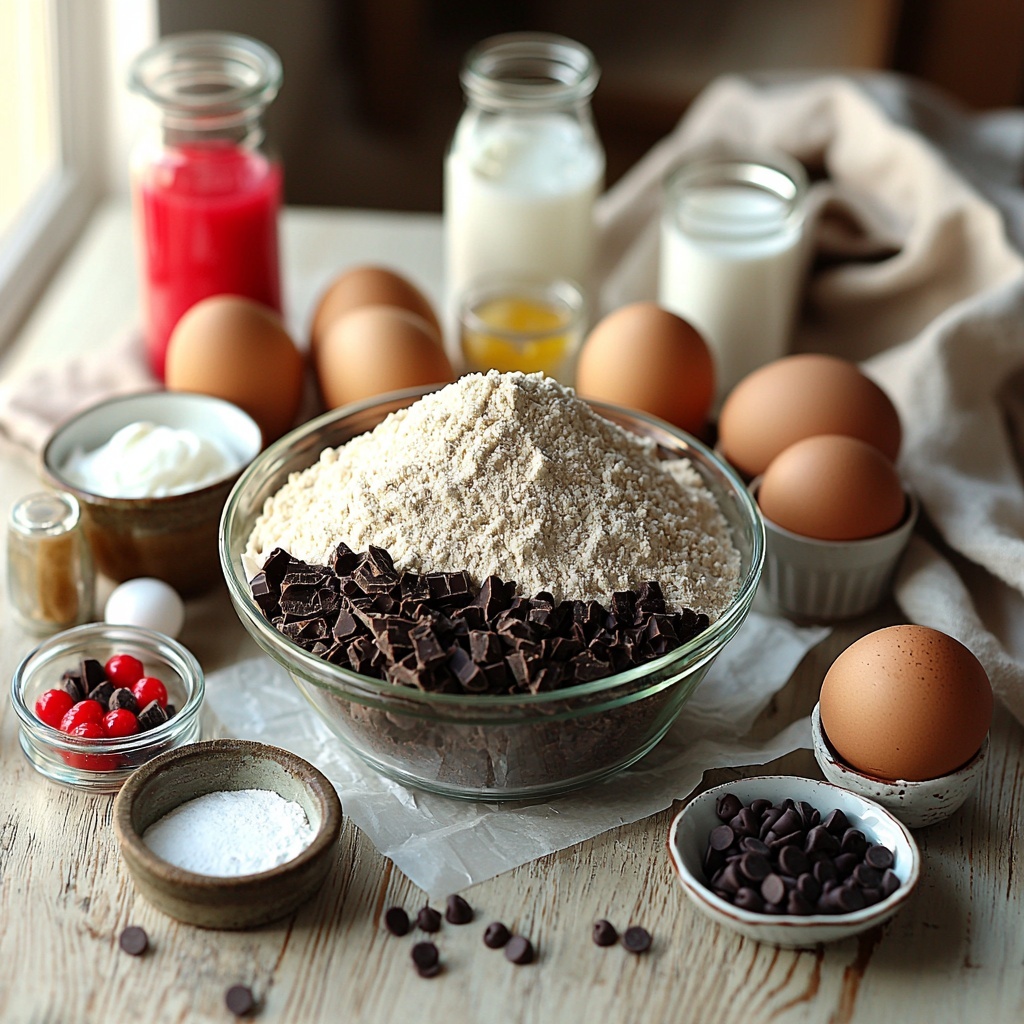
Gathering these straightforward but essential ingredients is the first step to creating your stunning Red Velvet Chocolate Chip Cake Recipe. Each element plays a key role, from the rich cocoa powder lending depth, to the red food gel dye that gives the cake its iconic vibrant color and the mini chocolate chips for delightful bursts of chocolatey goodness.
- All-purpose flour: The base that provides the structure and tender crumb you’ll love.
- Unsweetened cocoa powder (Dutch process): Adds a subtle chocolate undertone that’s classic in red velvet.
- Baking powder: Helps the cake rise just right for a light texture.
- Baking soda: Works perfectly with vinegar to create lift and balance acidity.
- Salt: Enhances all the flavors and prevents the sweetness from becoming flat.
- Oil (canola or vegetable): Keeps the cake incredibly moist without weighing it down.
- Unsalted butter (room temperature): Adds richness and helps with the fluffy crumb.
- White granulated sugar: Sweetens the cake while contributing to tenderness.
- Pure vanilla extract: Elevates the overall flavor with its warm, aromatic notes.
- White vinegar: Reacts with baking soda for perfect rise and adds tanginess.
- Sour cream (or Greek yogurt): Brings moistness and a slight tang that’s signature to red velvet.
- Large eggs (room temperature): Provide stability and structure for the cake layers.
- Red food gel dye: The magic touch that gives the cake its classic red velvet vibrancy.
- Buttermilk (room temperature): Adds moisture and a delicate tartness.
- Mini chocolate chips: Folded inside for delightful sweet chocolate bites throughout the cake.
- Unsalted butter (for frosting): Creamy base of the luscious cream cheese frosting.
- Cream cheese (for frosting): Tangy and smooth, it’s the star of the frosting.
- Powdered sugar (sifted): Sweetens and thickens the frosting perfectly.
- Pure vanilla extract (for frosting): Adds a fragrant nuance to the frosting.
- Mini chocolate chips (for frosting): Sprinkled on top for extra chocolatey crunch.
How to Make Red Velvet Chocolate Chip Cake Recipe
Step 1: Prepare Your Pans and Oven
Start by heating your oven to 350℉. Spray three 8-inch cake pans with a nonstick spray, then line the bottoms with parchment paper and spray again. Prepping your pans this way ensures your beautiful layers come out cleanly and maintain their perfect shape.
Step 2: Mix Dry Ingredients
In a medium bowl, sift together the flour, Dutch-process cocoa powder, baking powder, baking soda, and salt. Sifting ensures the dry ingredients combine smoothly and your cake batter is nice and light without any lumps.
Step 3: Cream Butter, Oil, and Sugar
In a large bowl using a mixer, beat the unsalted butter, oil, and sugar on high speed for 2 minutes until pale and fluffy. This step is crucial for a tender crumb and a light, airy cake foundation.
Step 4: Add Wet Ingredients
Mix in the vanilla extract, vinegar, sour cream, eggs, and the red food gel dye on medium speed until just combined. This will give your cake that signature red hue and that slight tang we all adore in red velvet.
Step 5: Combine Dry Ingredients and Buttermilk
On low speed, alternate adding the dry ingredients with buttermilk to the wet mixture. Once almost combined, turn off the mixer and fold in the mini chocolate chips gently with a spatula. This prevents breaking the chips while ensuring they’re well-distributed in your batter.
Step 6: Bake Your Cake Layers
Divide the batter evenly into the prepared pans and smooth the tops. Bake for 25–30 minutes, or until a toothpick inserted in the center comes out clean. Let them rest in the pans for 10 minutes before transferring to a wire rack to cool completely — patience pays off here!
Step 7: Make the Cream Cheese Frosting
Sift the powdered sugar into a bowl and set aside. In a separate bowl, beat the butter on high speed for 2 minutes, then add cream cheese and keep mixing until smooth and creamy. Gradually add the powdered sugar in two parts, mixing on low till combined, then add vanilla extract and beat on high until fluffy and luscious.
Step 8: Assemble Your Red Velvet Chocolate Chip Cake Recipe
Start by placing a dab of frosting on your cake board to keep the first layer in place. Spread about one cup of frosting on the first layer and sprinkle 1/3 cup of mini chocolate chips over it. Repeat the frosting and chocolate chip layering with the second cake layer. Place the third layer upside down for a flat top. Frost the entire cake in a thin crumb coat and chill for 15 minutes to set the base.
Step 9: Final Frosting and Decoration
Frost the cake generously with the remaining cream cheese frosting and finish by scattering mini chocolate chips all over the top for that irresistible, chocolate-studded finish. Now you’re ready to wow everyone with this slice of heaven!
How to Serve Red Velvet Chocolate Chip Cake Recipe
Garnishes
To make your Red Velvet Chocolate Chip Cake Recipe even more dazzling, consider adding fresh raspberries or strawberries on top for a pop of color and brightness. Dusting a little extra cocoa powder or edible glitter can add a playful sparkle that’s perfect for celebrations.
Side Dishes
This cake pairs wonderfully with a scoop of vanilla bean ice cream or a dollop of lightly whipped cream. A cup of rich, dark coffee or a creamy latte balances the sweetness beautifully and enhances the chocolate notes.
Creative Ways to Present
For a stunning presentation, serve your cake slices on vintage plates with delicate silver forks. You could also create individual mini cakes or cake jars layered with frosting and chocolate chips for a cute, portable twist that’s perfect for parties.
Make Ahead and Storage
Storing Leftovers
Keep any leftover Red Velvet Chocolate Chip Cake Recipe tightly covered in the refrigerator. It will stay fresh and moist for up to 4 days, allowing you to enjoy every bit without rushing.
Freezing
You can freeze the cake layers (wrapped tightly in plastic wrap and foil) for up to 3 months. Freeze the frosting separately if you want to frost right before serving. This way, you can enjoy your cake anytime with minimal effort.
Reheating
To serve leftovers at their best, let refrigerated cake sit at room temperature for about 30 minutes before eating. Avoid microwaving as it can alter the texture. If frozen, thaw overnight in the fridge, then bring to room temperature.
FAQs
Can I use regular cocoa powder instead of Dutch process?
Yes, but it might slightly affect the cake’s color and flavor. Dutch process cocoa provides a deeper chocolate flavor and richer color, which complements red velvet perfectly.
What’s the best way to get vibrant red color without overusing dye?
Using a concentrated gel food dye like Americolor super red gives the best results without needing too much, which can alter the cake’s texture or taste.
Can I substitute the sour cream with something else?
Greek yogurt is a great substitute and can be used in equal amounts. It maintains the moisture and tartness crucial to red velvet cake.
Are mini chocolate chips necessary inside the cake?
While optional, mini chocolate chips add delightful little bursts of chocolate in every bite, enhancing the classic red velvet flavor.
How do I prevent the frosting from being too soft?
Make sure your butter and cream cheese are fully softened but not warm. Chilling the assembled cake briefly helps the frosting set firmly for easier slicing.
Final Thoughts
I cannot recommend this Red Velvet Chocolate Chip Cake Recipe enough for anyone craving a unique twist on a classic favorite. It’s a beautifully rich yet tender cake loaded with little chocolate surprises that everyone will adore. Trust me, once you make it, this luscious cake will become a go-to for celebrations or whenever you want to treat yourself and your loved ones with something truly special. Dig in and enjoy every delicious bite!
Print
Red Velvet Chocolate Chip Cake Recipe
- Prep Time: 45 minutes
- Cook Time: 30 minutes
- Total Time: 2 hours 25 minutes
- Yield: 16 servings
- Category: Dessert
- Method: Baking
- Cuisine: American
Description
This Red Velvet Chocolate Chip Cake is a decadent and moist layered dessert combining the classic flavors of red velvet and rich chocolate chips, all layered and frosted with creamy homemade cream cheese frosting. Perfect for celebrations, it features three layers of vibrant red velvet cake studded with mini chocolate chips, frosted generously with smooth cream cheese icing and topped with extra chocolate chips for a delightful texture contrast.
Ingredients
Dry Ingredients
- 3 1/2 cups All-purpose flour
- 1/4 cup Unsweetened cocoa powder (dutch process preferred)
- 2 tsp Baking powder
- 1/2 tsp Baking soda
- 1 tsp Salt
Wet Ingredients
- 1/2 cup Oil (canola or vegetable)
- 1/2 cup Unsalted butter (room temperature)
- 1 3/4 cup White granulated sugar
- 1 tsp Pure vanilla extract
- 1 tsp White vinegar
- 1/3 cup Sour cream (room temperature or Greek yogurt)
- 4 Large eggs (room temperature)
- 1 tsp Red food gel dye (Americolor super red recommended)
- 1 cup Buttermilk (room temperature)
- 1 1/2 cups Mini chocolate chips
Cream Cheese Frosting
- 2 cups Unsalted butter (room temperature)
- 8 oz Cream cheese (room temperature)
- 5 cups Powdered sugar (sifted)
- 1 tsp Pure vanilla extract
- 1/2 cup Mini chocolate chips (for filling and topping)
Instructions
- Preheat and prepare pans: Preheat the oven to 350℉. Spray three 8-inch cake pans with baking nonstick spray. Line the bottoms with parchment paper and spray again to ensure easy removal. Set aside.
- Sift dry ingredients: In a medium bowl, sift together the all-purpose flour, cocoa powder, baking powder, baking soda, and salt. This ensures even mixing and removes lumps. Set aside.
- Beat butter, oil, and sugar: Using a mixer fitted with a large bowl, beat the room temperature butter, oil, and granulated sugar on high speed for 2 minutes. The mixture should lighten in color and become fluffy, which helps create a tender texture in the cake.
- Add wet flavorings and eggs: Add the vanilla extract, white vinegar, sour cream, eggs, and red food gel dye to the butter mixture. Mix on medium speed until all ingredients are well incorporated and the batter is smooth and evenly colored.
- Combine wet and dry ingredients: Add the sifted dry ingredients and buttermilk to the wet mixture. Mix on low speed until just combined; overmixing can toughen the cake. Remove the bowl from the mixer and gently fold in the mini chocolate chips using a spatula for even distribution.
- Divide and bake batter: Evenly divide the batter between the prepared cake pans, smoothing the tops with a spatula to create an even layer. Bake in the preheated oven for 25-30 minutes or until a toothpick inserted into the center comes out clean.
- Cool cakes: Allow the cakes to rest in the pans for 10 minutes after baking. Then, carefully transfer them to a cooling rack and cool completely before frosting.
- Prepare frosting dry ingredients: Sift the powdered sugar in a large bowl to remove lumps and set aside.
- Beat butter and cream cheese: In a separate large bowl, beat the unsalted butter on high speed for 2 minutes until creamy. Scrape down the bowl sides then add the room temperature cream cheese. Beat on high for 1-2 minutes until smooth and lump-free.
- Incorporate powdered sugar and vanilla: Add half of the sifted powdered sugar to the butter and cream cheese mixture, mixing on low until nearly combined. Add the rest of the powdered sugar and mix on low speed again. Then add the vanilla extract and beat on high speed until the frosting is fluffy and creamy.
- Assemble the cake layers: Place a small dollop of frosting on your working surface to secure the first cake layer. Place the first cake layer down, then spread about 1 cup of frosting evenly over its surface. Sprinkle 1/3 cup mini chocolate chips over the frosting for added texture.
- Layer second and third cakes: Repeat the frosting and chocolate chip filling on the second layer. For the third layer, invert it so the bottom faces up for a flat surface on top of the cake.
- Apply crumb coat and chill: Apply a thin layer of frosting over the entire cake to seal in crumbs. Place the cake in the freezer for 15 minutes to allow this crumb coat to set and firm up.
- Final frosting and decoration: Frost the cake fully with the remaining frosting, smoothing the surface. Finish by sprinkling mini chocolate chips all over the top of the cake for decoration and extra chocolate flavor.
Notes
- Ensure all refrigerated ingredients such as eggs, sour cream, and buttermilk are at room temperature to achieve a smooth batter and proper rise.
- Use dutch process cocoa powder for a deeper chocolate flavor and vibrant red color.
- Red food gel dye provides a more intense color than liquid dyes without thinning the batter.
- Chilling the cake after crumb coating helps to create a professional-looking finish when frosting the cake fully.
- The mini chocolate chips add delightful texture and chocolate bursts inside the cake and as decoration.
- Store leftovers covered in the refrigerator for up to 4 days and bring to room temperature before serving.
- For best results, use three 8-inch pans to create even layers; alternatively, bake in batches if fewer pans are available.


